 Bubble Mew
UMAD — Phase 2: God Kefka#
See the fundamentals for role abbreviations (MT/ST/H1/H2/D1/D2/D3/D4).
Boss Overview#
God Kefka. This phase is the Forsaken sequence — a long chain of clone baits and 8 towers where the towers themselves anchor your sense of left/right for the entire phase. The hard part is not knowing where your tower is; it's eyes and spacing inside it (cone vs. stack vs. spread) and being fast enough on the clone baits that you don't mis-turn a clone.
We run the Kroxy-Rinon 3/4/1 (Center / N stacks) strat. This is the same resolution used in Party Finder — see the PF page, which points at the same raidplan.
Source raidplan: https://raidplan.io/plan/UATE__aDcw1-bgVv (read every page; the last page — circle-marker variant — is not used). Sim it: https://github.com/WCGH/Waju-Sims/releases. Mechanic explanation (different positions, but explains why): https://raidplan.io/plan/afbvbg4f8k32k4e8.
Diagrams on this page are captured from the raidplan above; the job icons are the author's light-party layout.
Waymarks#
This strat only works with the Diamond / box waymark preset (12y):
| Mark | Spot | Mark | Spot |
|---|---|---|---|
| A | N (12y) | 1 | NW |
| B | E (12y) | 2 | NE |
| C | S (12y) | 3 | SE |
| D | W (12y) | 4 | SW |
- Letter marks (A/B/C/D) = the front edge of a tower (toward the boss).
- Number marks (1/2/3/4) = the back edge of a tower (away from the boss).
The numbers in the raidplan slides are just illustrating position — 1 is not literally two spots over from A in game. What matters is where you stand on the marker next to your tower.
Mechanic Timeline#
| # | Mechanic | Notes |
|---|---|---|
| 1 | Clone Baiting | Supports left, DPS right — opposite of the towers. Melee bait on the outer hitbox |
| 2 | Past / Future | Everyone baits at max melee. Be fast or you mis-turn the clones |
| 3 | Forsaken — Towers 1–8 | 8 towers in sequence; odd and even towers resolve differently |
| 4 | Post-Tower 8 | Final stacks, then everyone baits Past/Future one more time at the A marker |
| 5 | Trines + Wings of Destruction | Enter the wave-1 triangle (3rd trine drops dead center). Split by radius for the near/far hit, by side for safe spots |
1 — Clone Baiting#
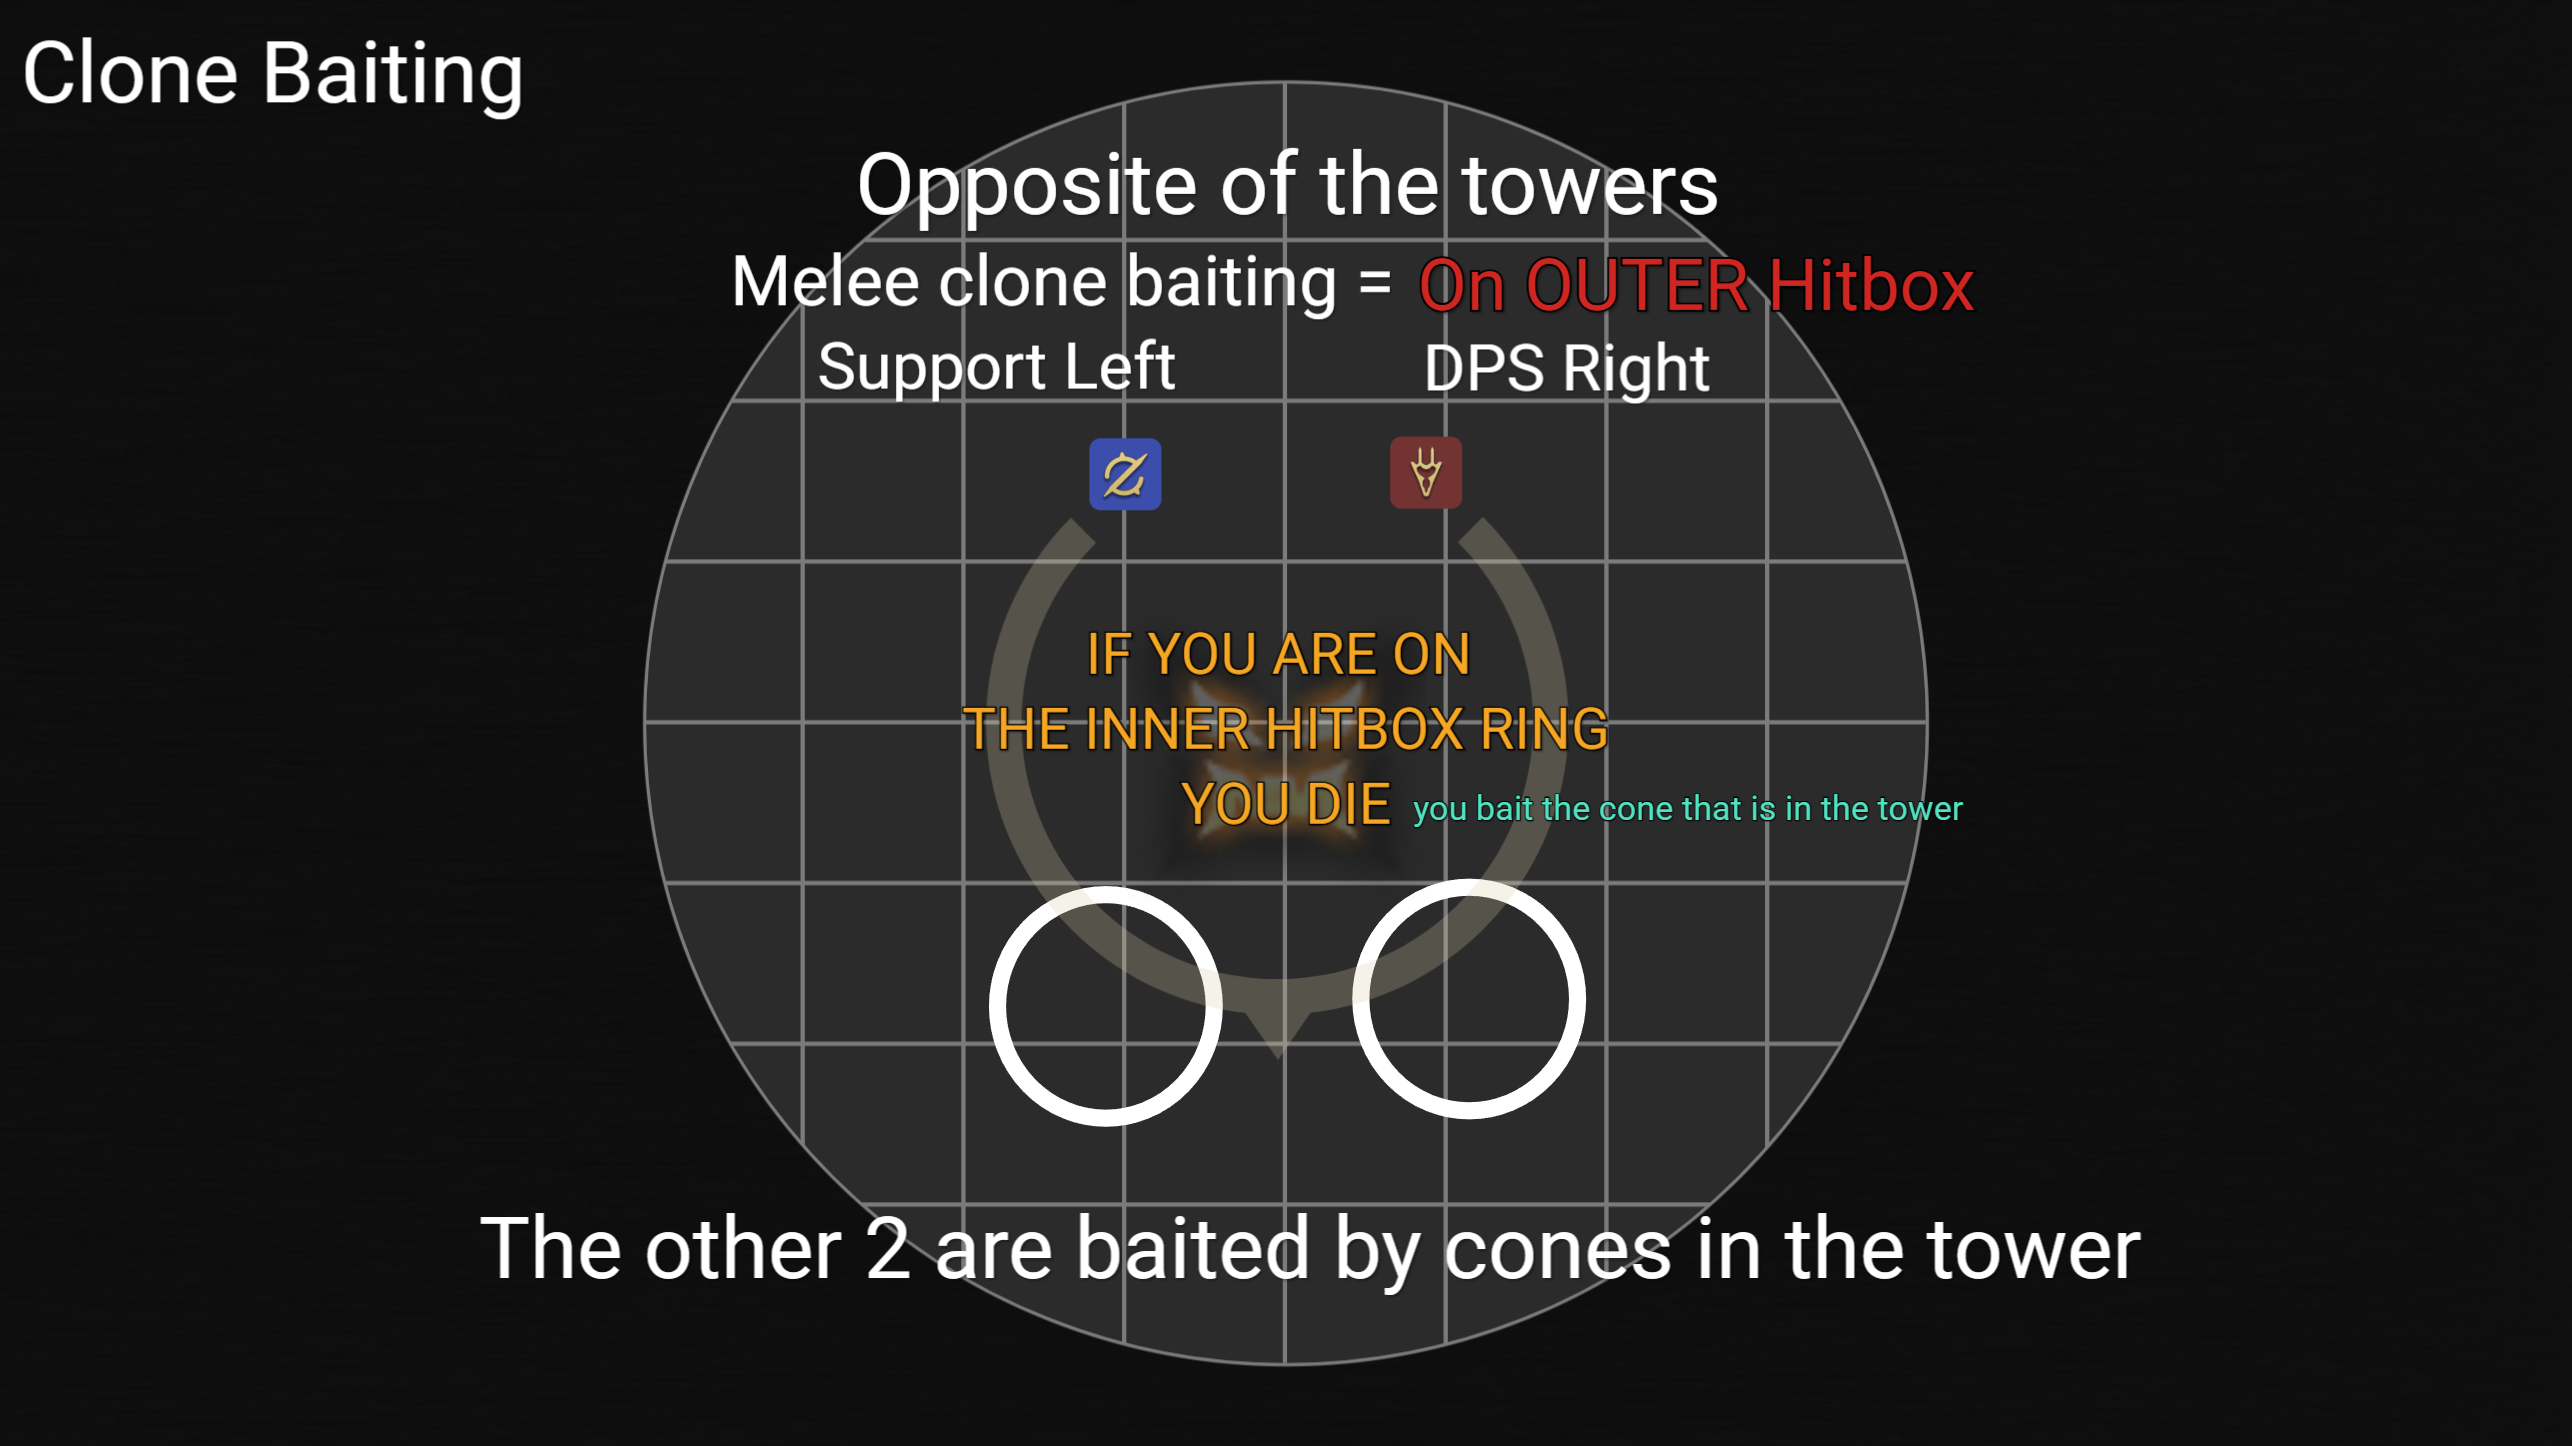
Bait the clones opposite of the towers:
- Supports → Left
- DPS → Right
Melee clone baiting = on the OUTER hitbox ring. You bait the cone that is in the tower; the other two are baited by the cones in the tower.
⚠️ If you are on the INNER hitbox ring, you die.
2 — Past / Future#
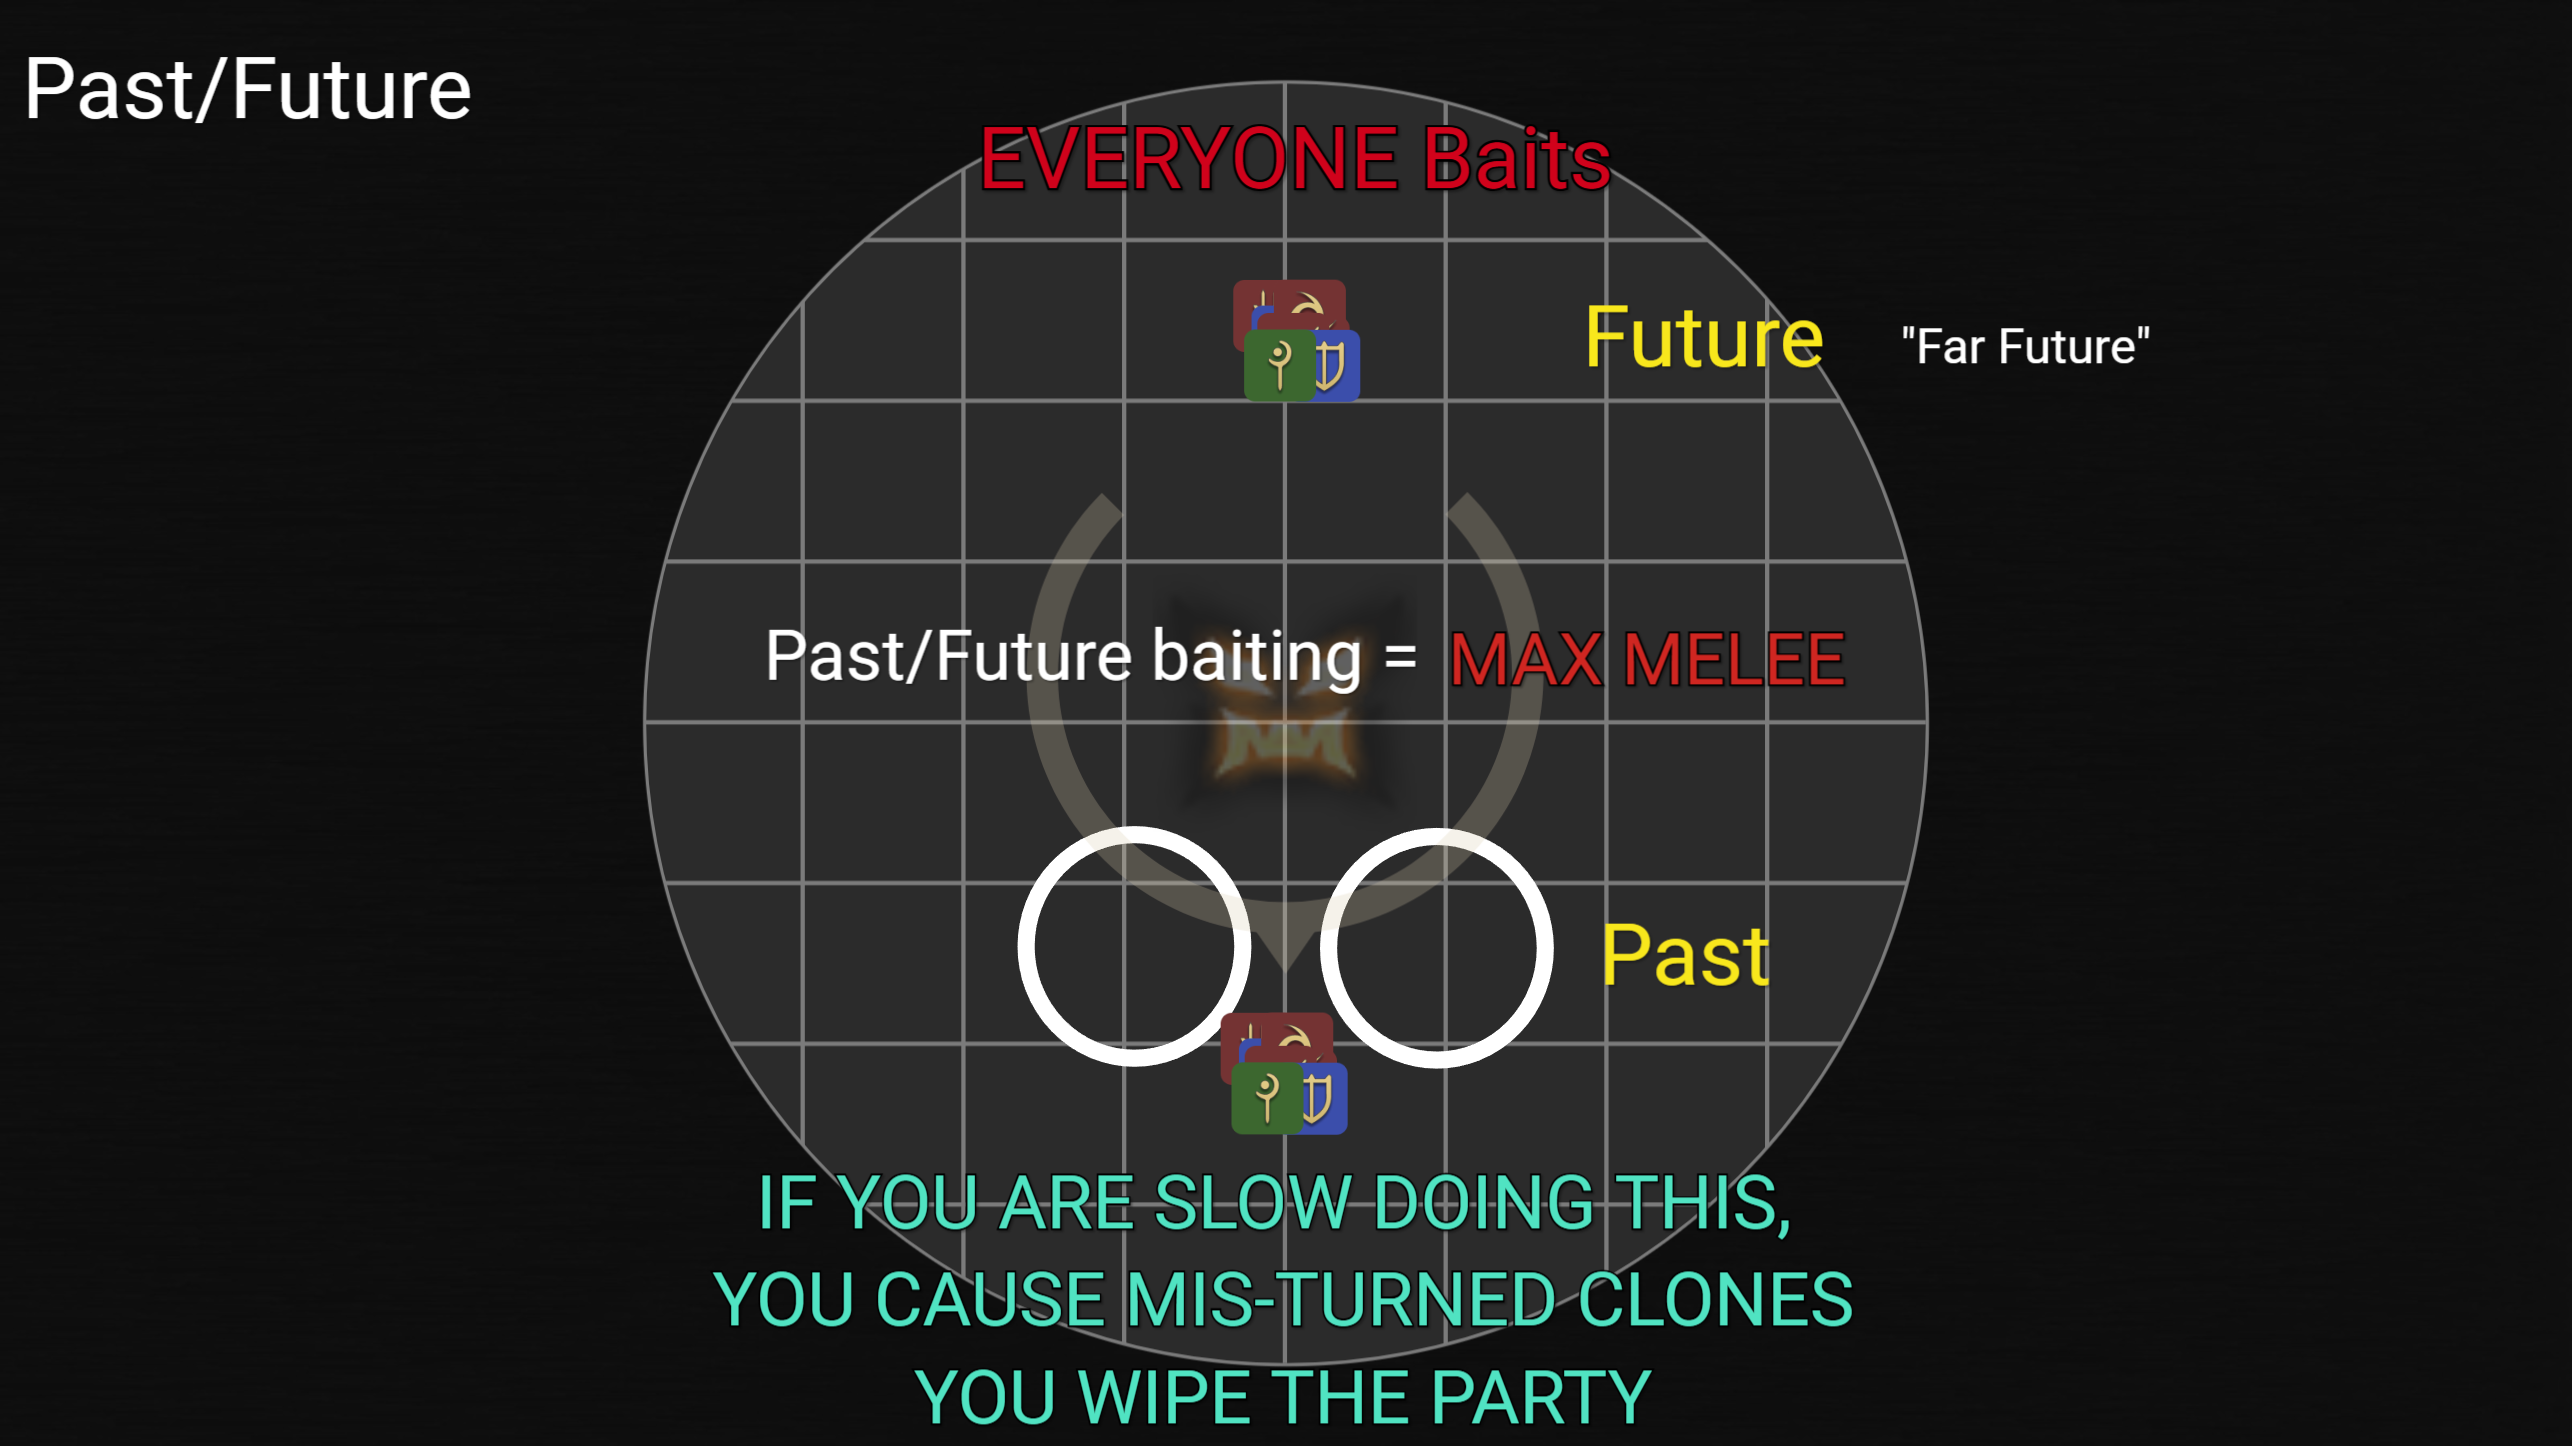
Everyone baits, stacked at MAX MELEE. Positions resolve as Past, Future, and "Far Future."
⚠️ If you are slow doing this, you cause mis-turned clones and wipe the party. Get in and out fast.
3 — Forsaken: The 8 Towers#
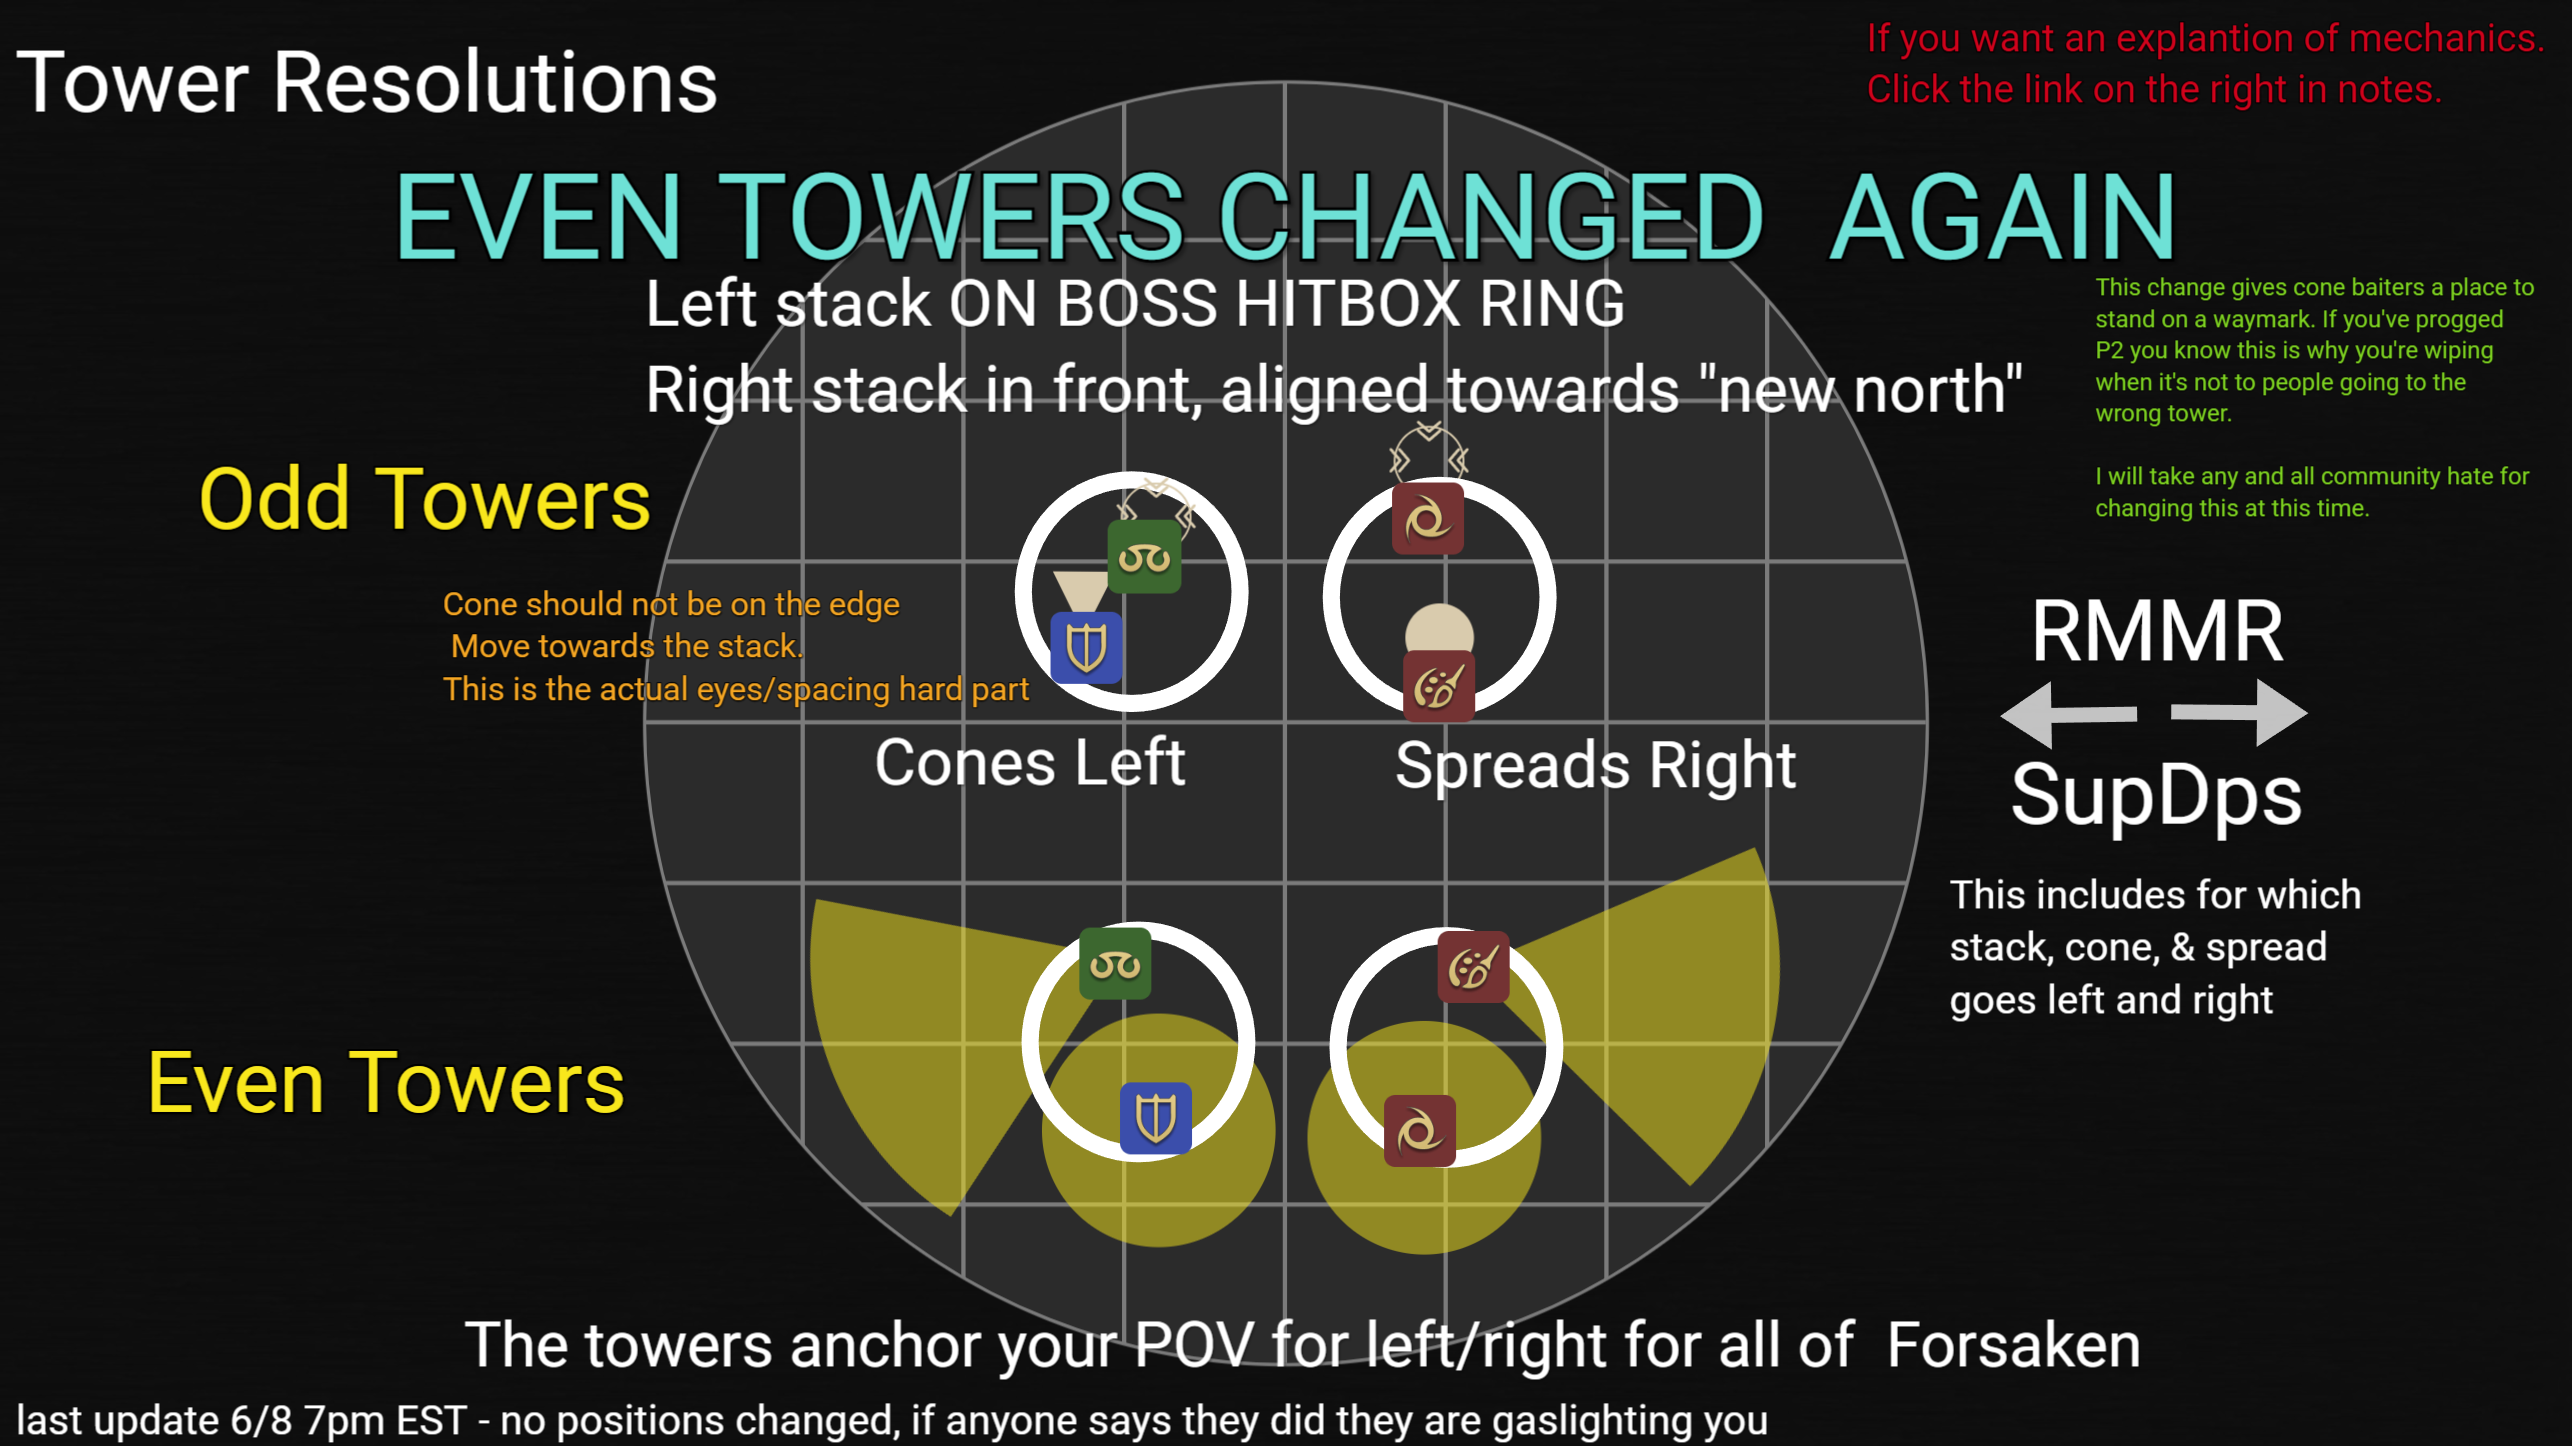
The towers run 1 → 8 and anchor your POV for left/right for all of Forsaken — orient off the tower, not the room.
Group split#
| Group | Job |
|---|---|
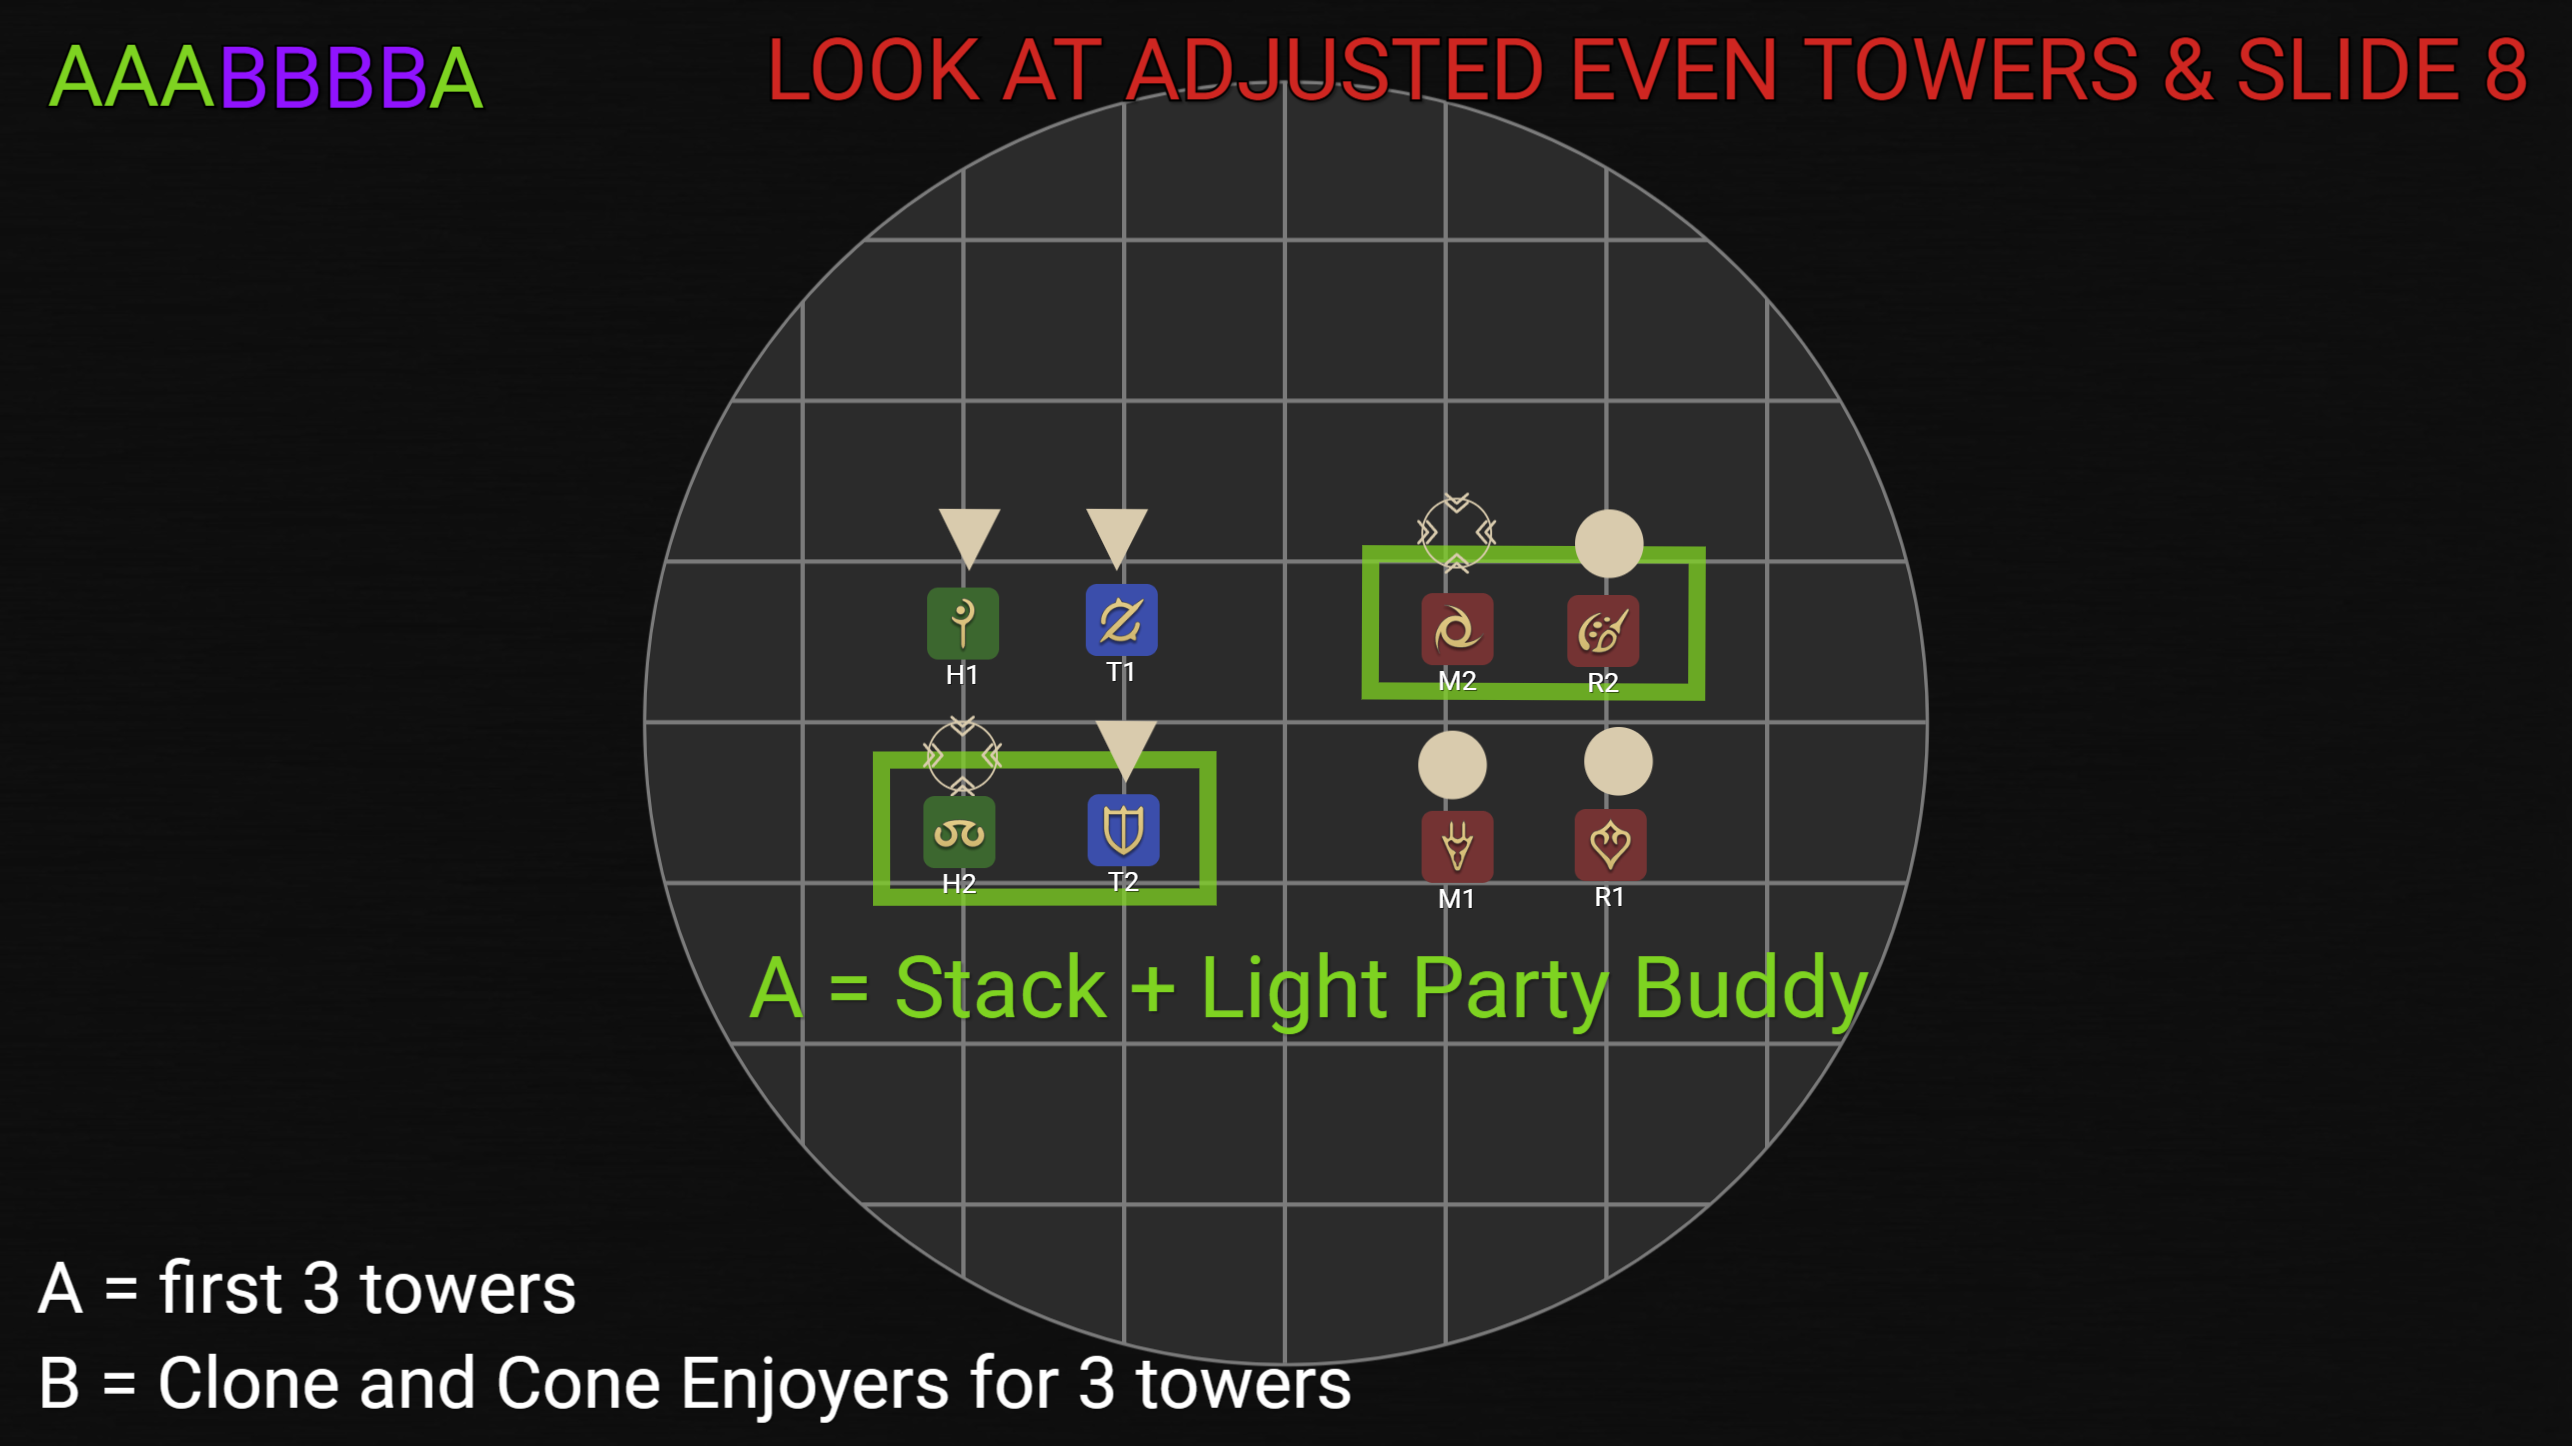
| A | Stack + Light-Party buddy. Takes the stacks on towers 1–3 (and tower 8) |
| B | Clone & Cone enjoyers for the first 3 towers… then B takes over the towers at Tower 4 |
So: B does the same thing on towers 1–3 and 8; A does the same thing on towers 4–7. Watch for the handoff at Tower 4 ("B take over towers").
Left/right priority#
Within a tower, who takes the cone/stack on which side is set by our standing priority:
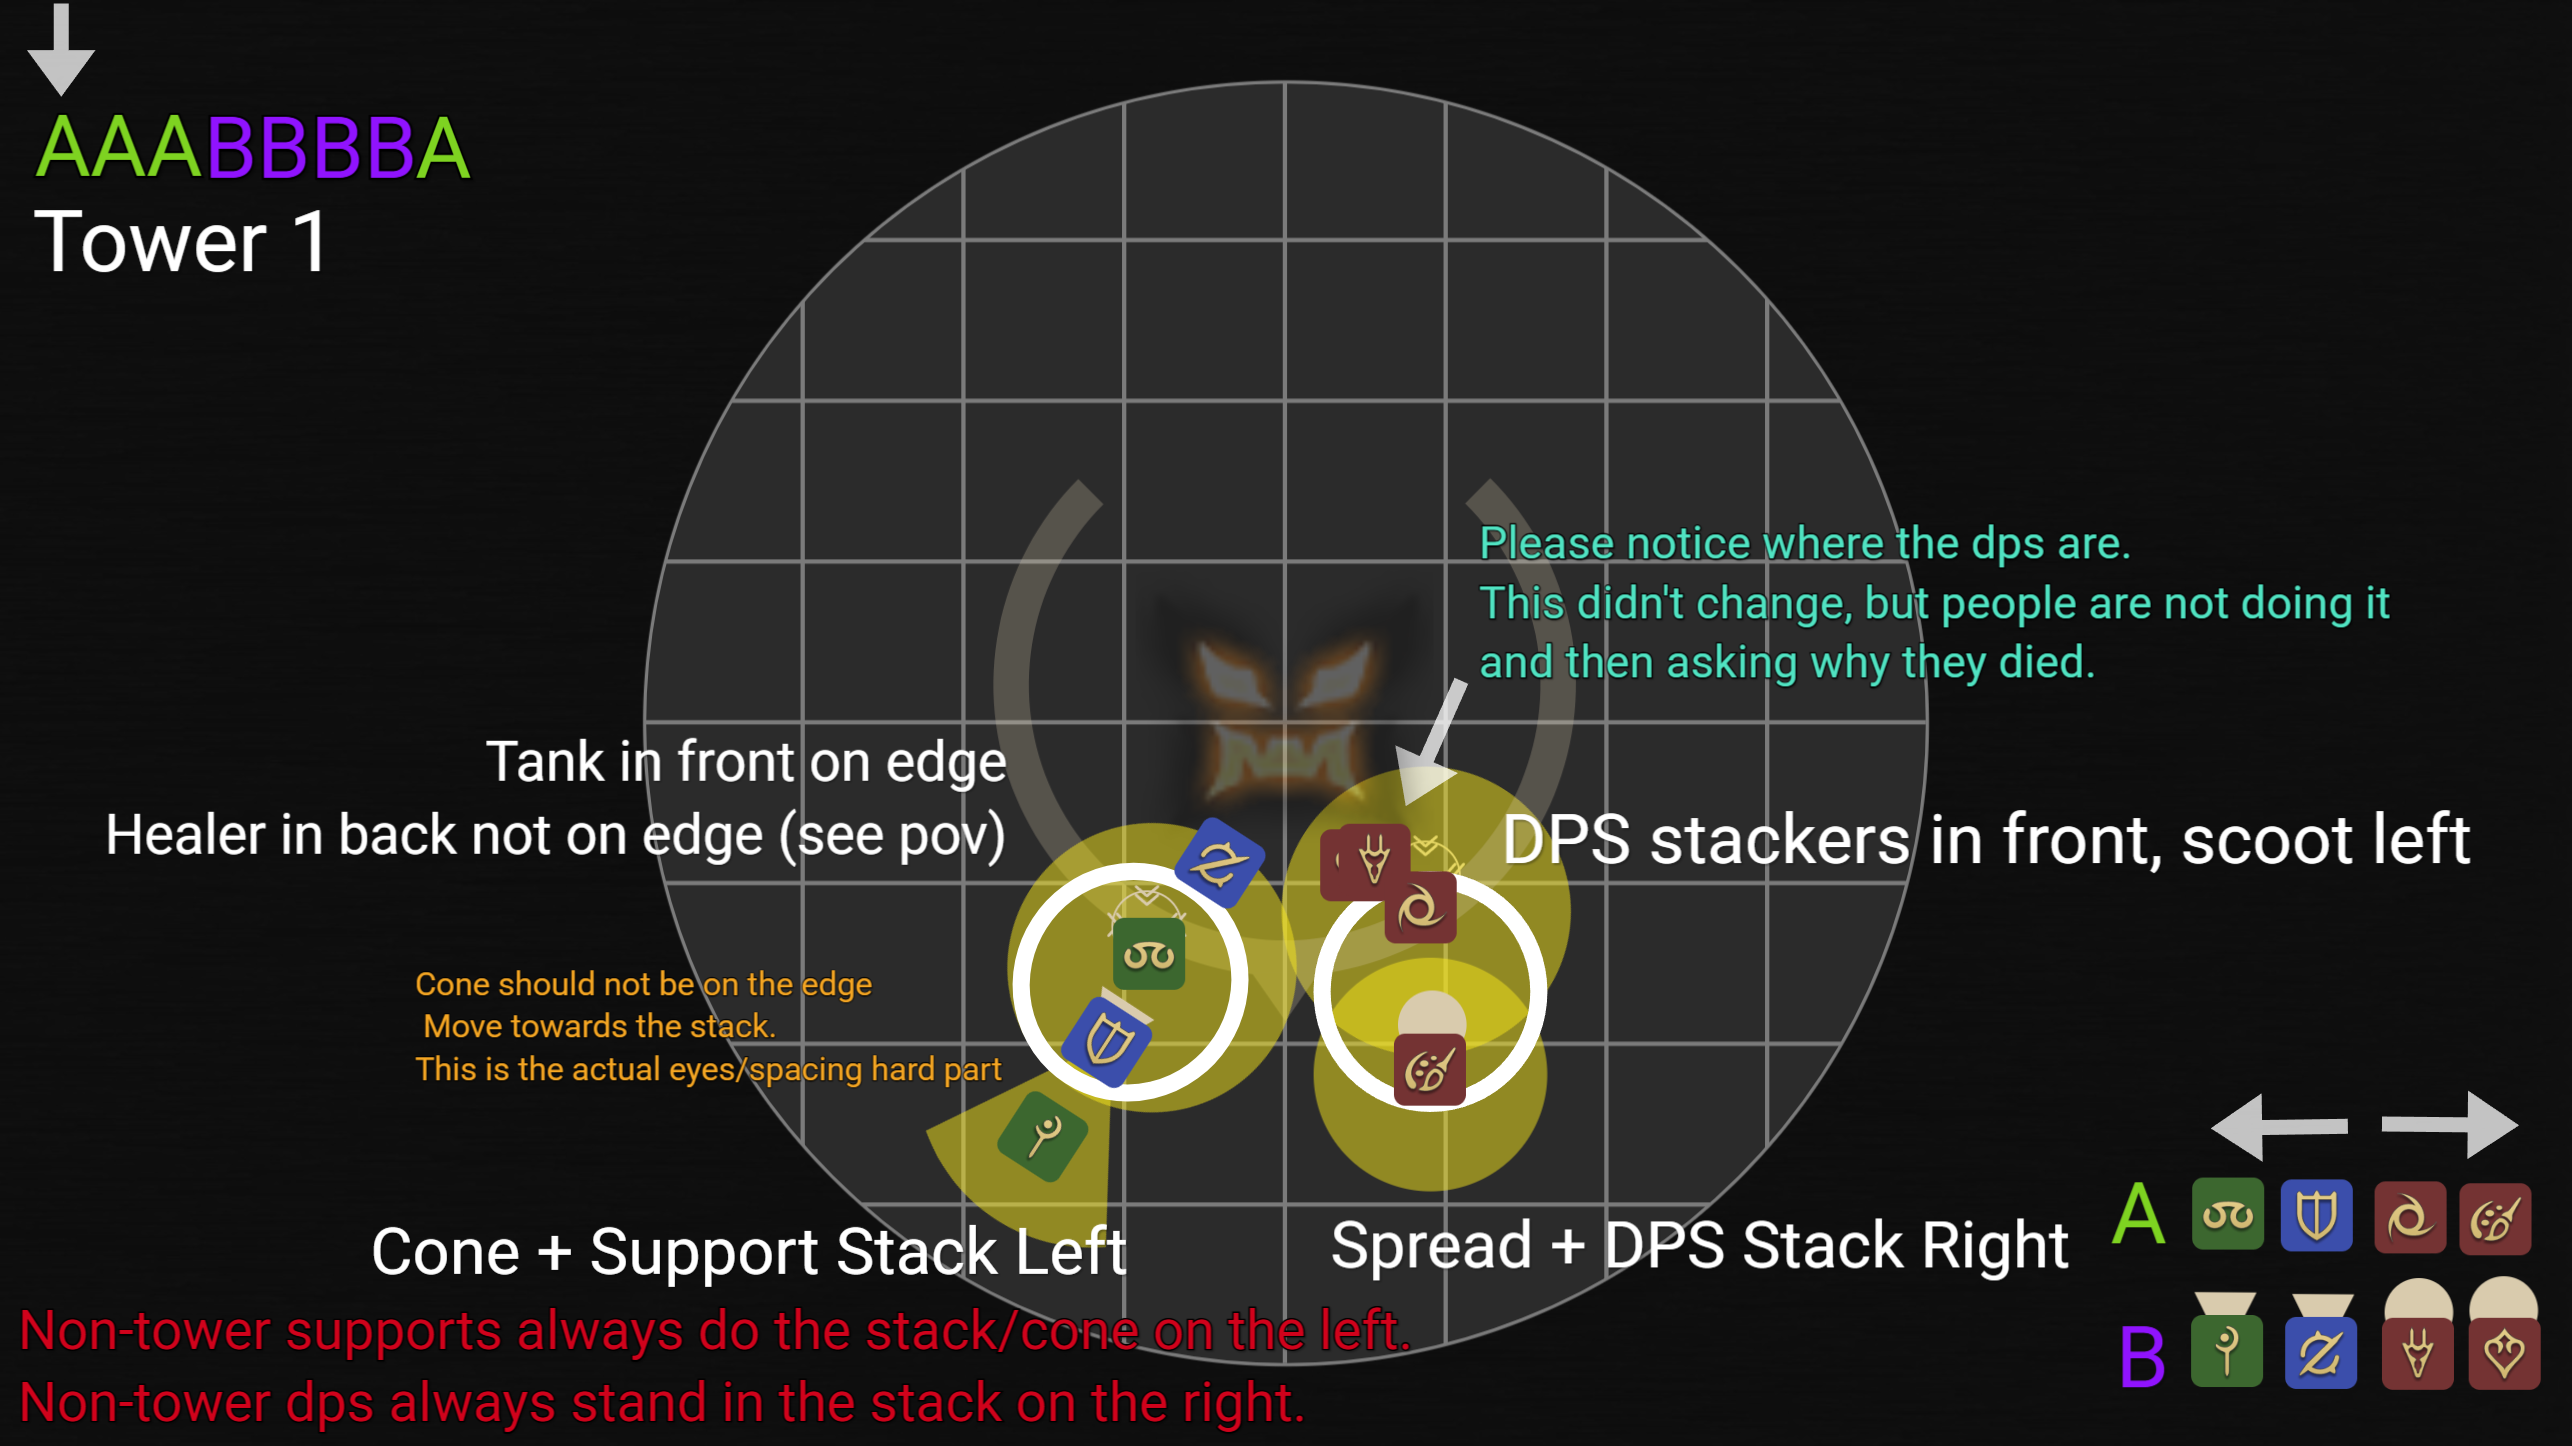
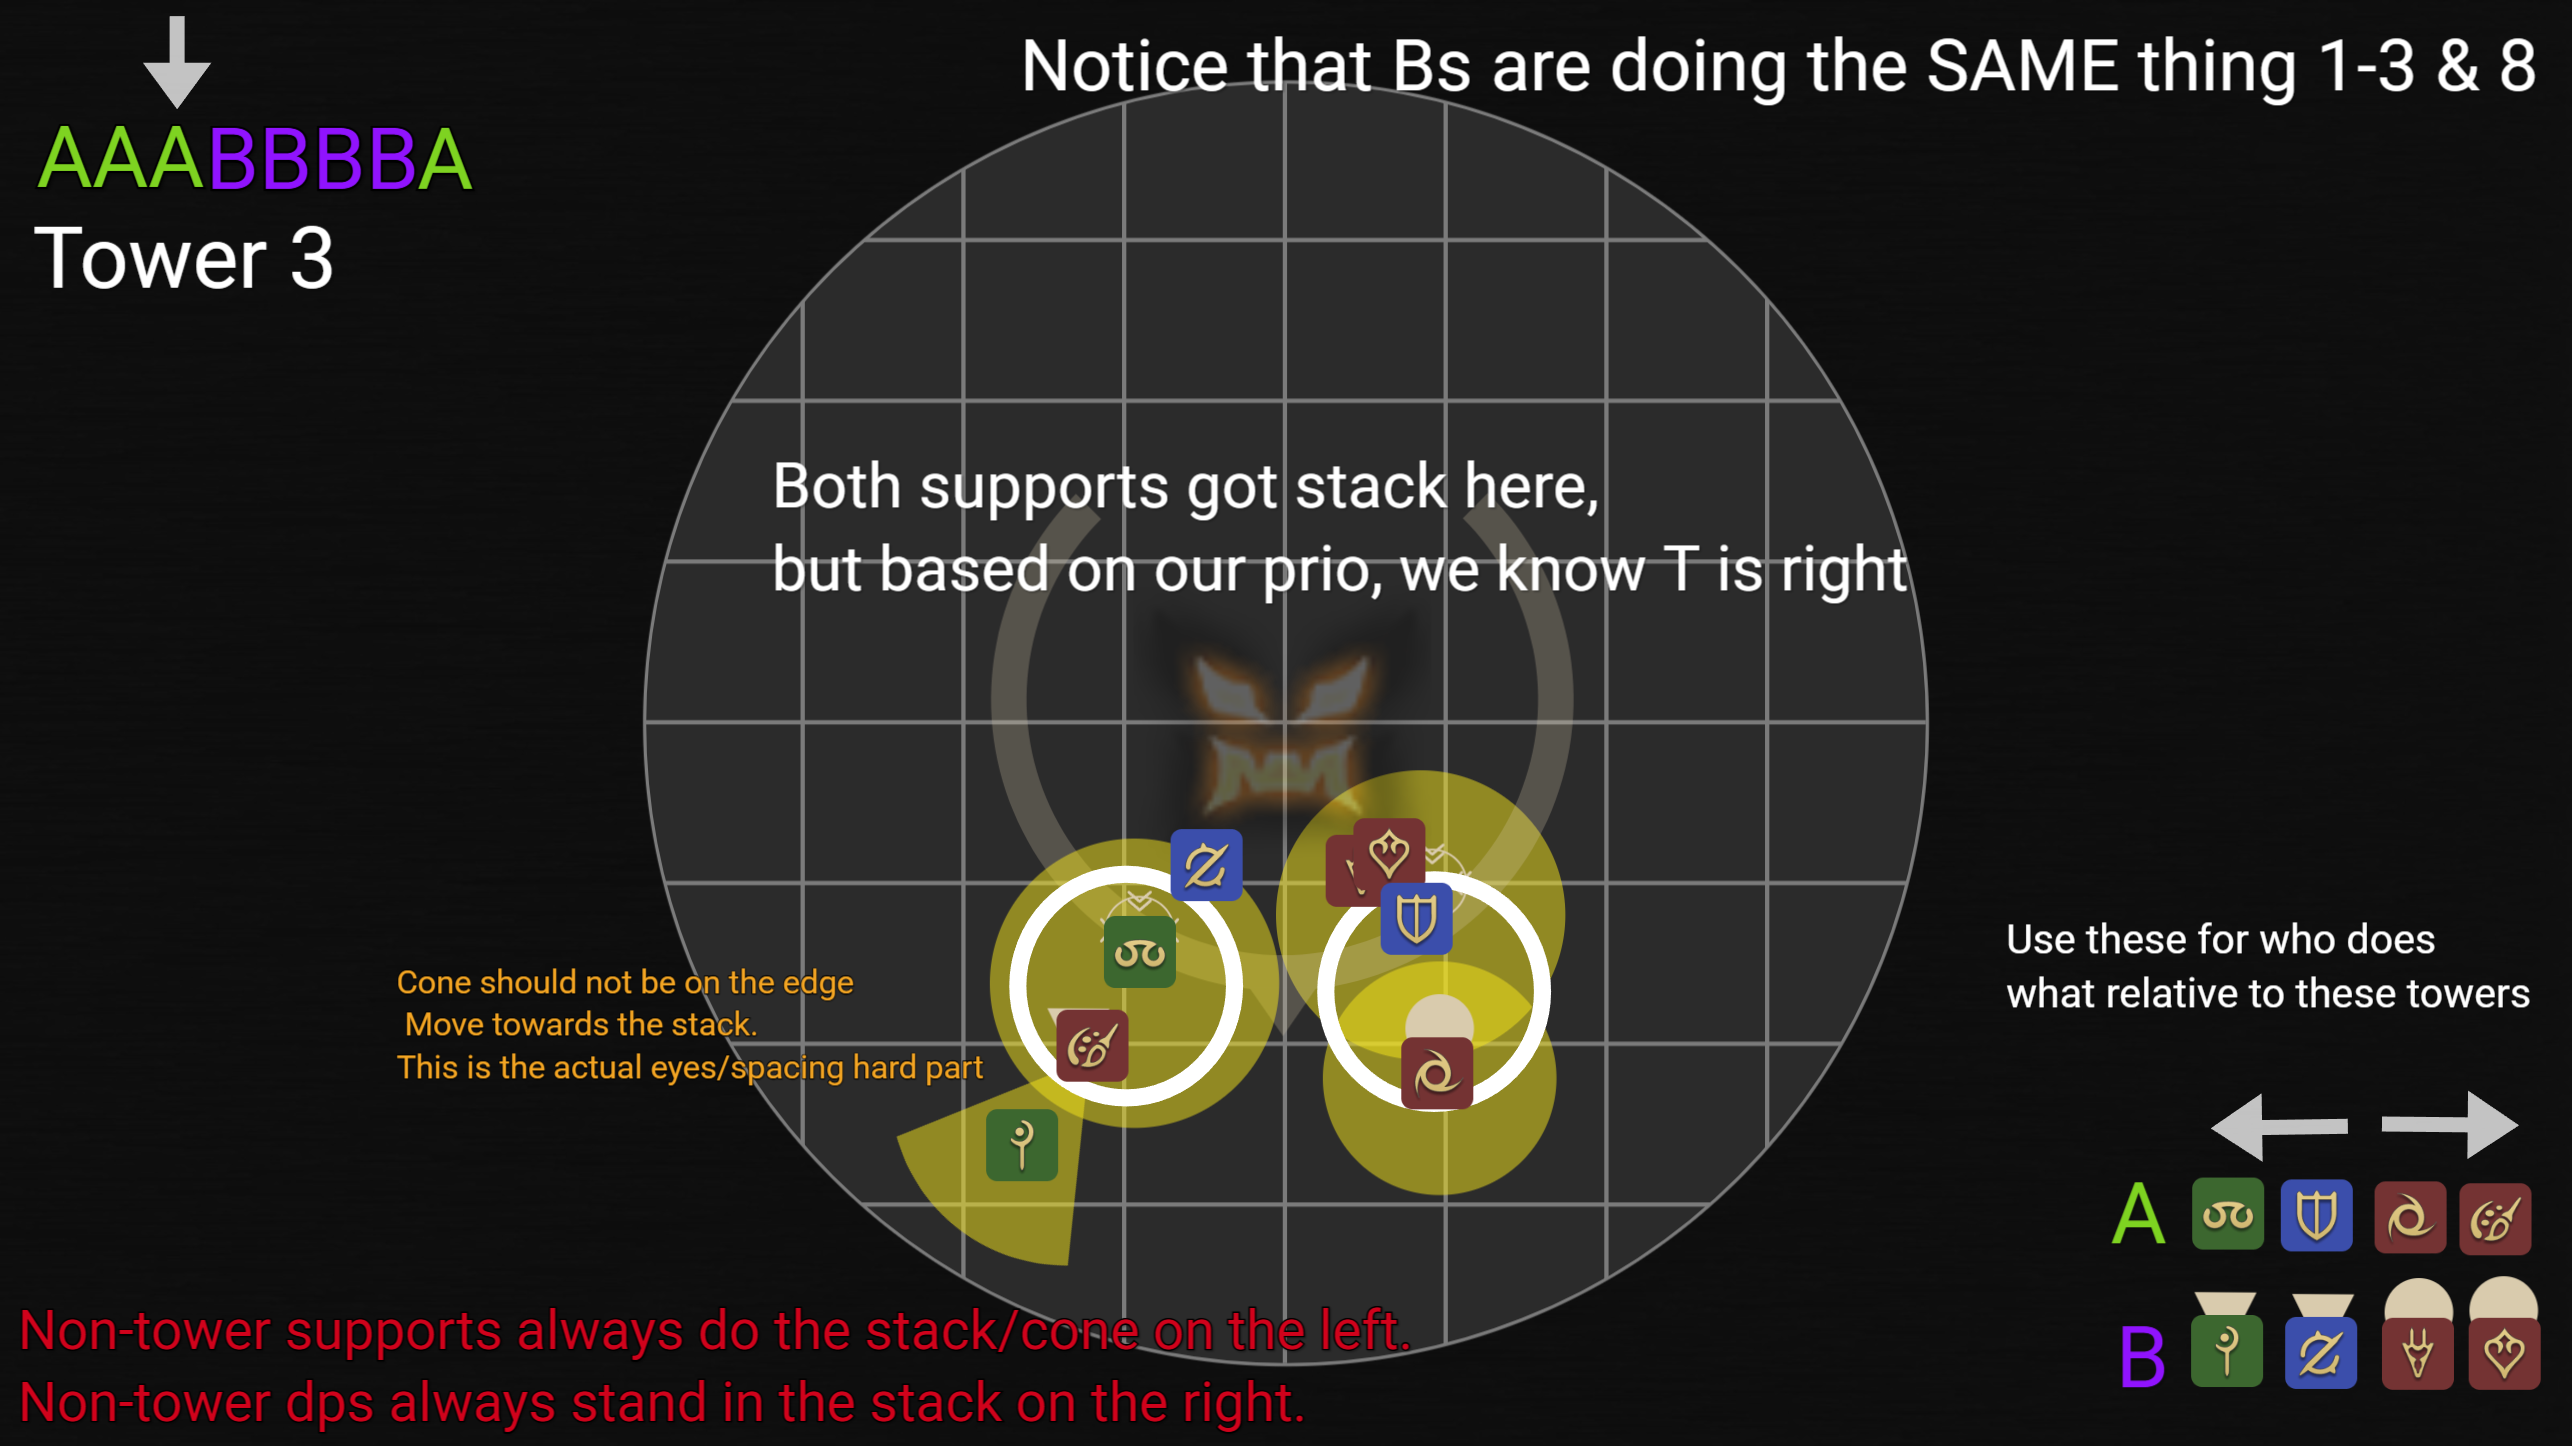
- Supports read left to right as RMMR
- Stacks read as SSDD (Support, Support, DPS, DPS)
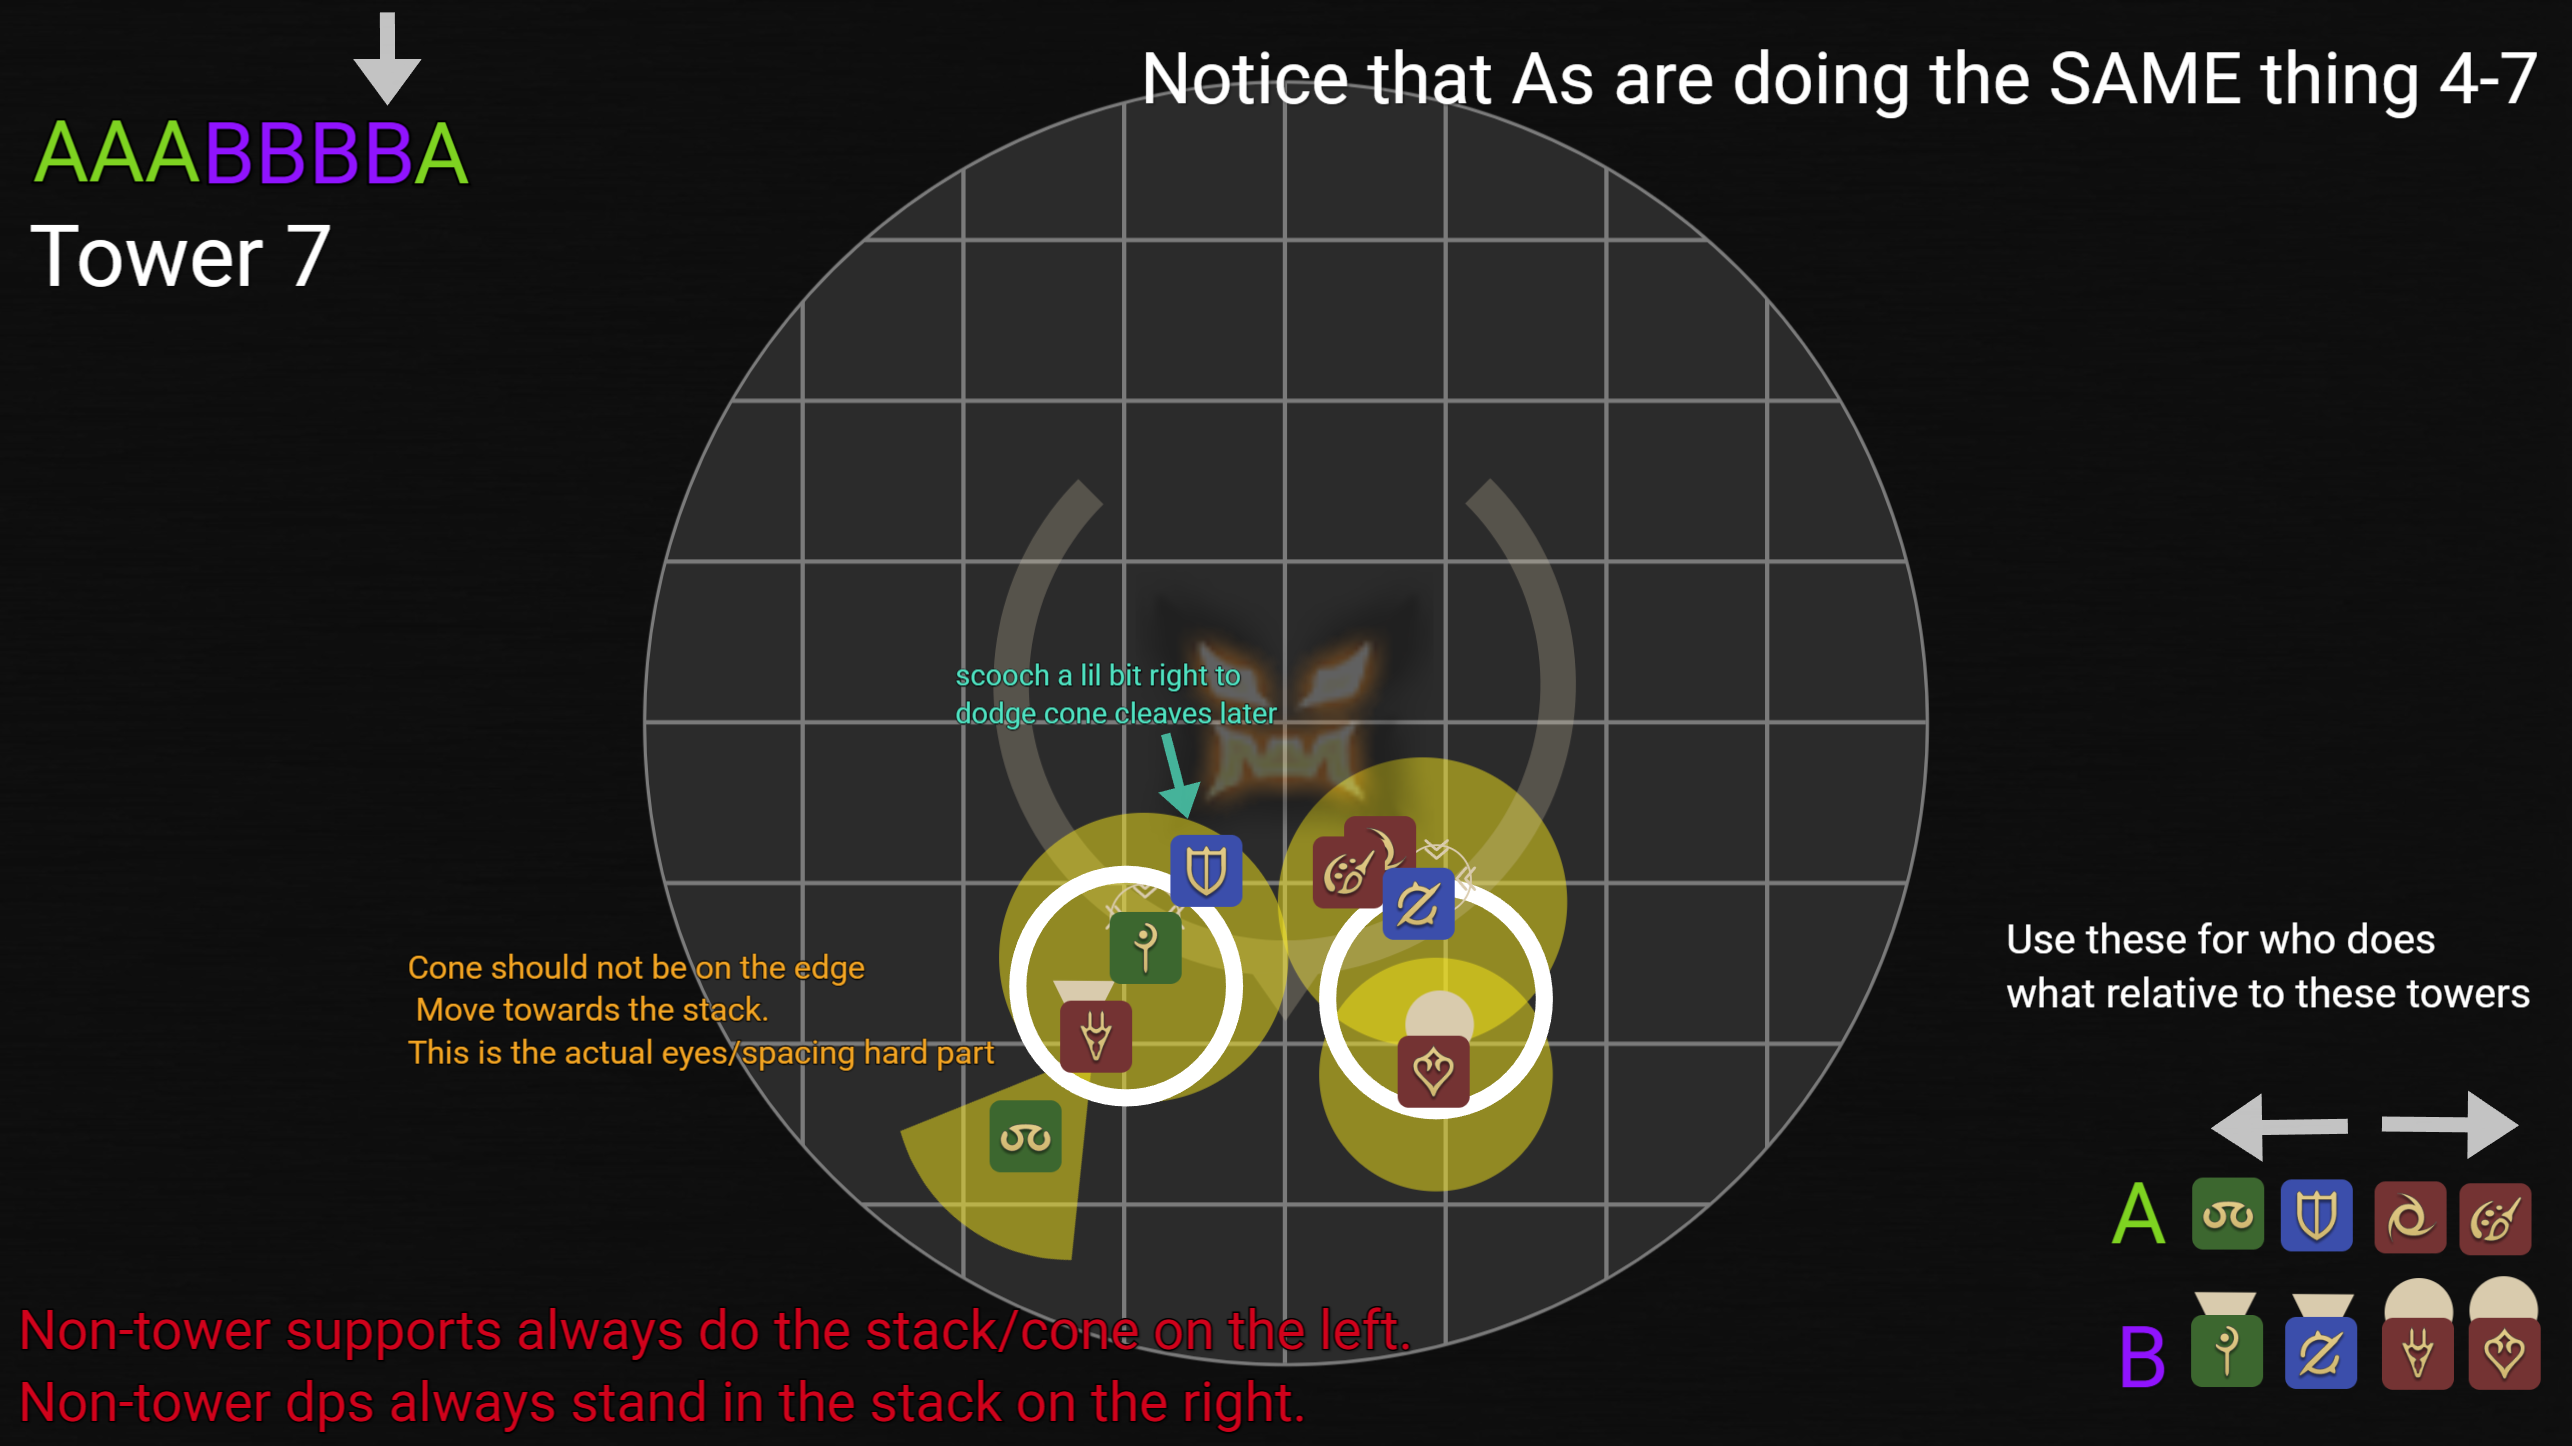
- Non-tower Supports always take the stack / cone on the LEFT.
- Non-tower DPS always stand in the stack on the RIGHT.
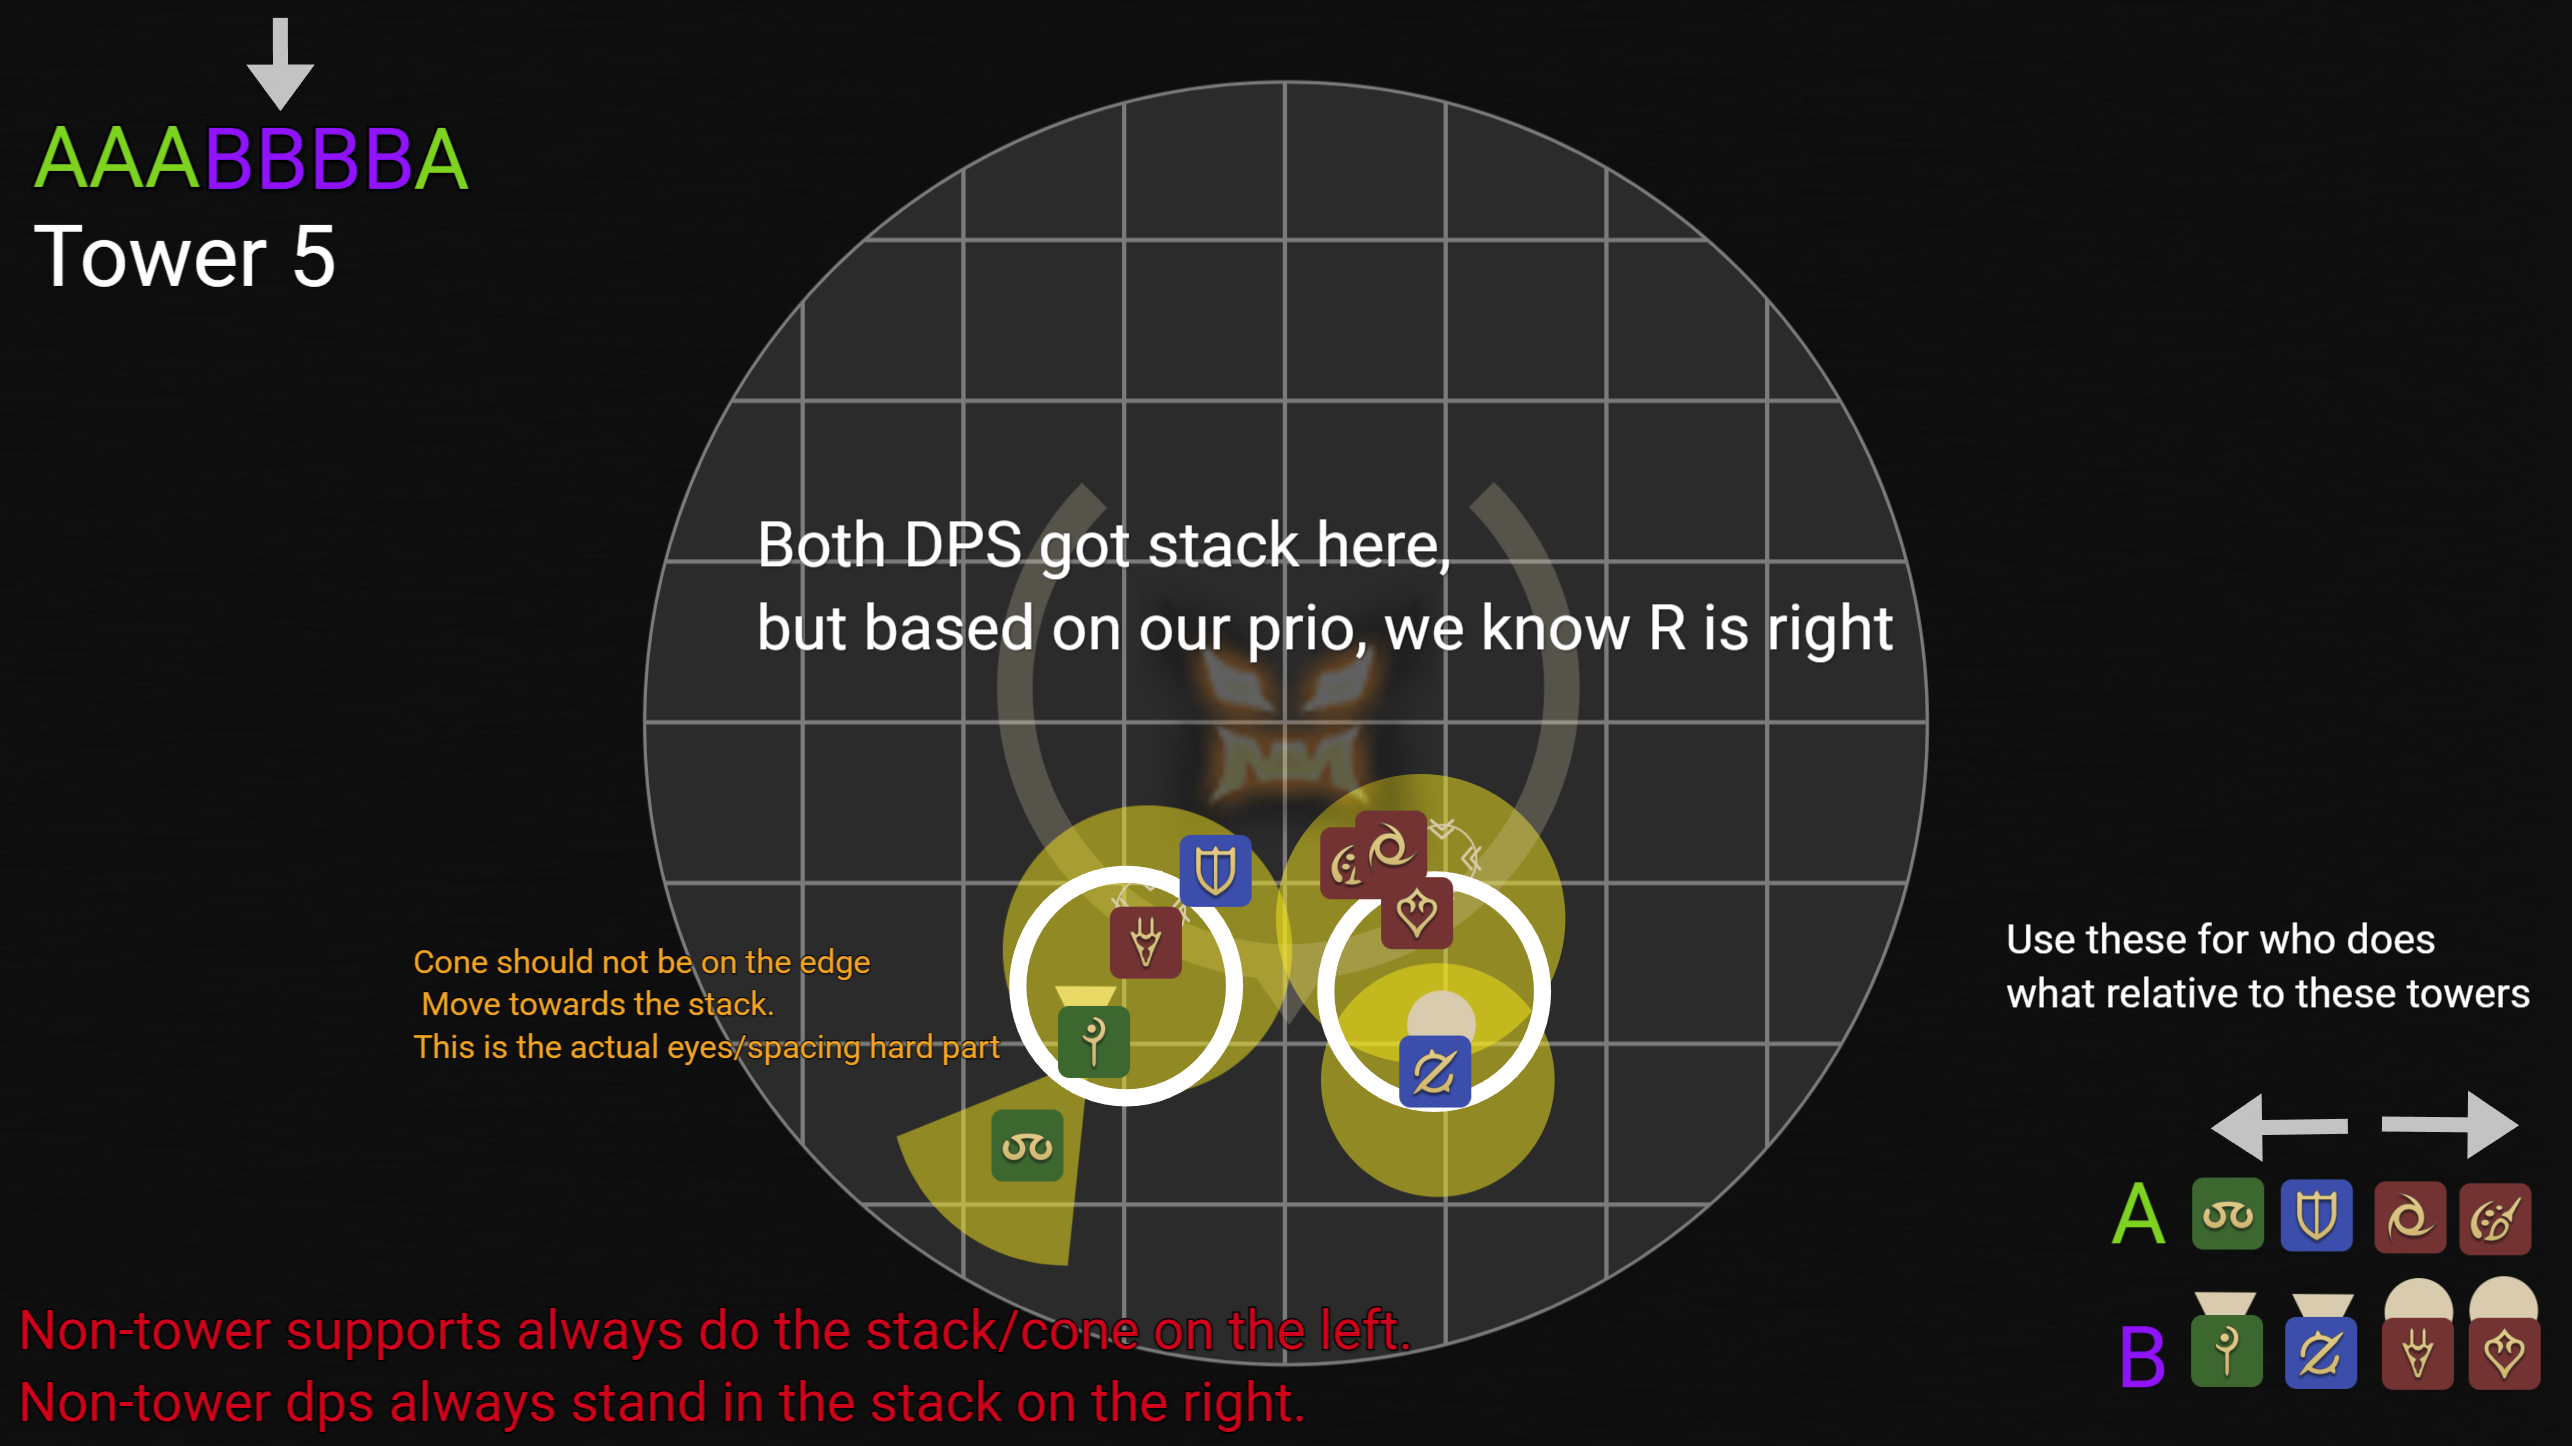
Even when both supports (or both DPS) get the stack, the priority tells you who's right — e.g. "both supports got stack, but by prio we know the Tank is right"; "both DPS got stack, but by prio we know Ranged is right." The exact per-tower spot is in the diagrams below.
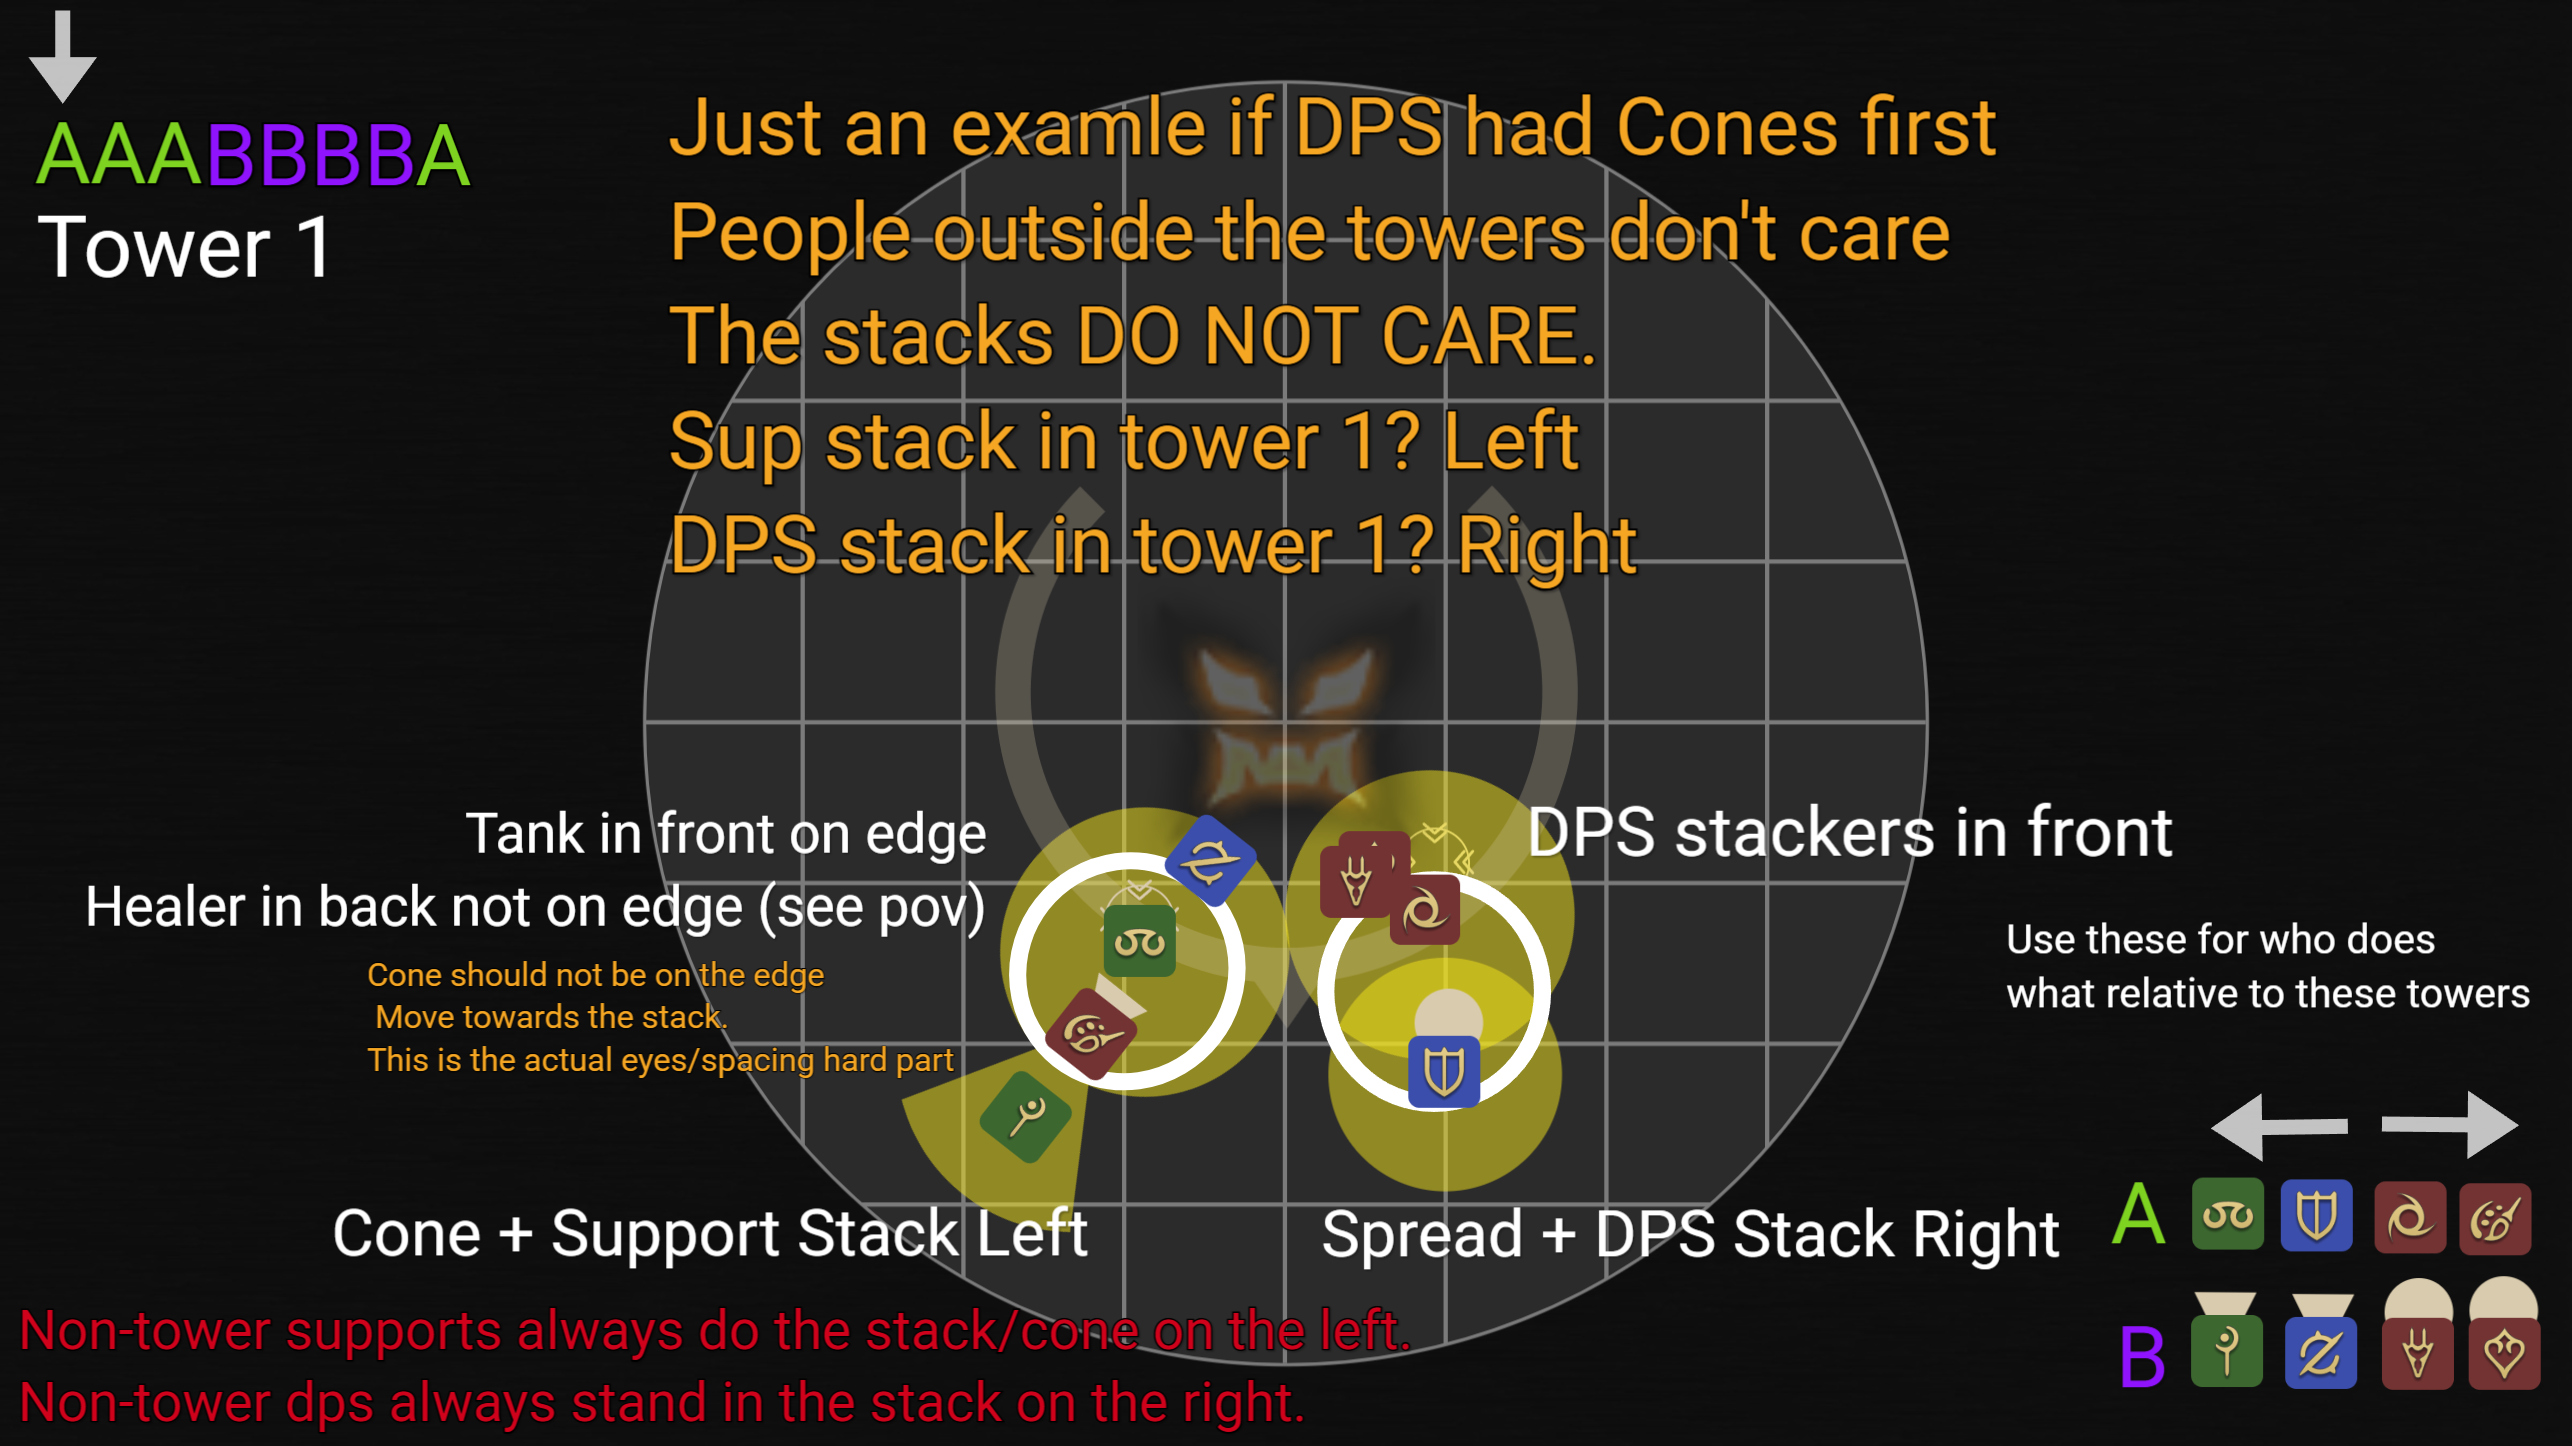
Odd Towers (1, 3, 5, 7) — Stack · Cone · Spread#
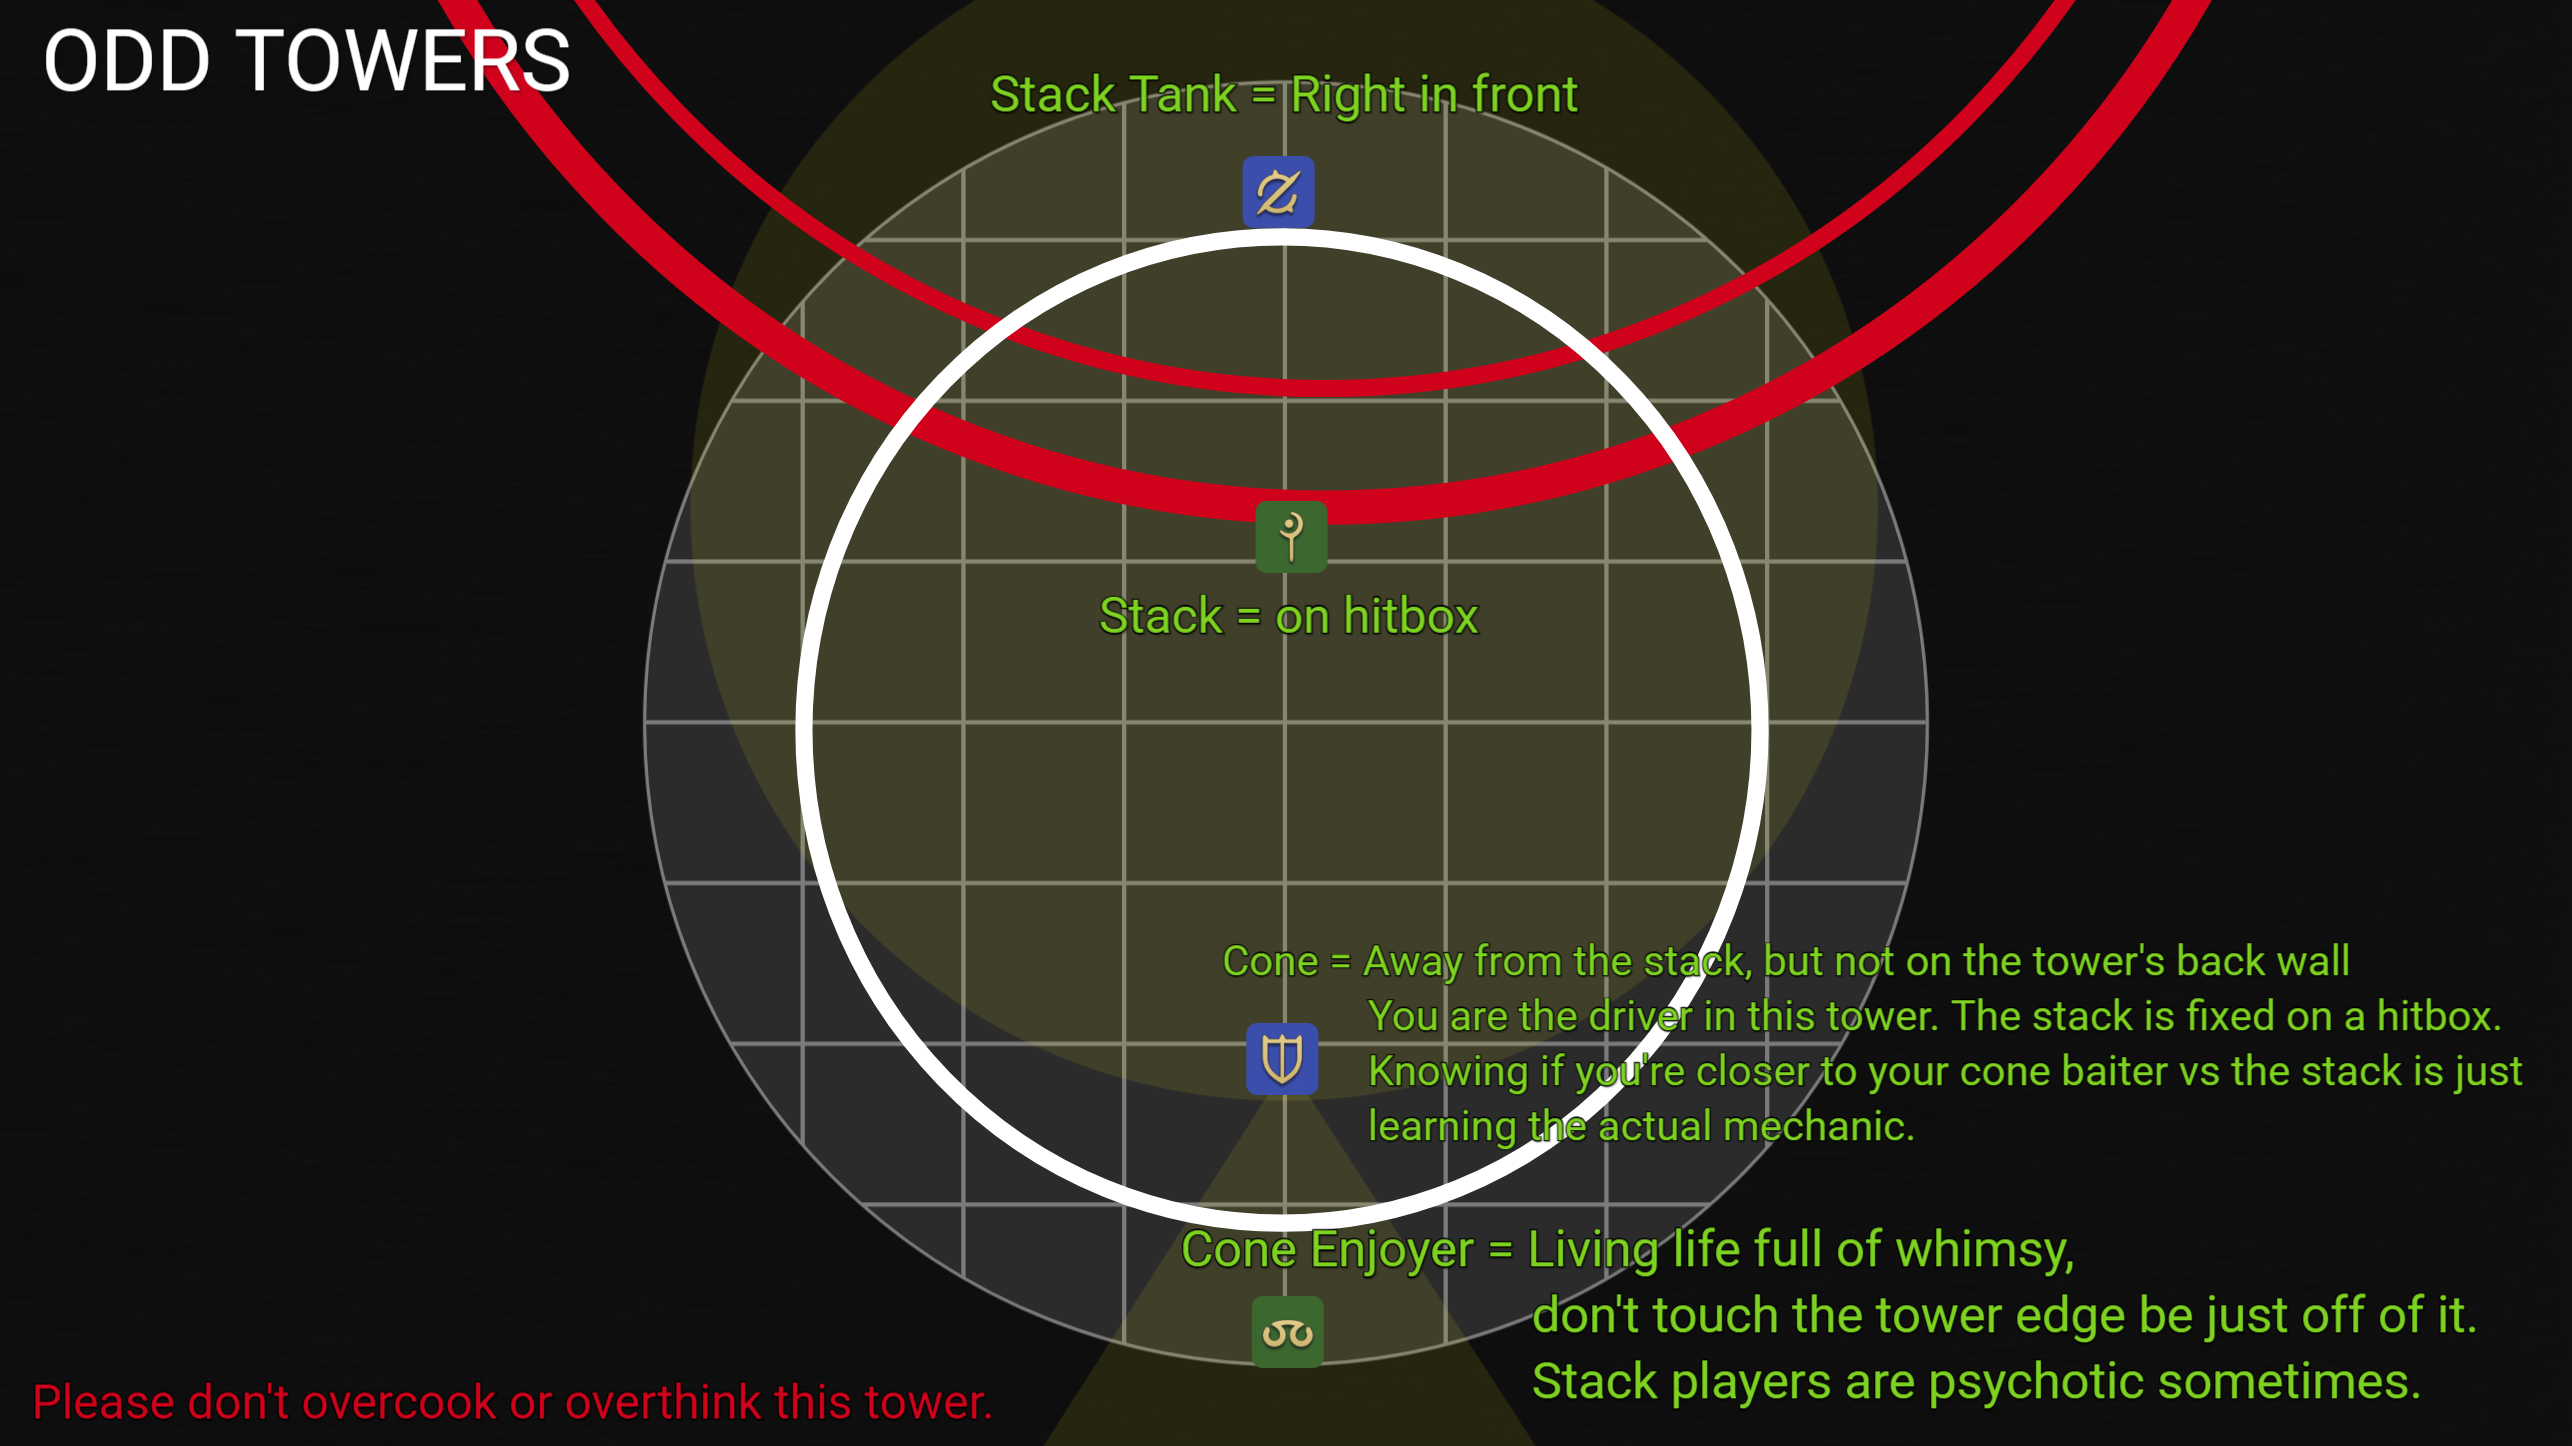
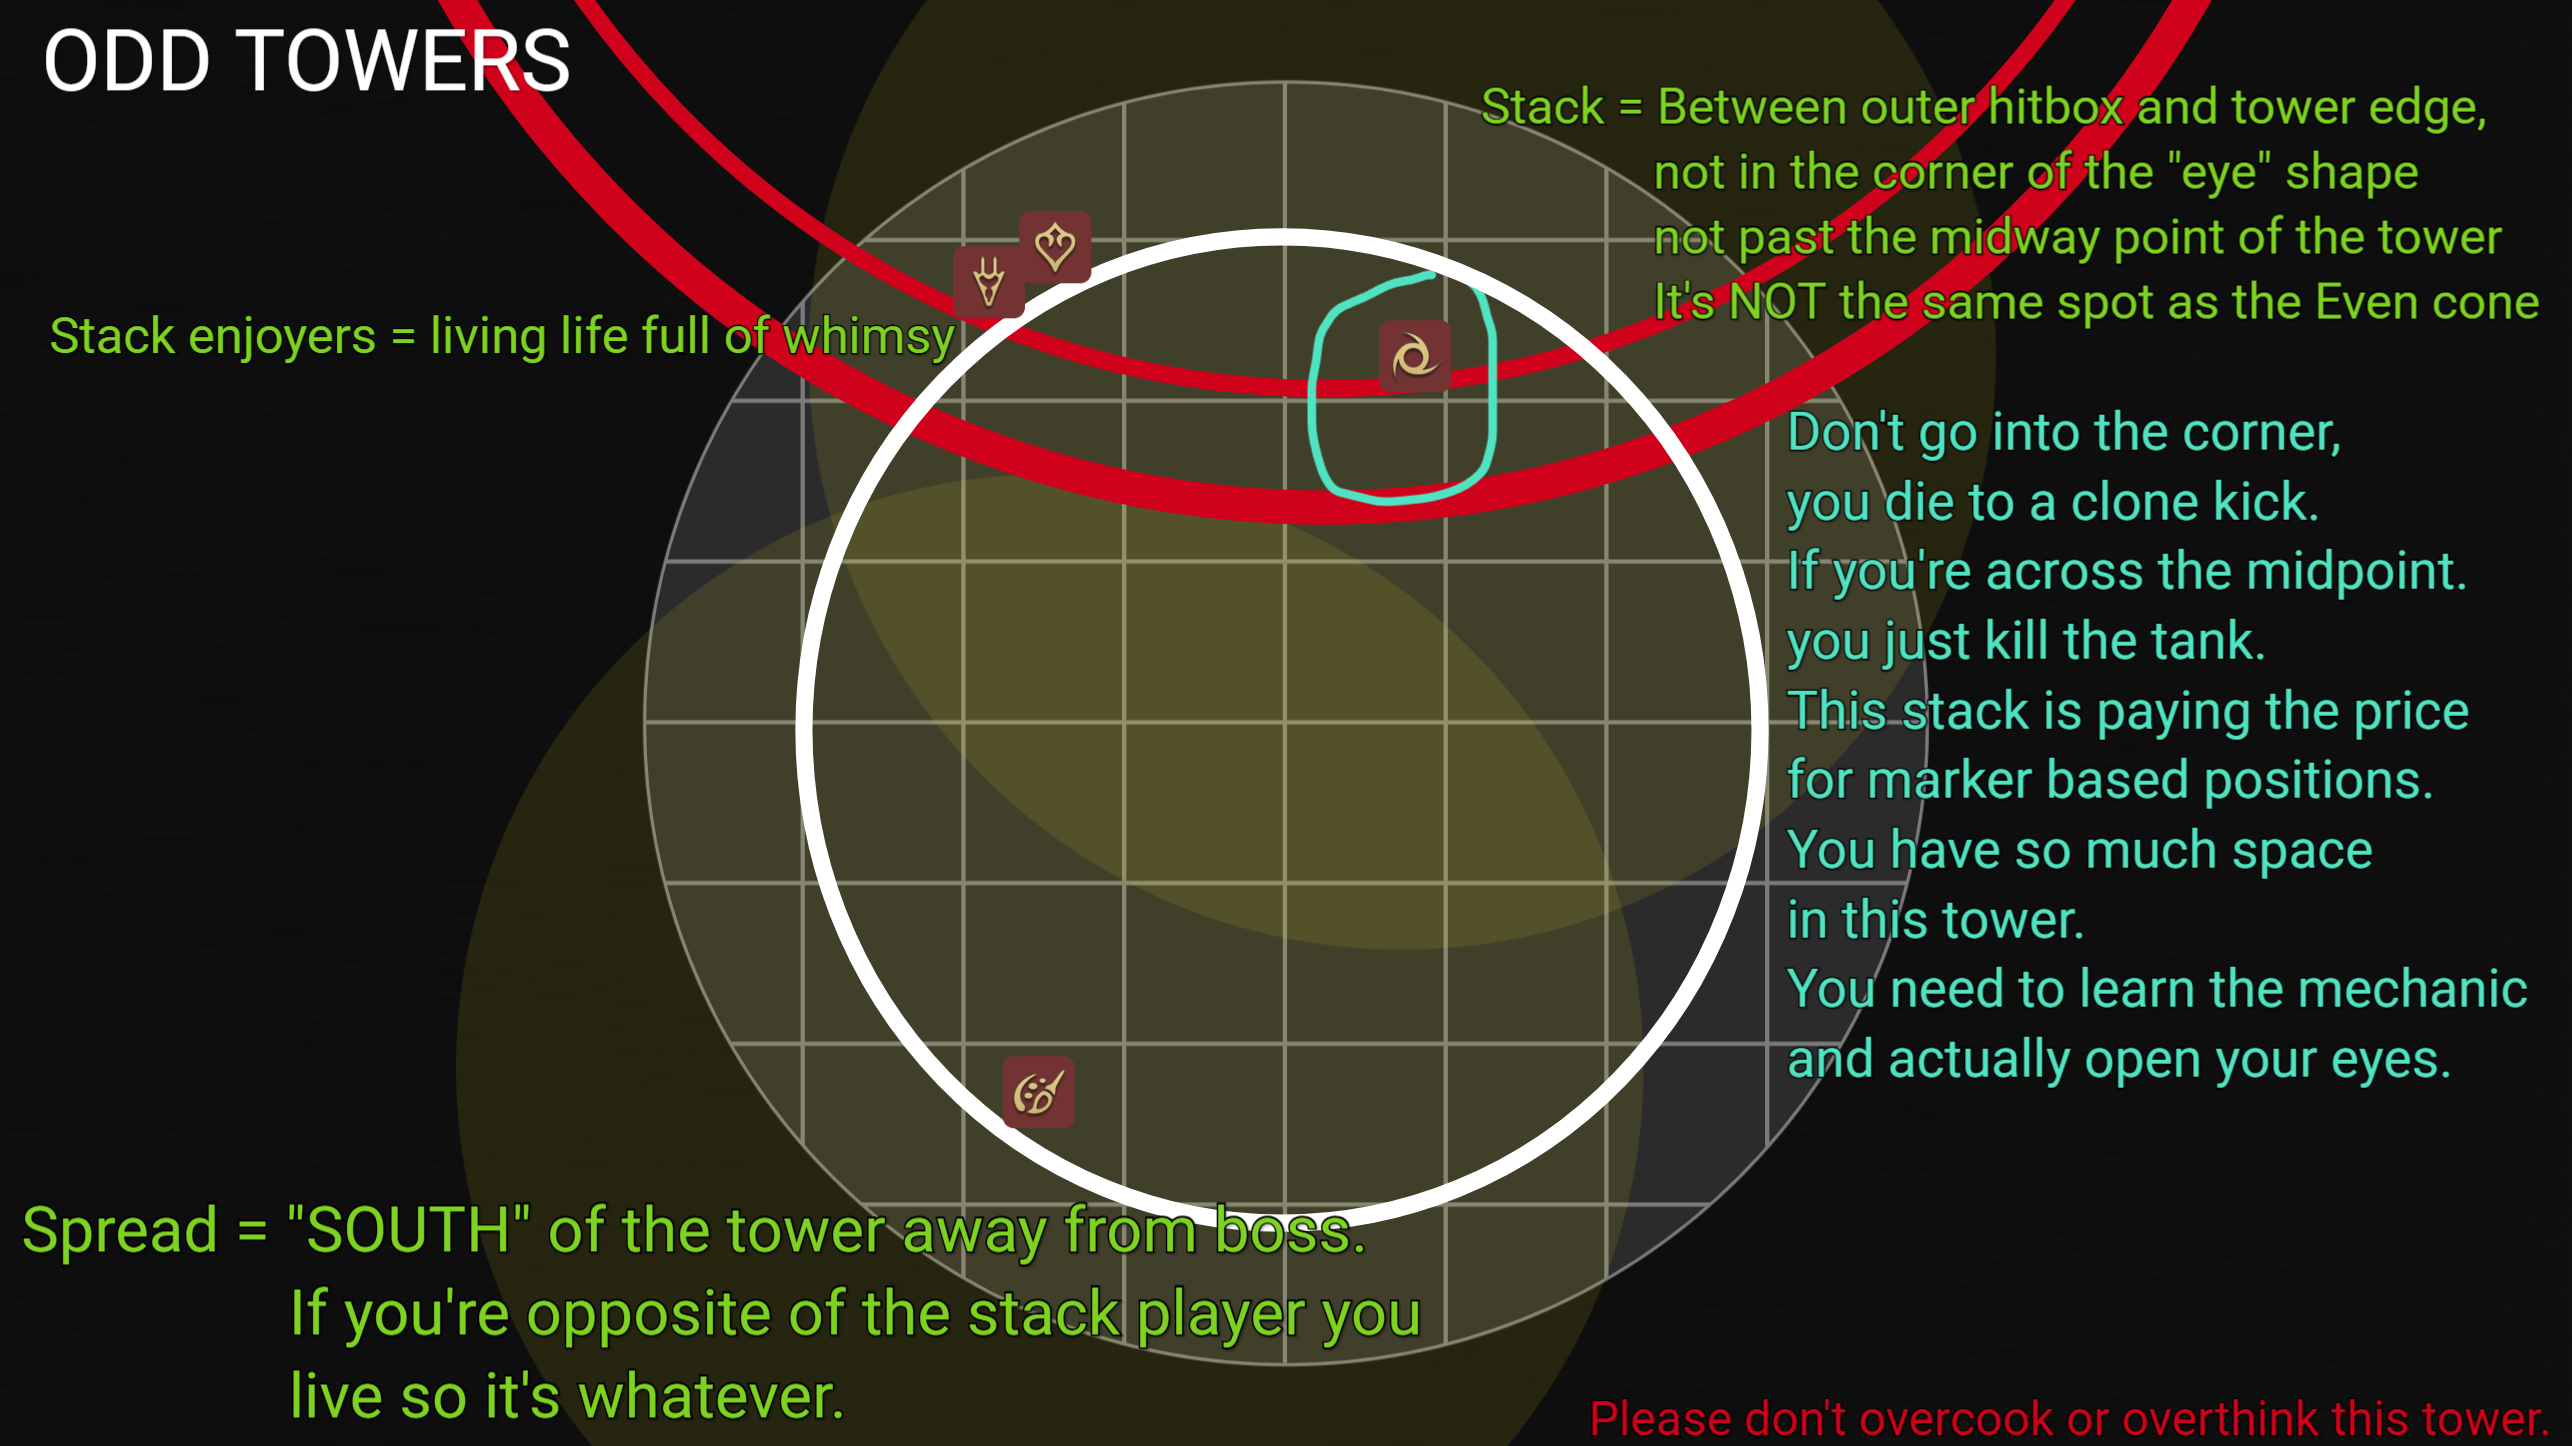
- Stack = on the boss hitbox, between the outer hitbox and the tower edge. Not in the
corner of the "eye" shape, not past the midway point of the tower. (It is not the same spot
as the Even-tower cone.)
- Tank stands right in front.
- Cone = away from the stack, but not on the tower's back wall. You are the driver of this tower — the stack is fixed on the hitbox, so judging whether you're closer to your cone baiter or the stack is the mechanic. Don't touch the tower edge, sit just off it.
- Spread = "South" of the tower (away from the boss). If you're opposite the stack player you live, so it's whatever.
Left stack goes on the boss hitbox ring; right stack goes in front, aligned toward the "new north." Don't go into the corner — you die to a clone kick. Don't cross the midpoint — you kill the tank. You have tons of space; open your eyes. Don't overcook this tower.
Even Towers (2, 4, 6, 8) — Cone · Spread · Clone bait#
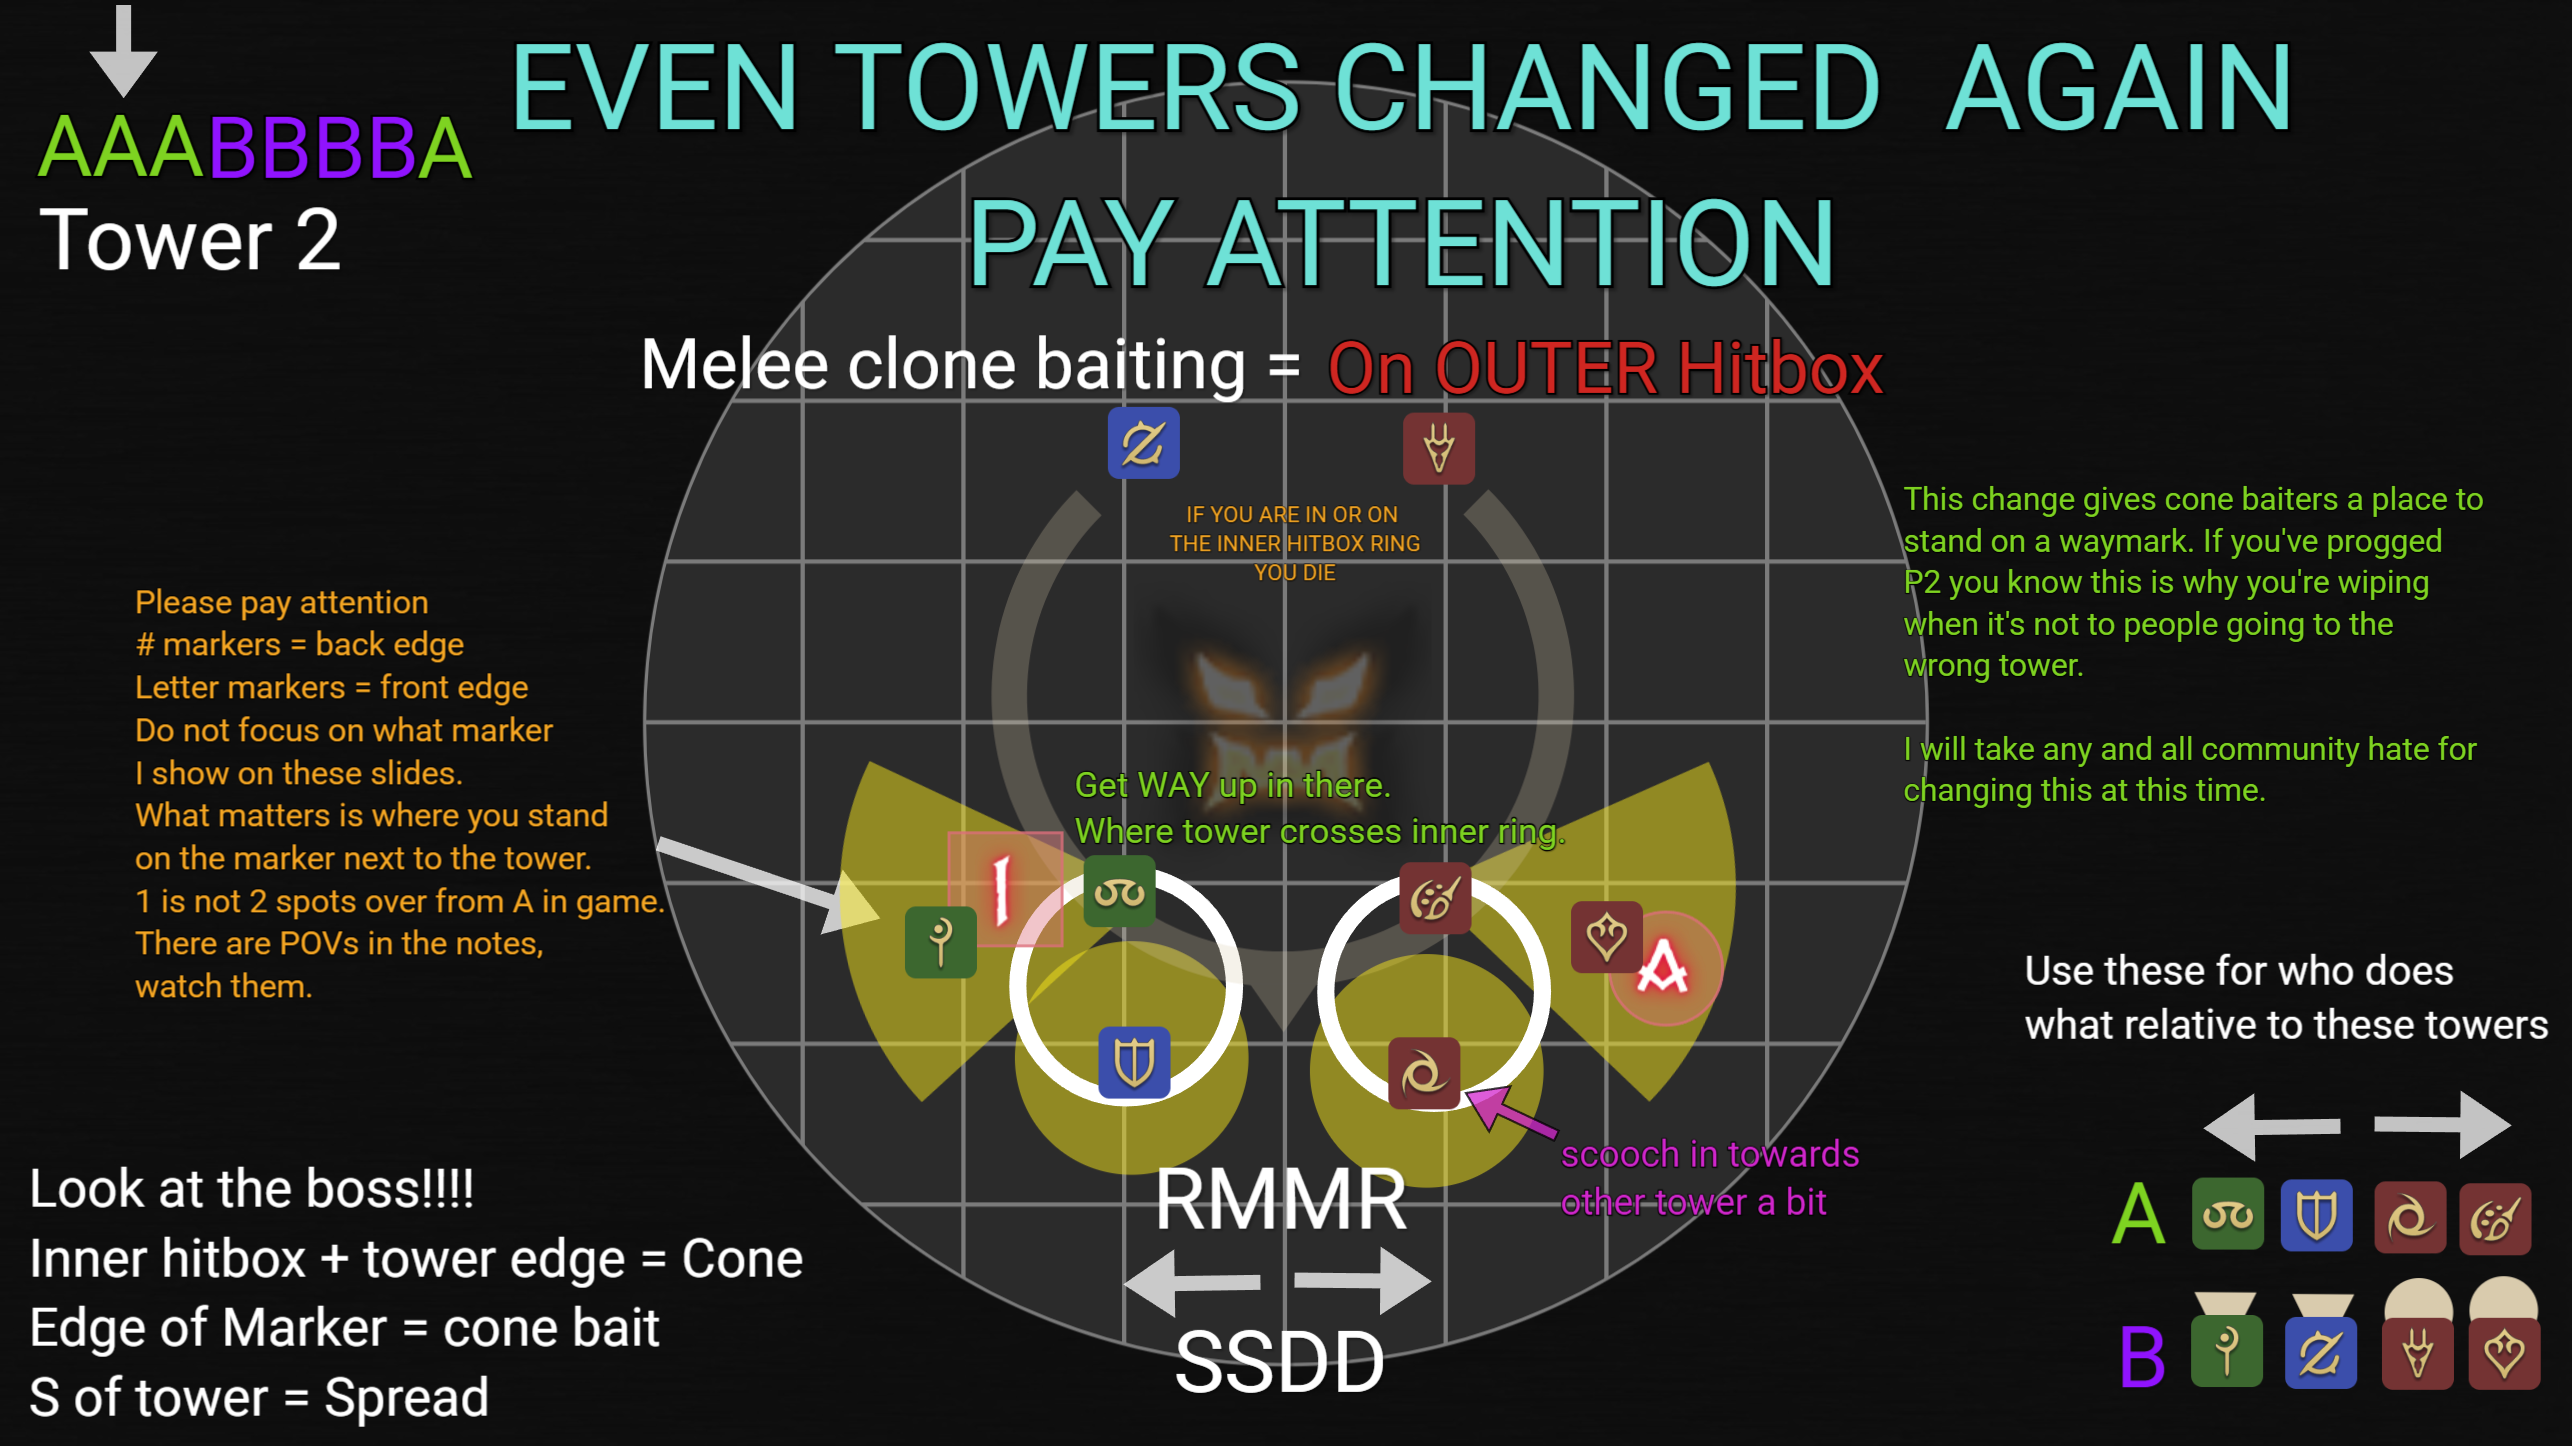
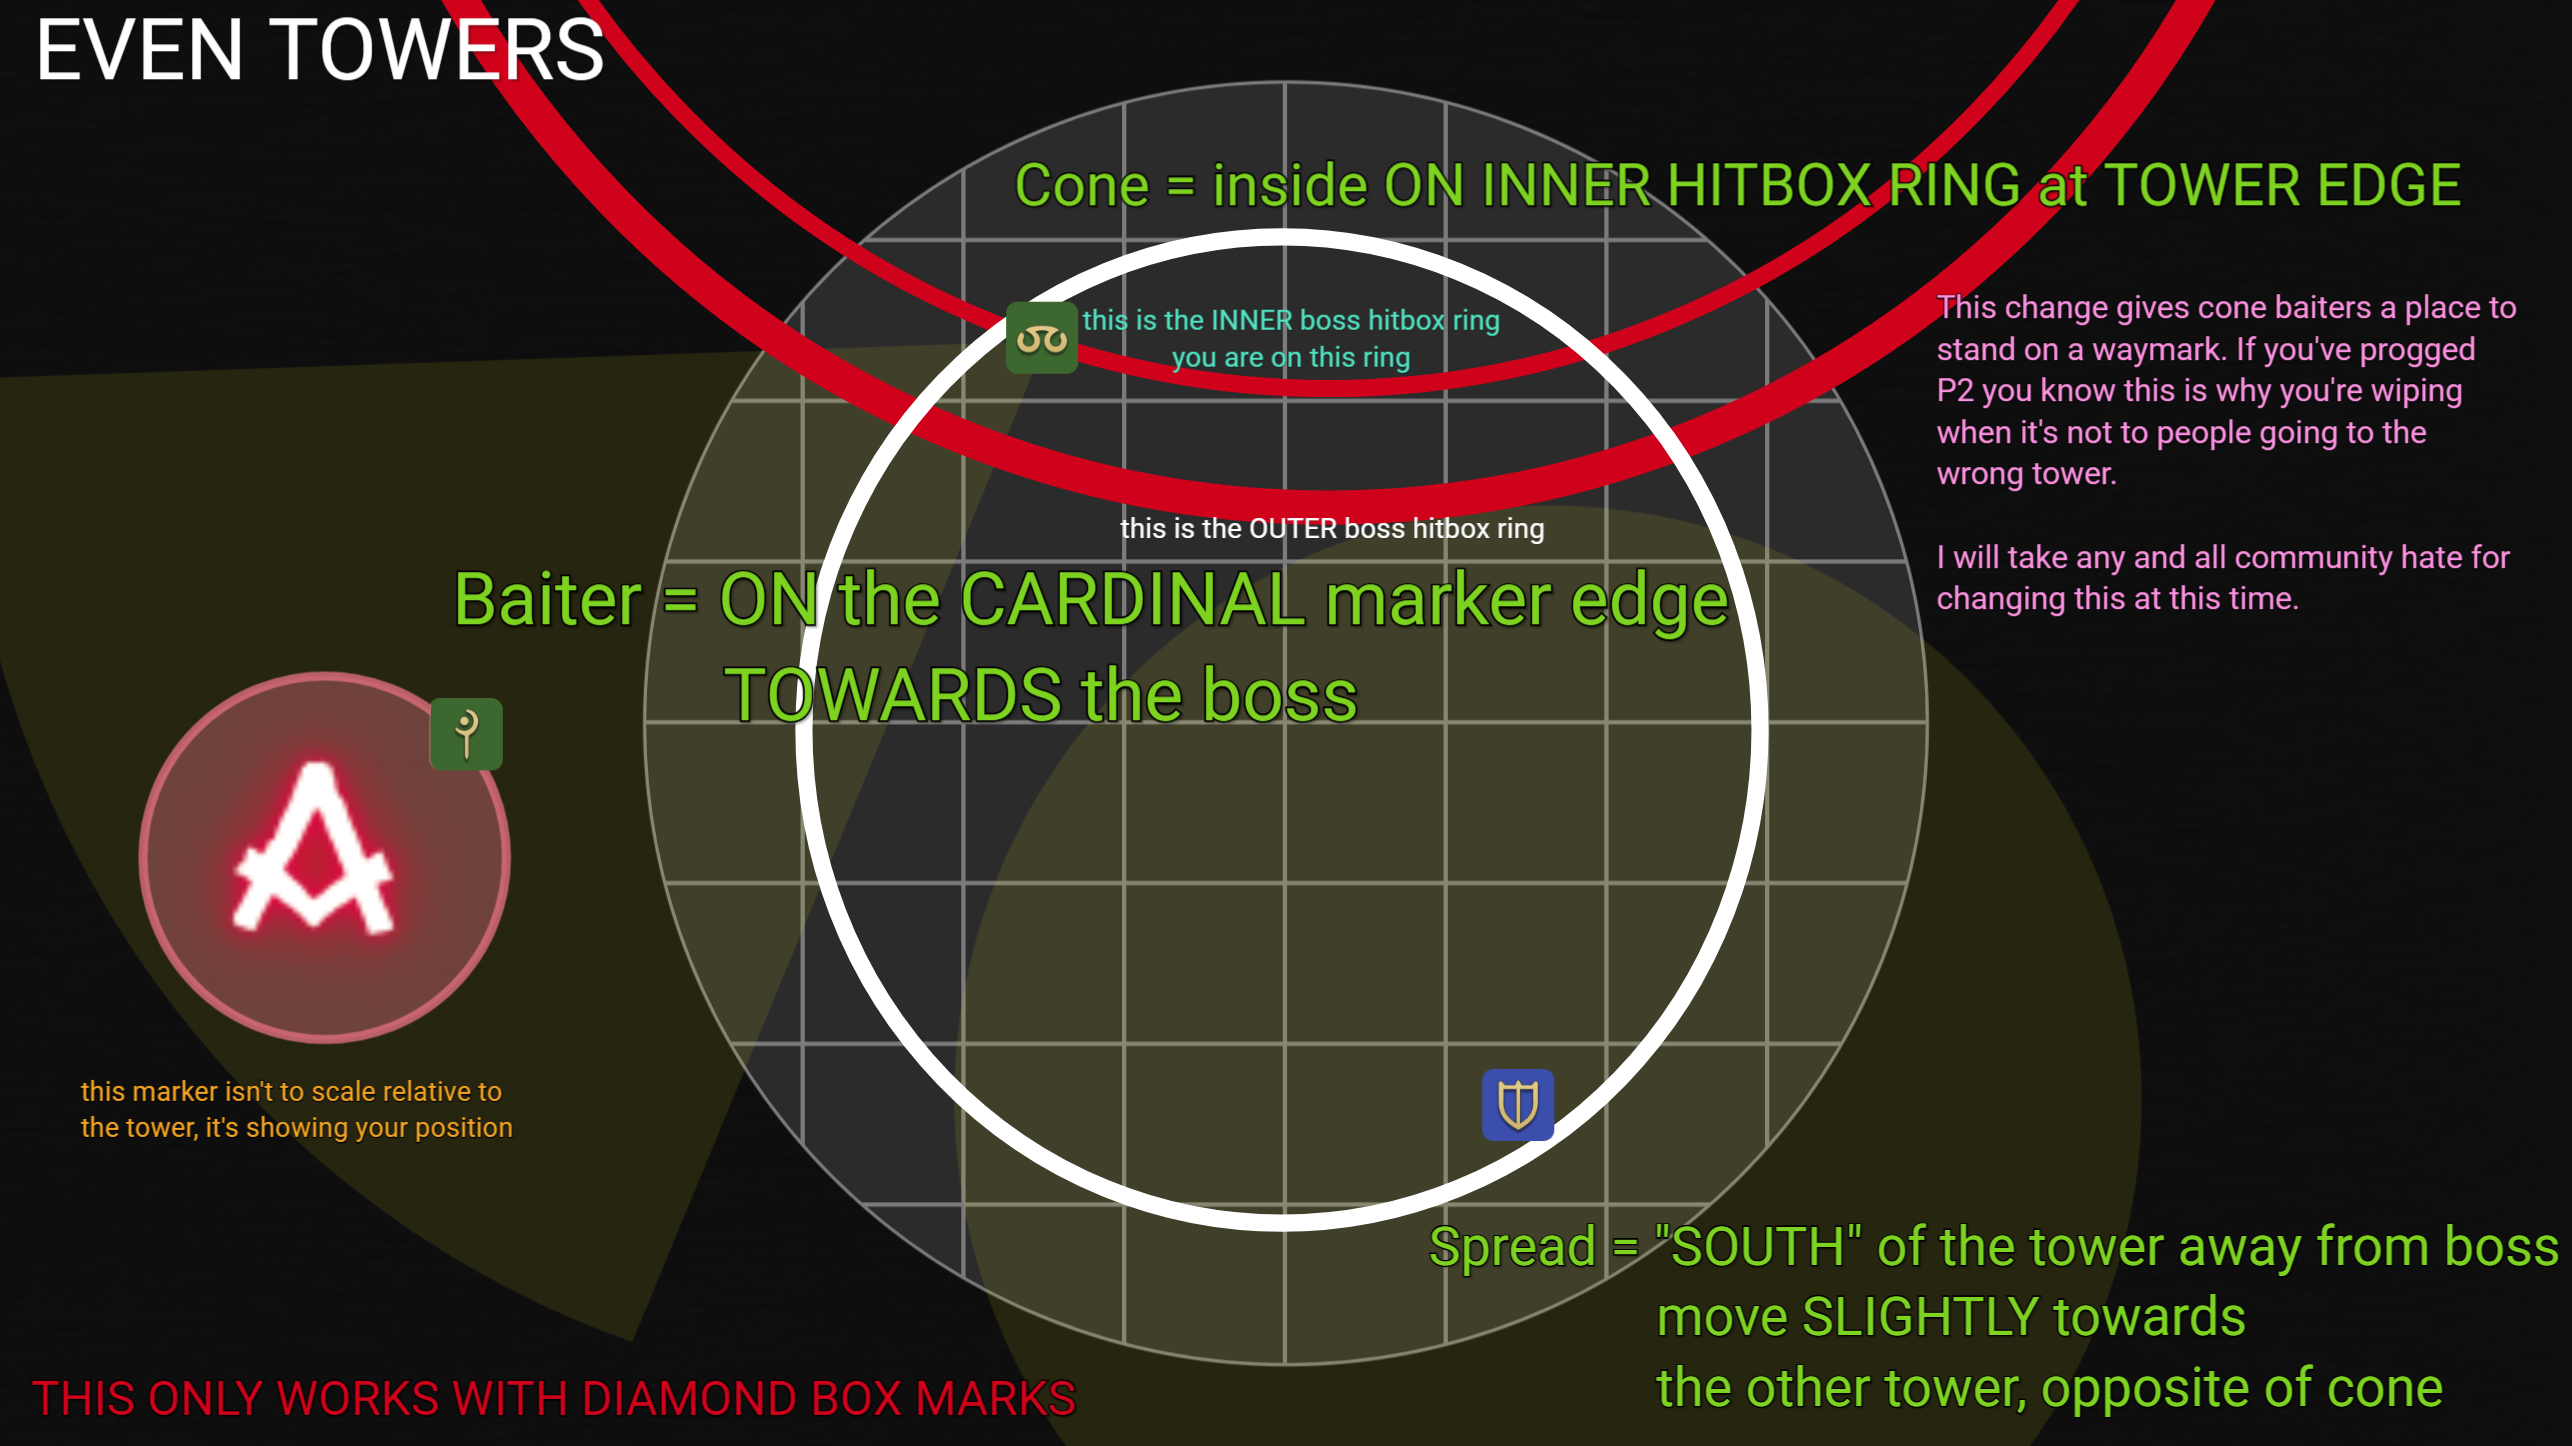
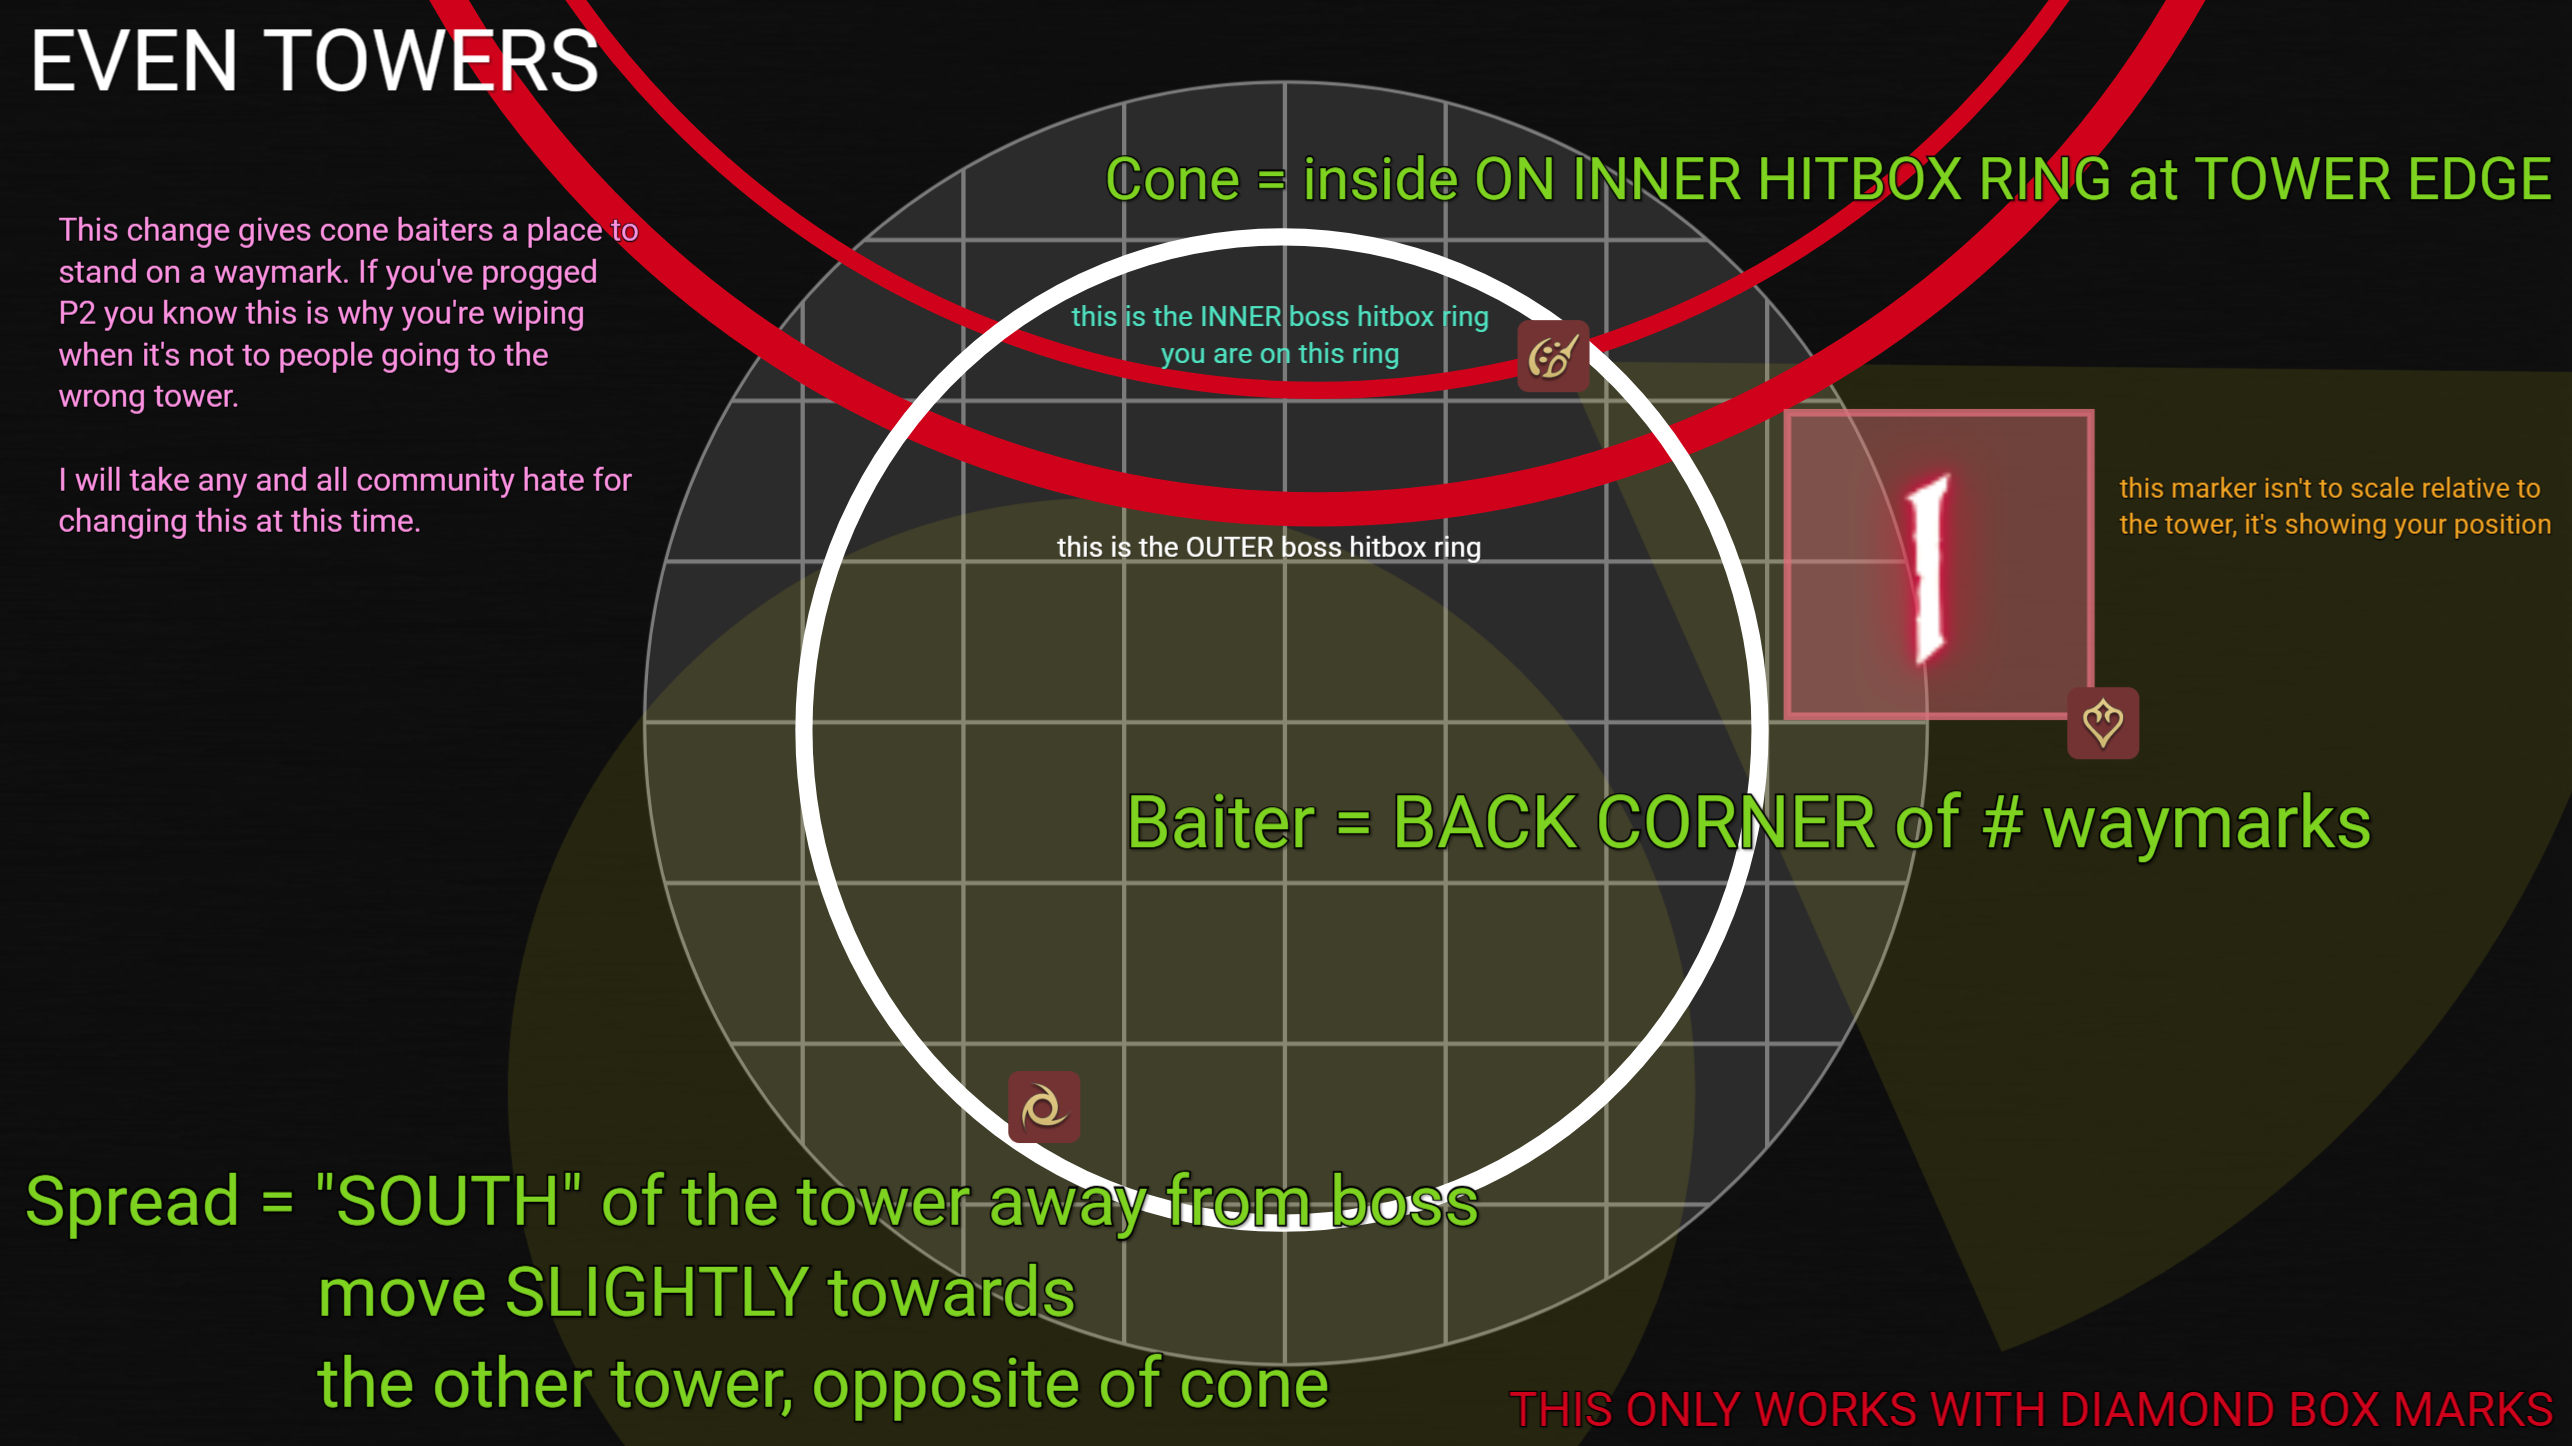
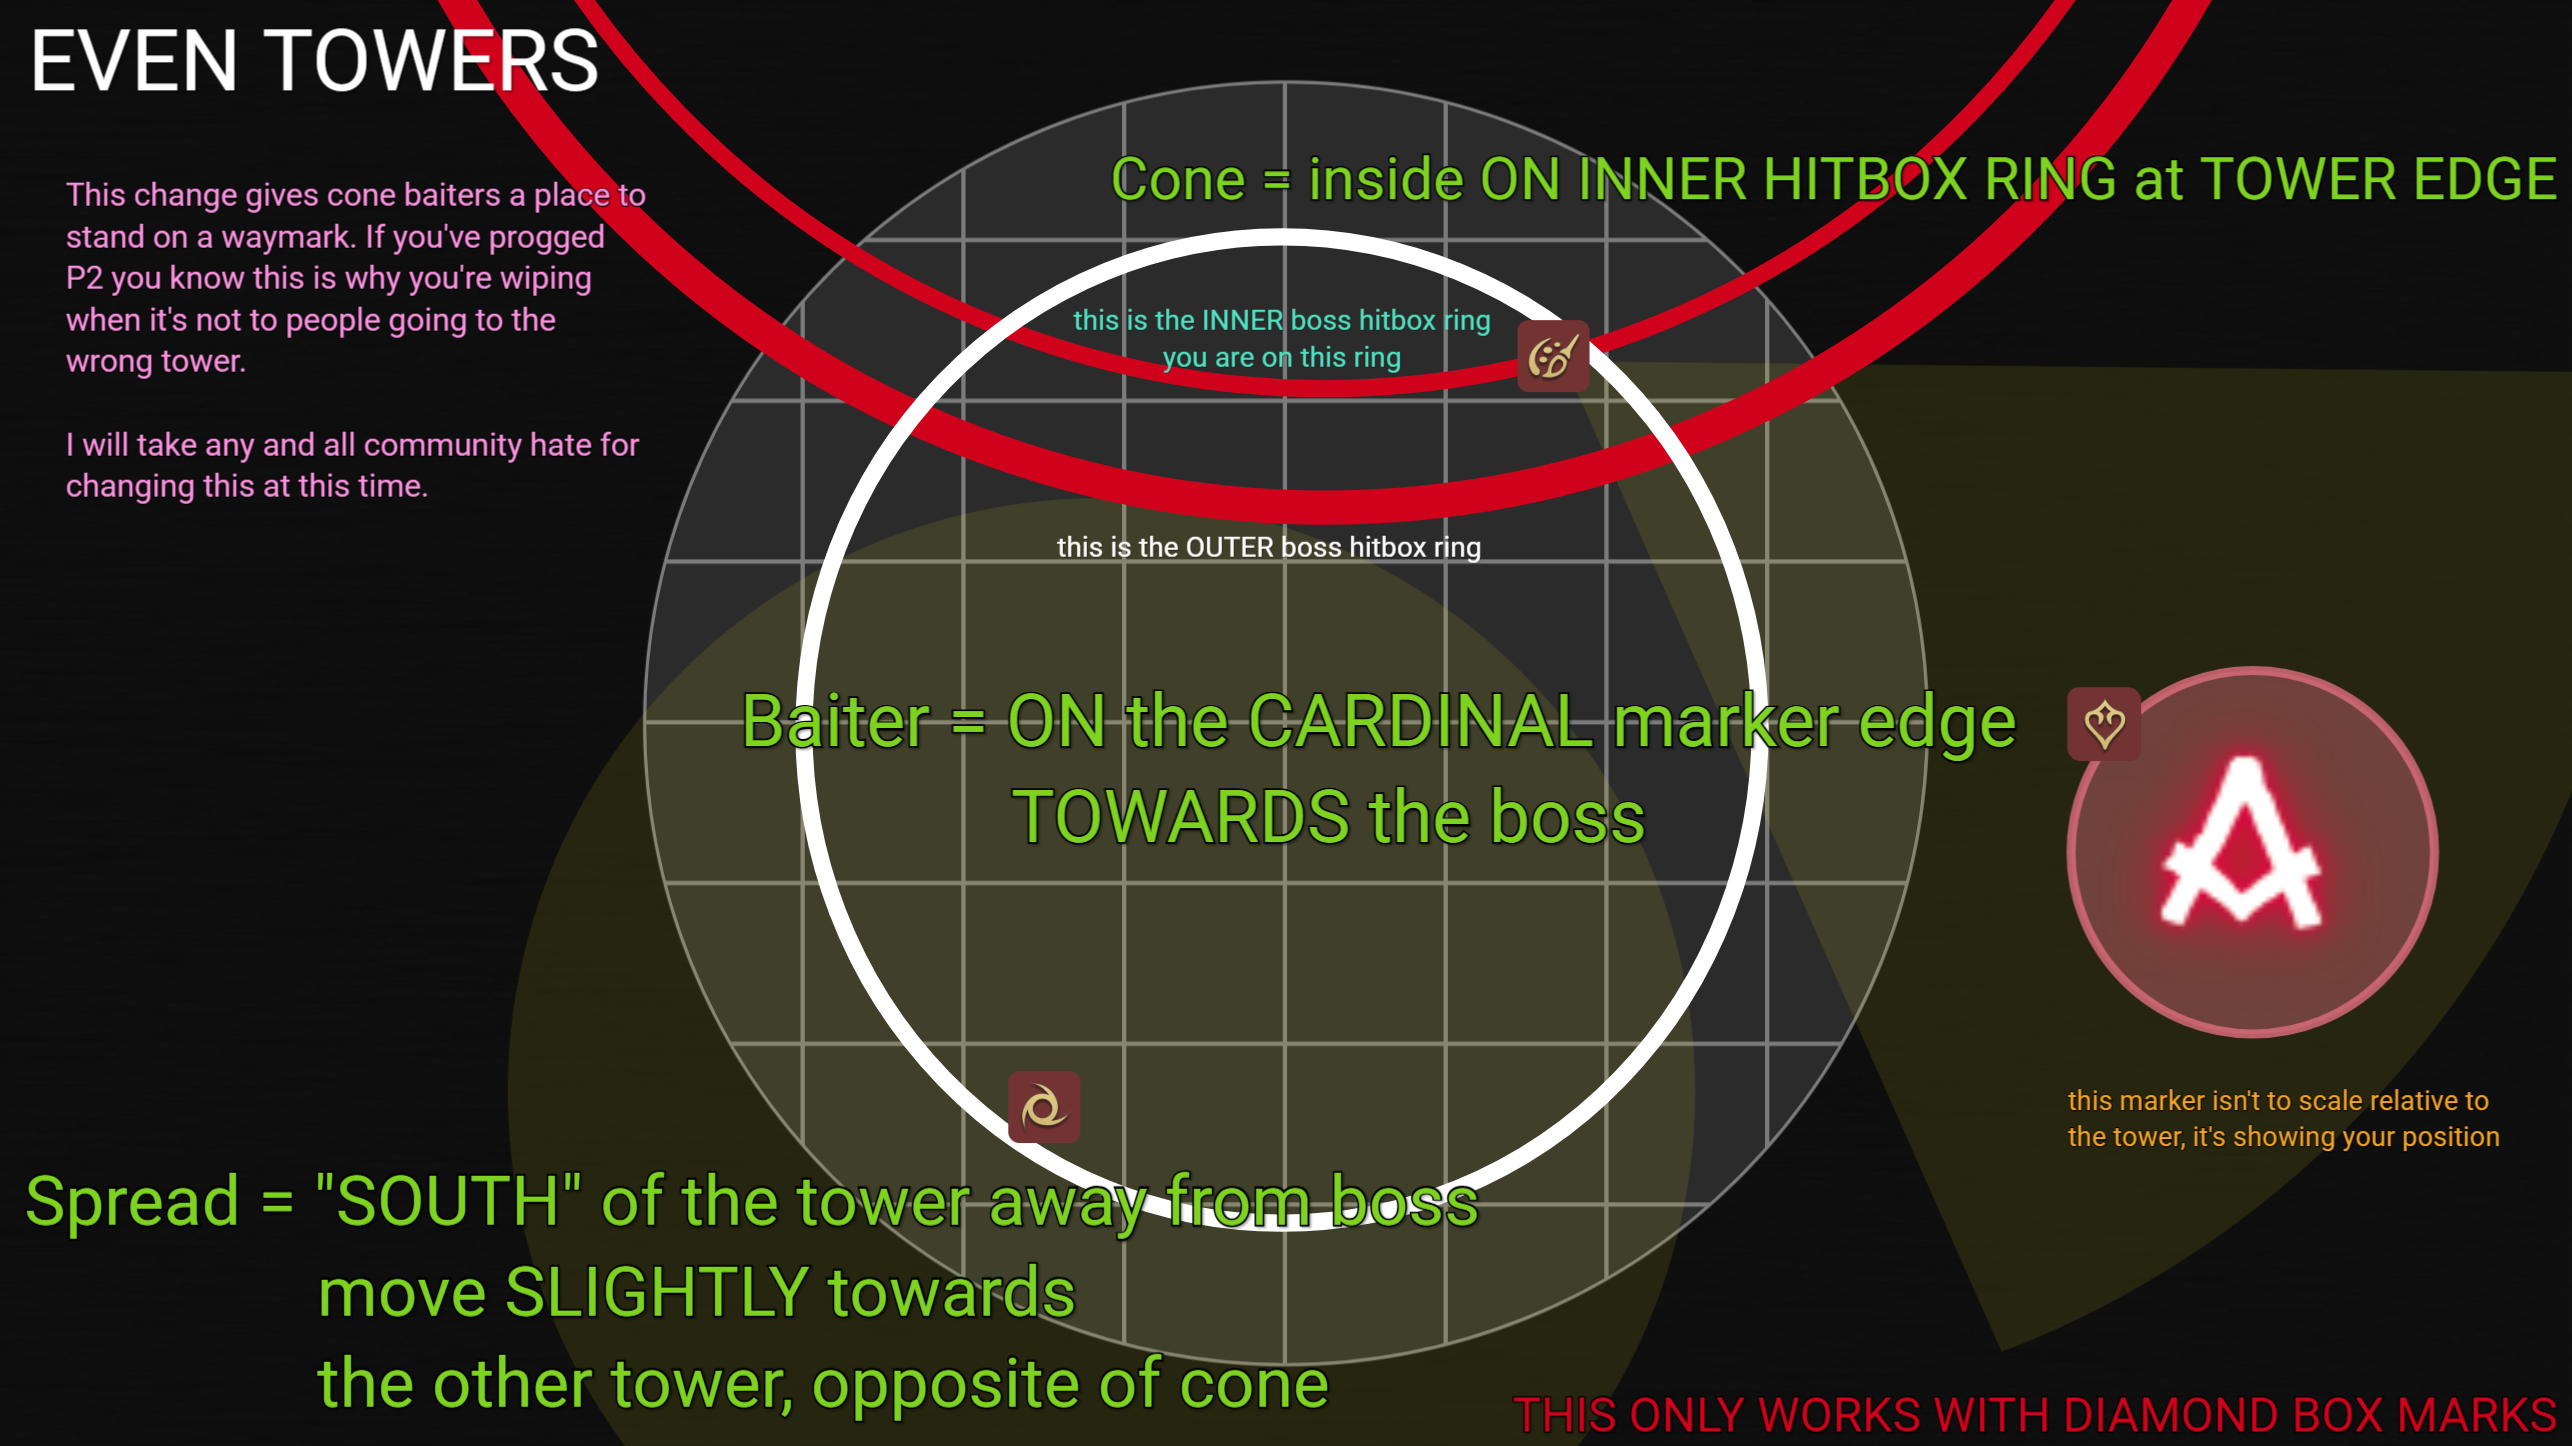
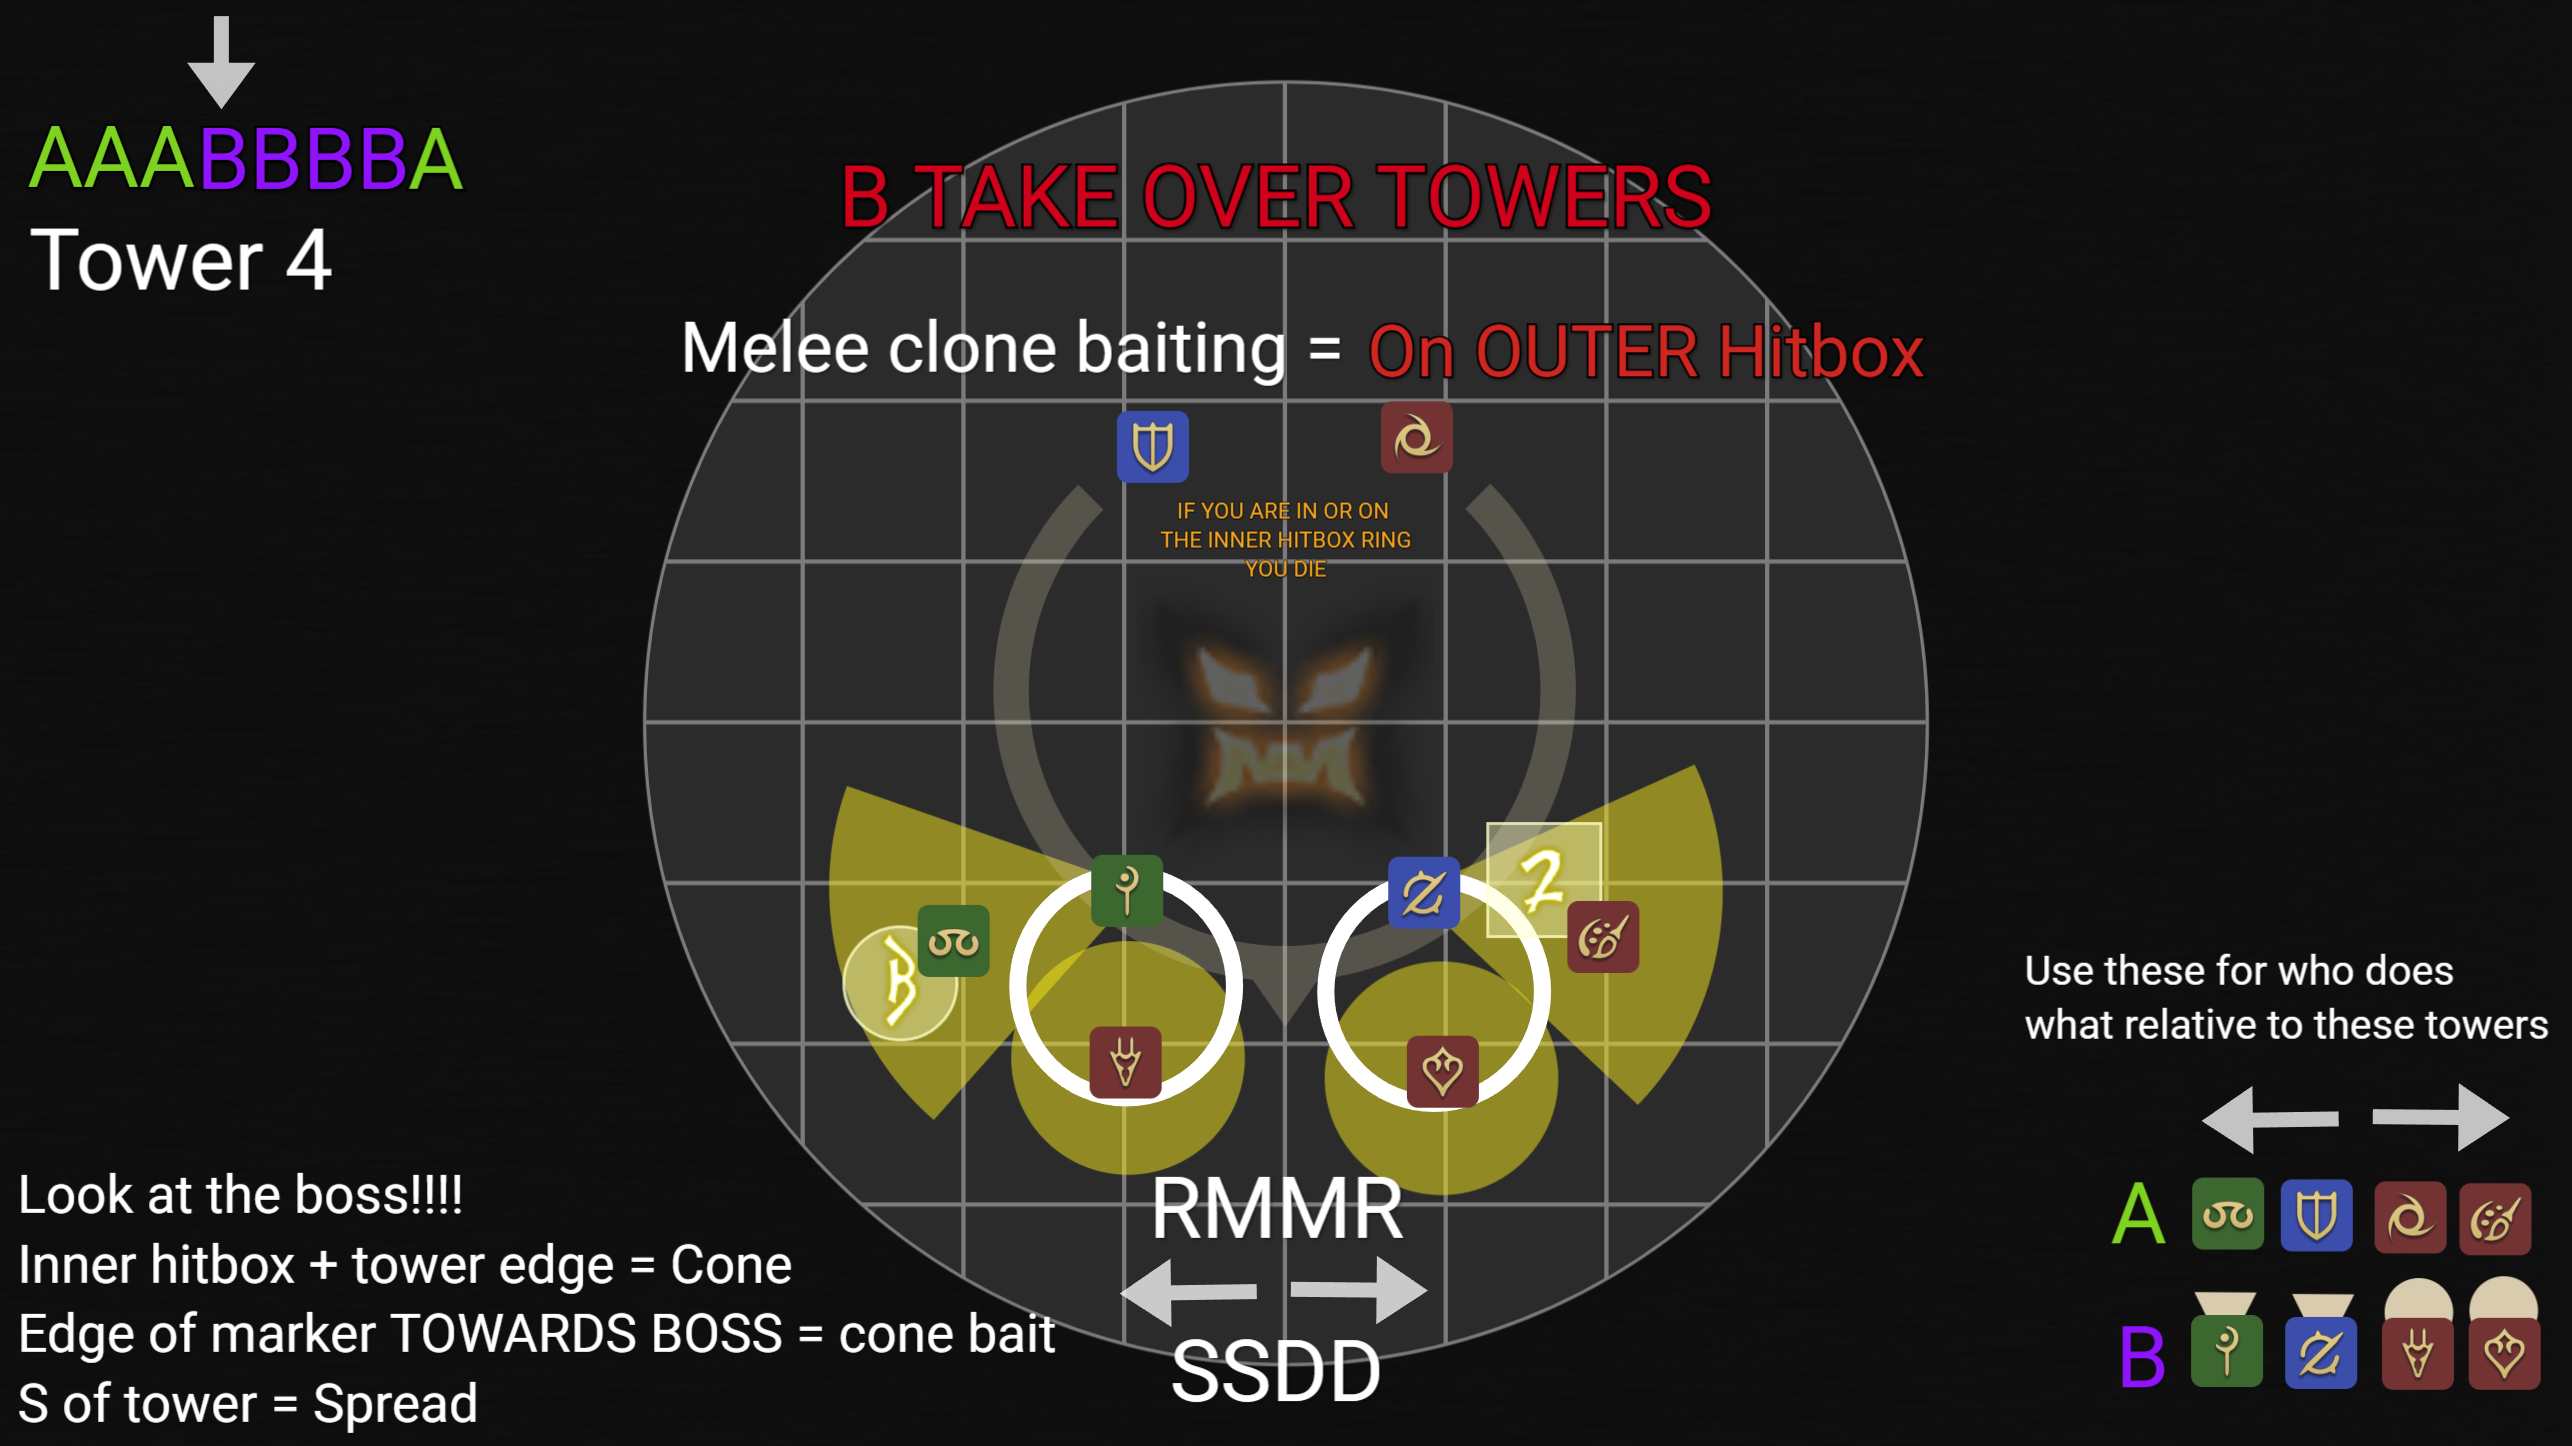
⚠️ EVEN TOWERS CHANGED — pay attention. This layout gives cone baiters a real waymark to stand on. If you progged this phase, even towers are why you were wiping.
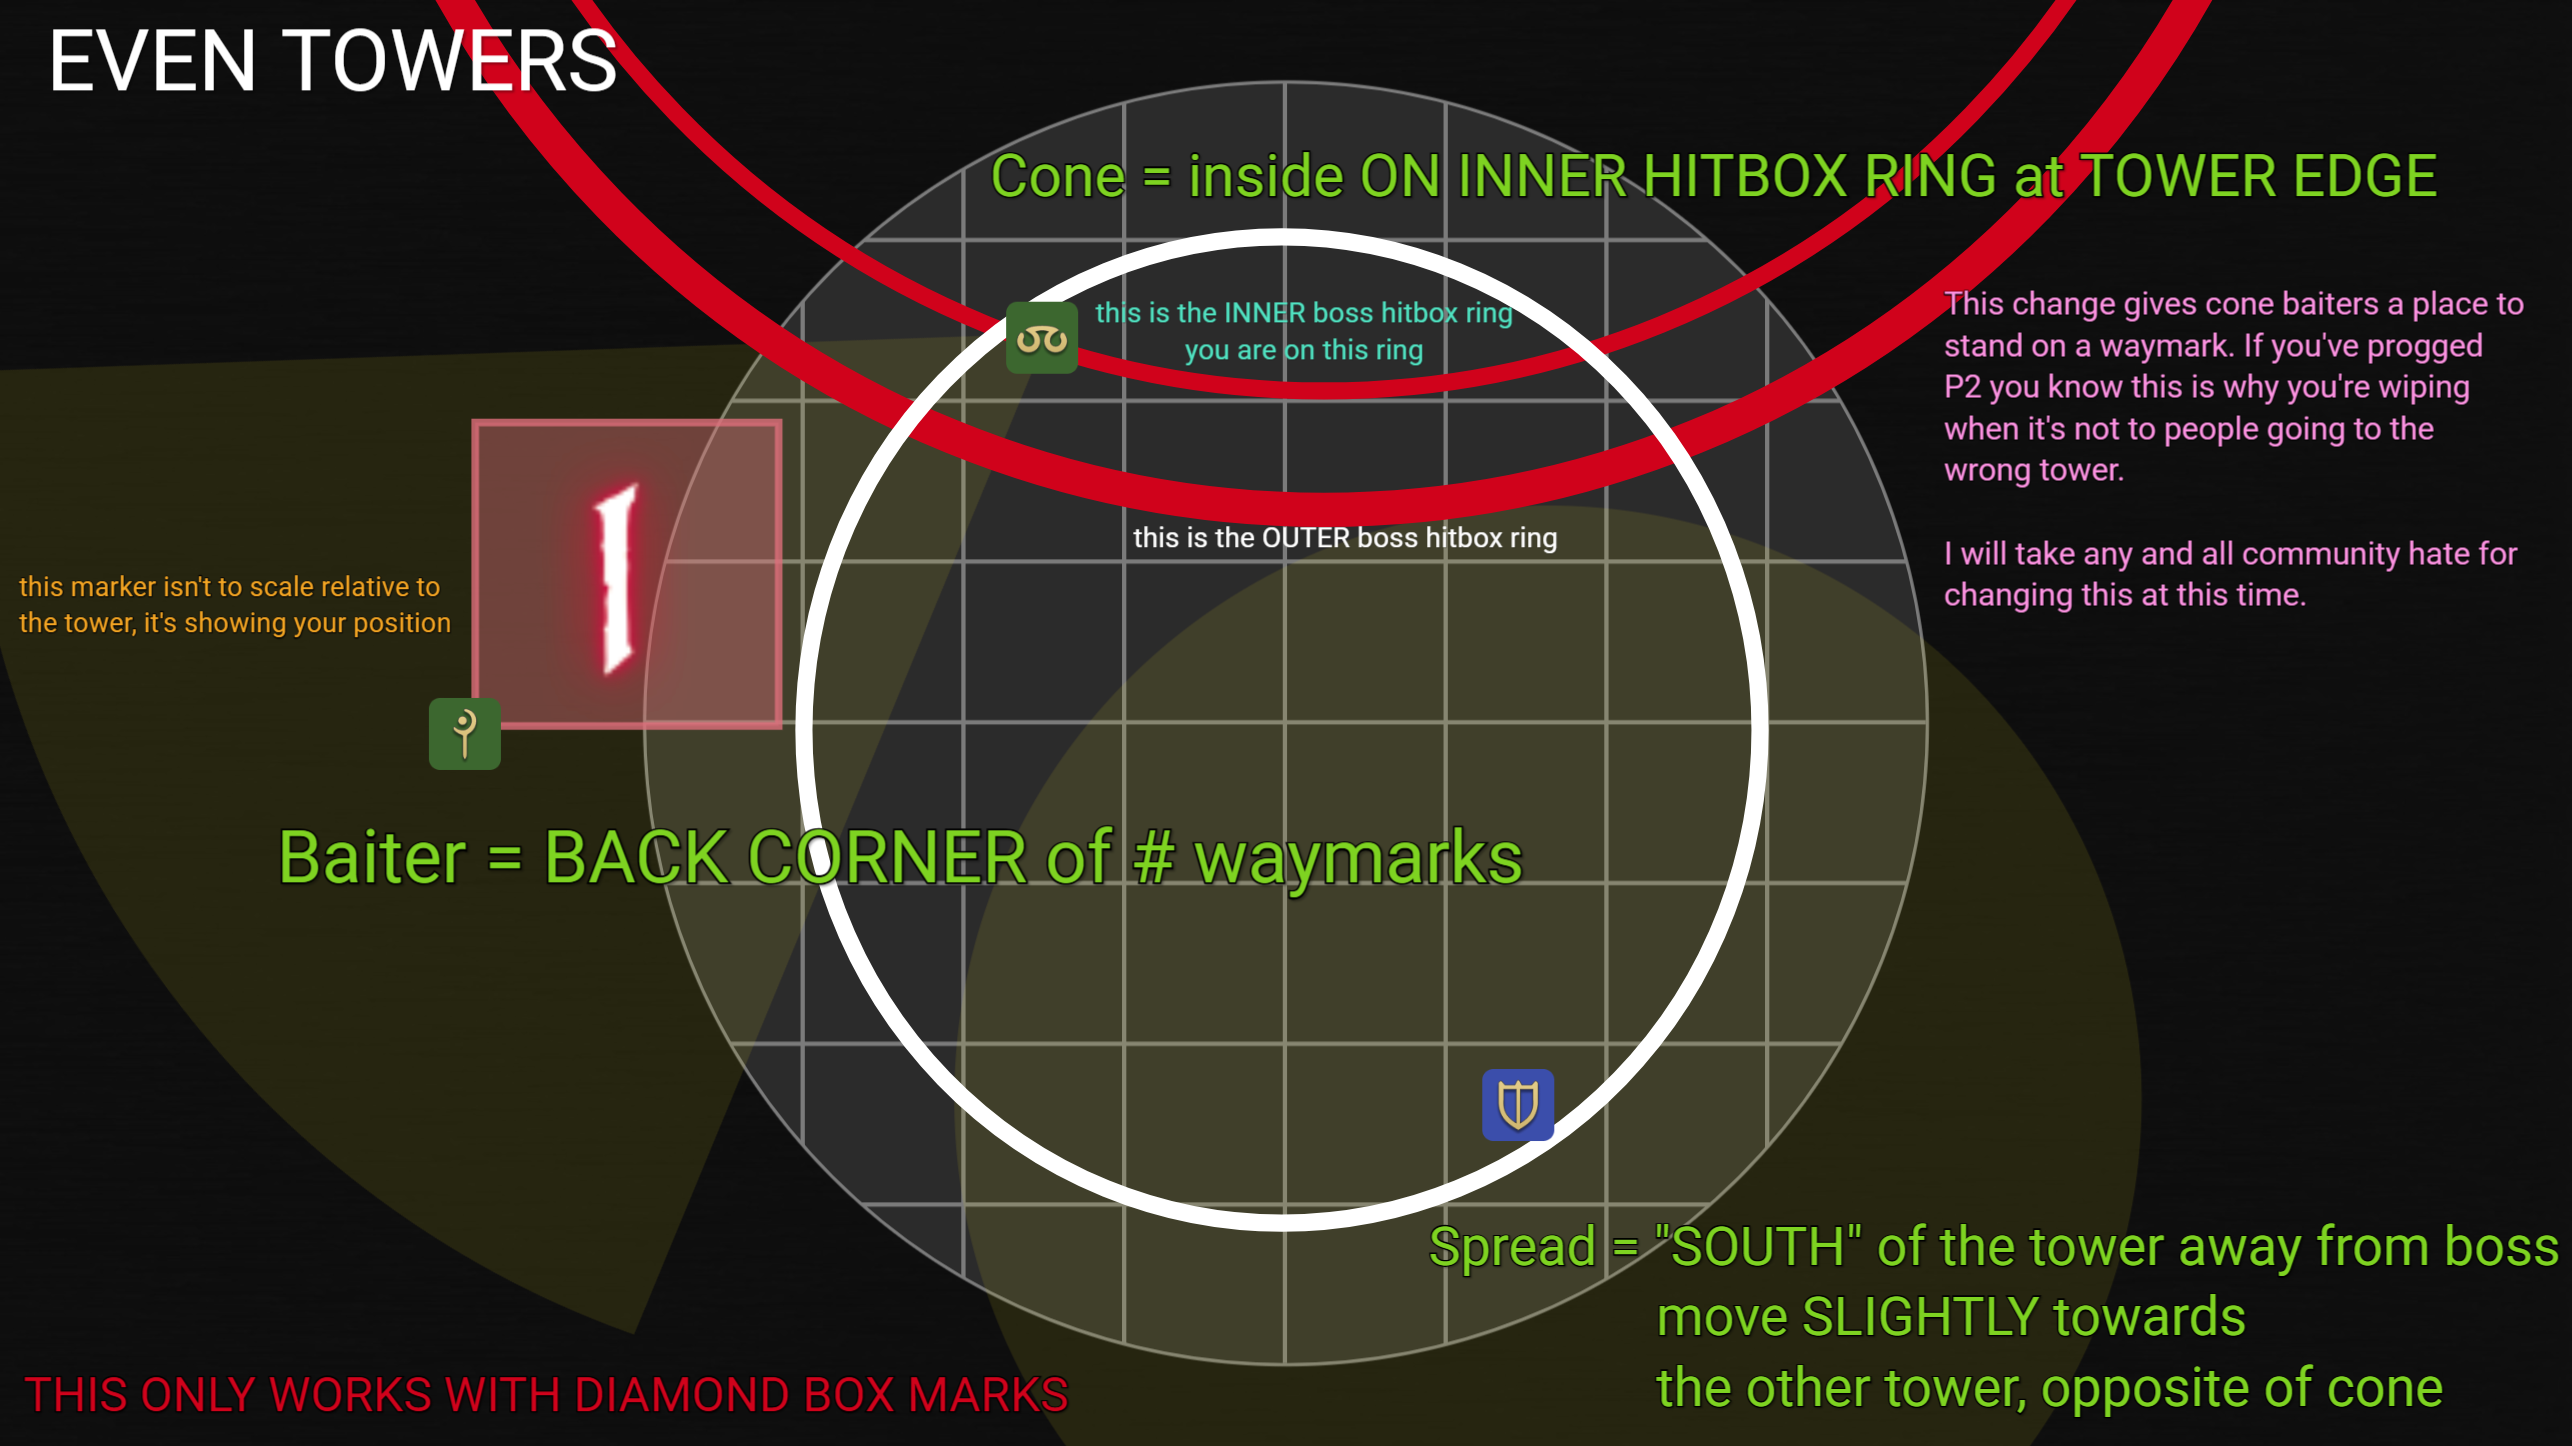
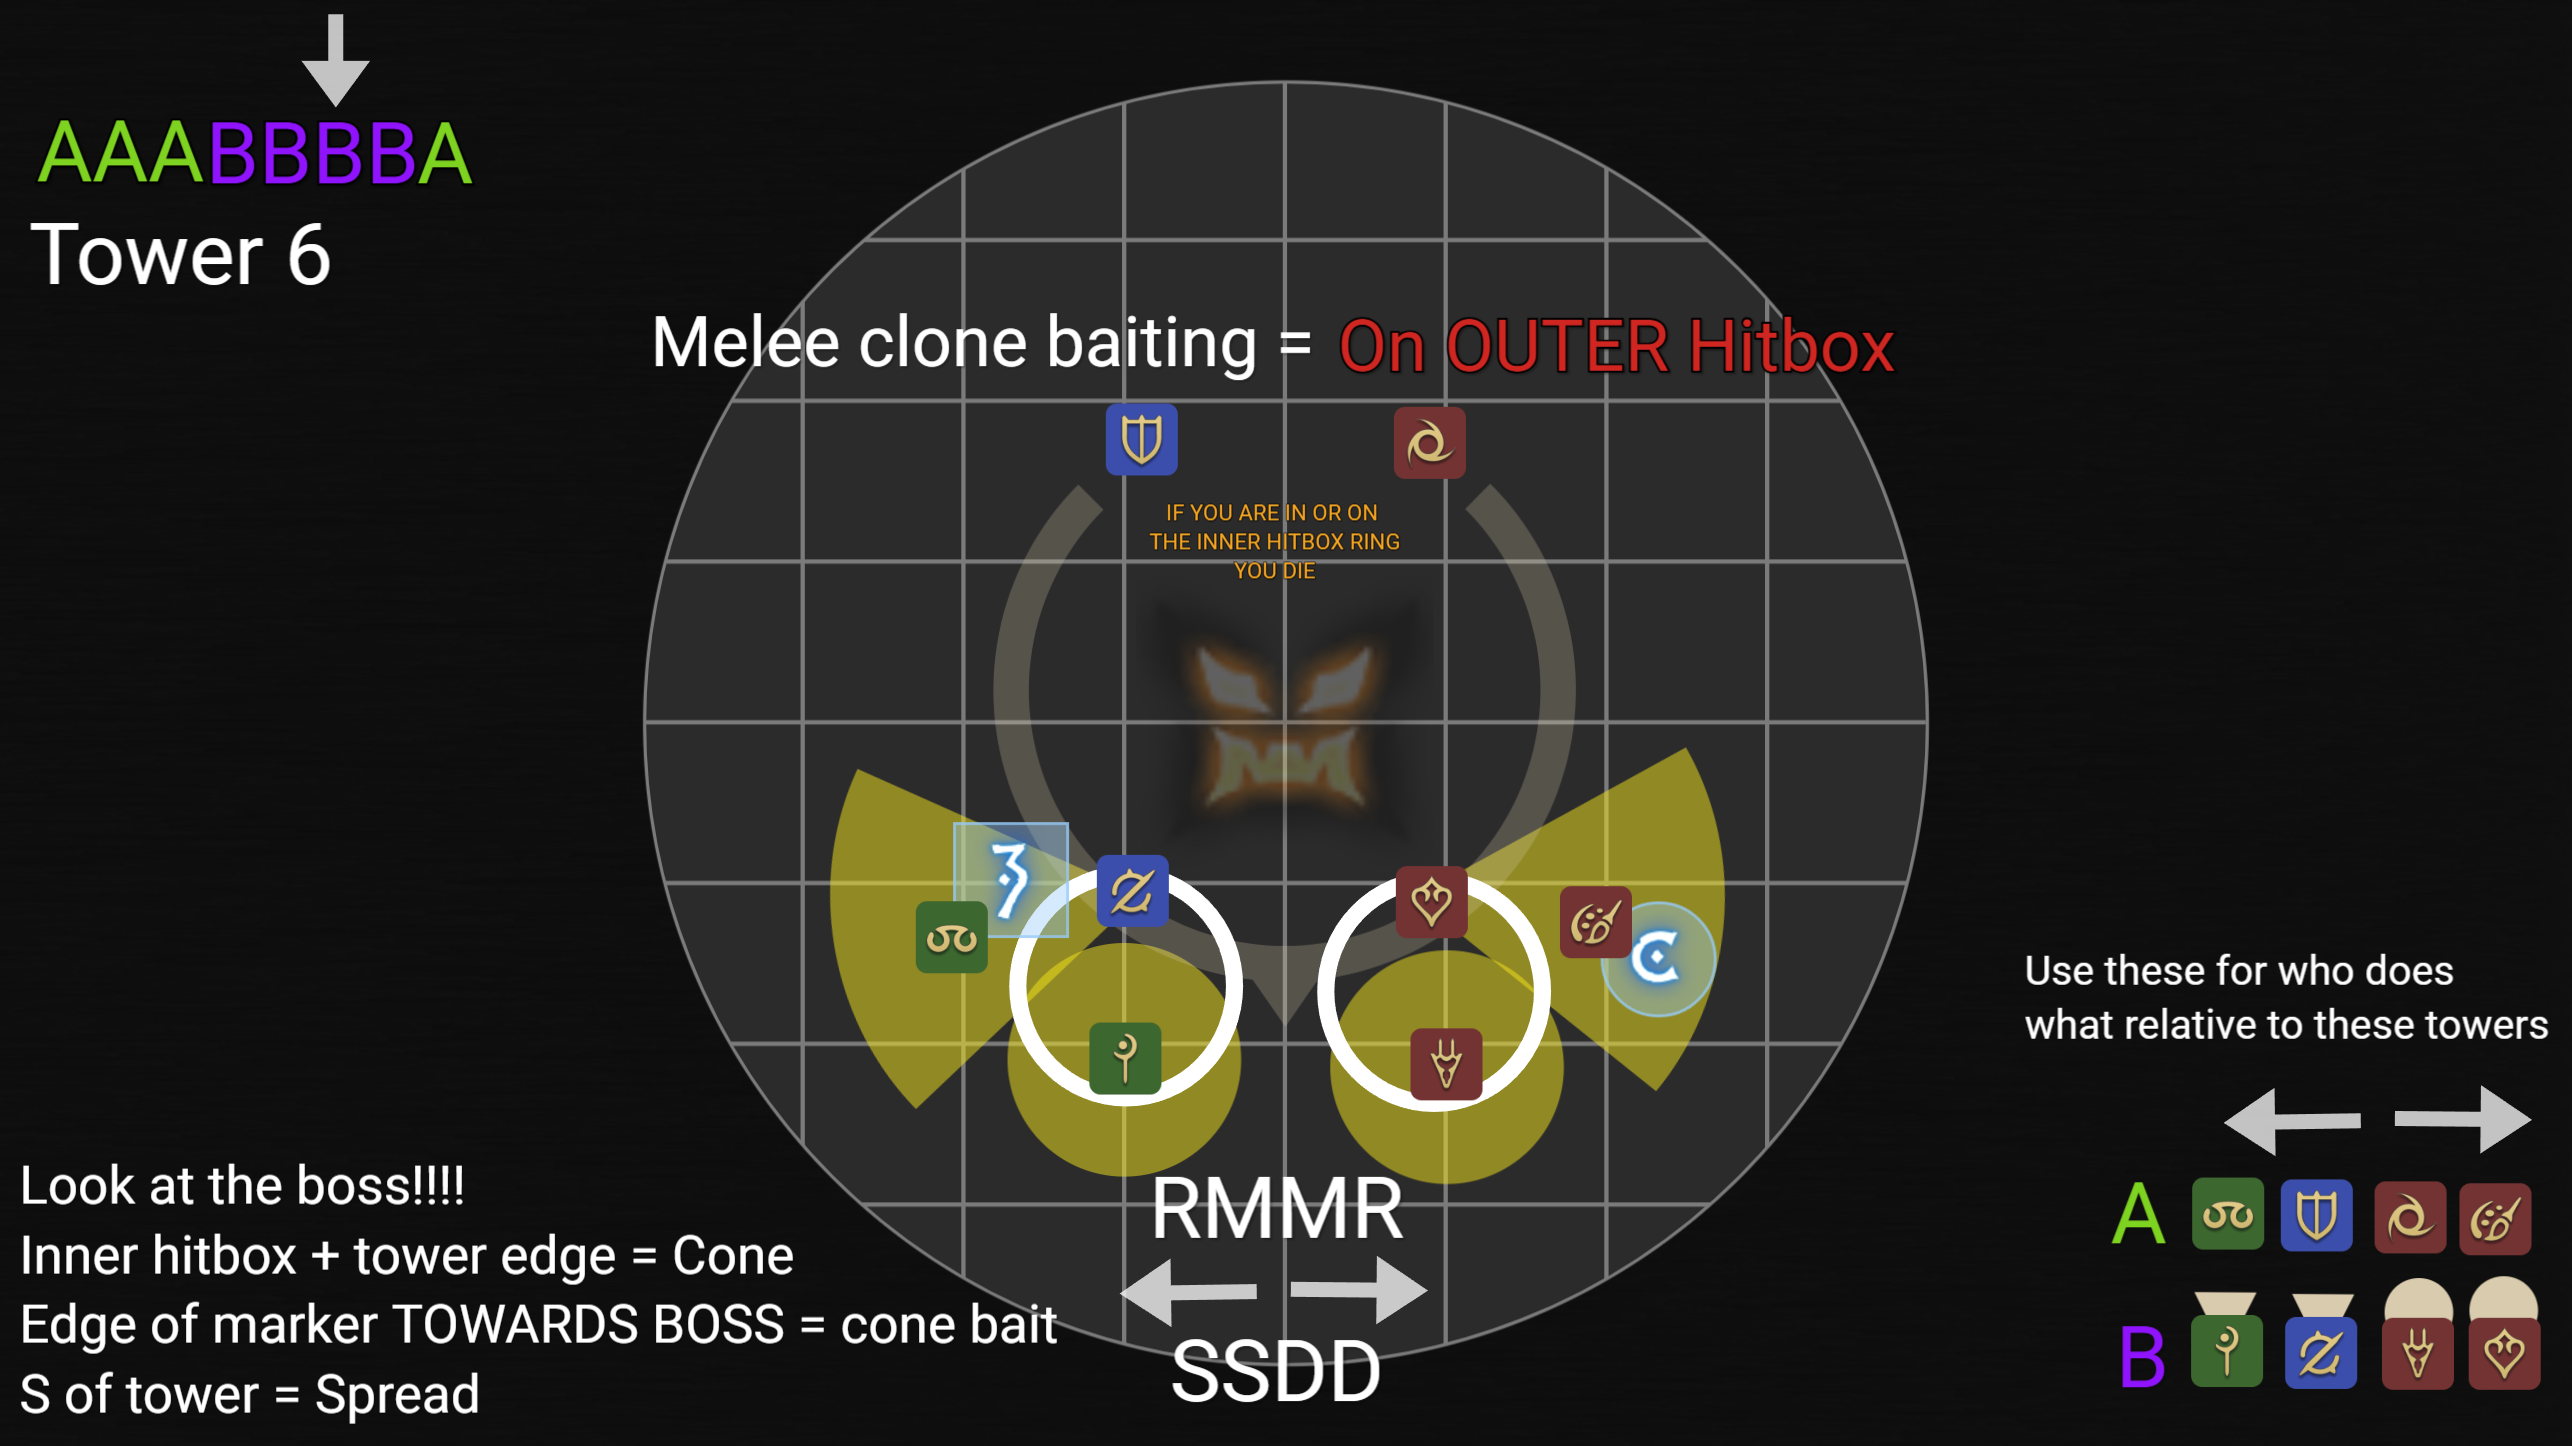
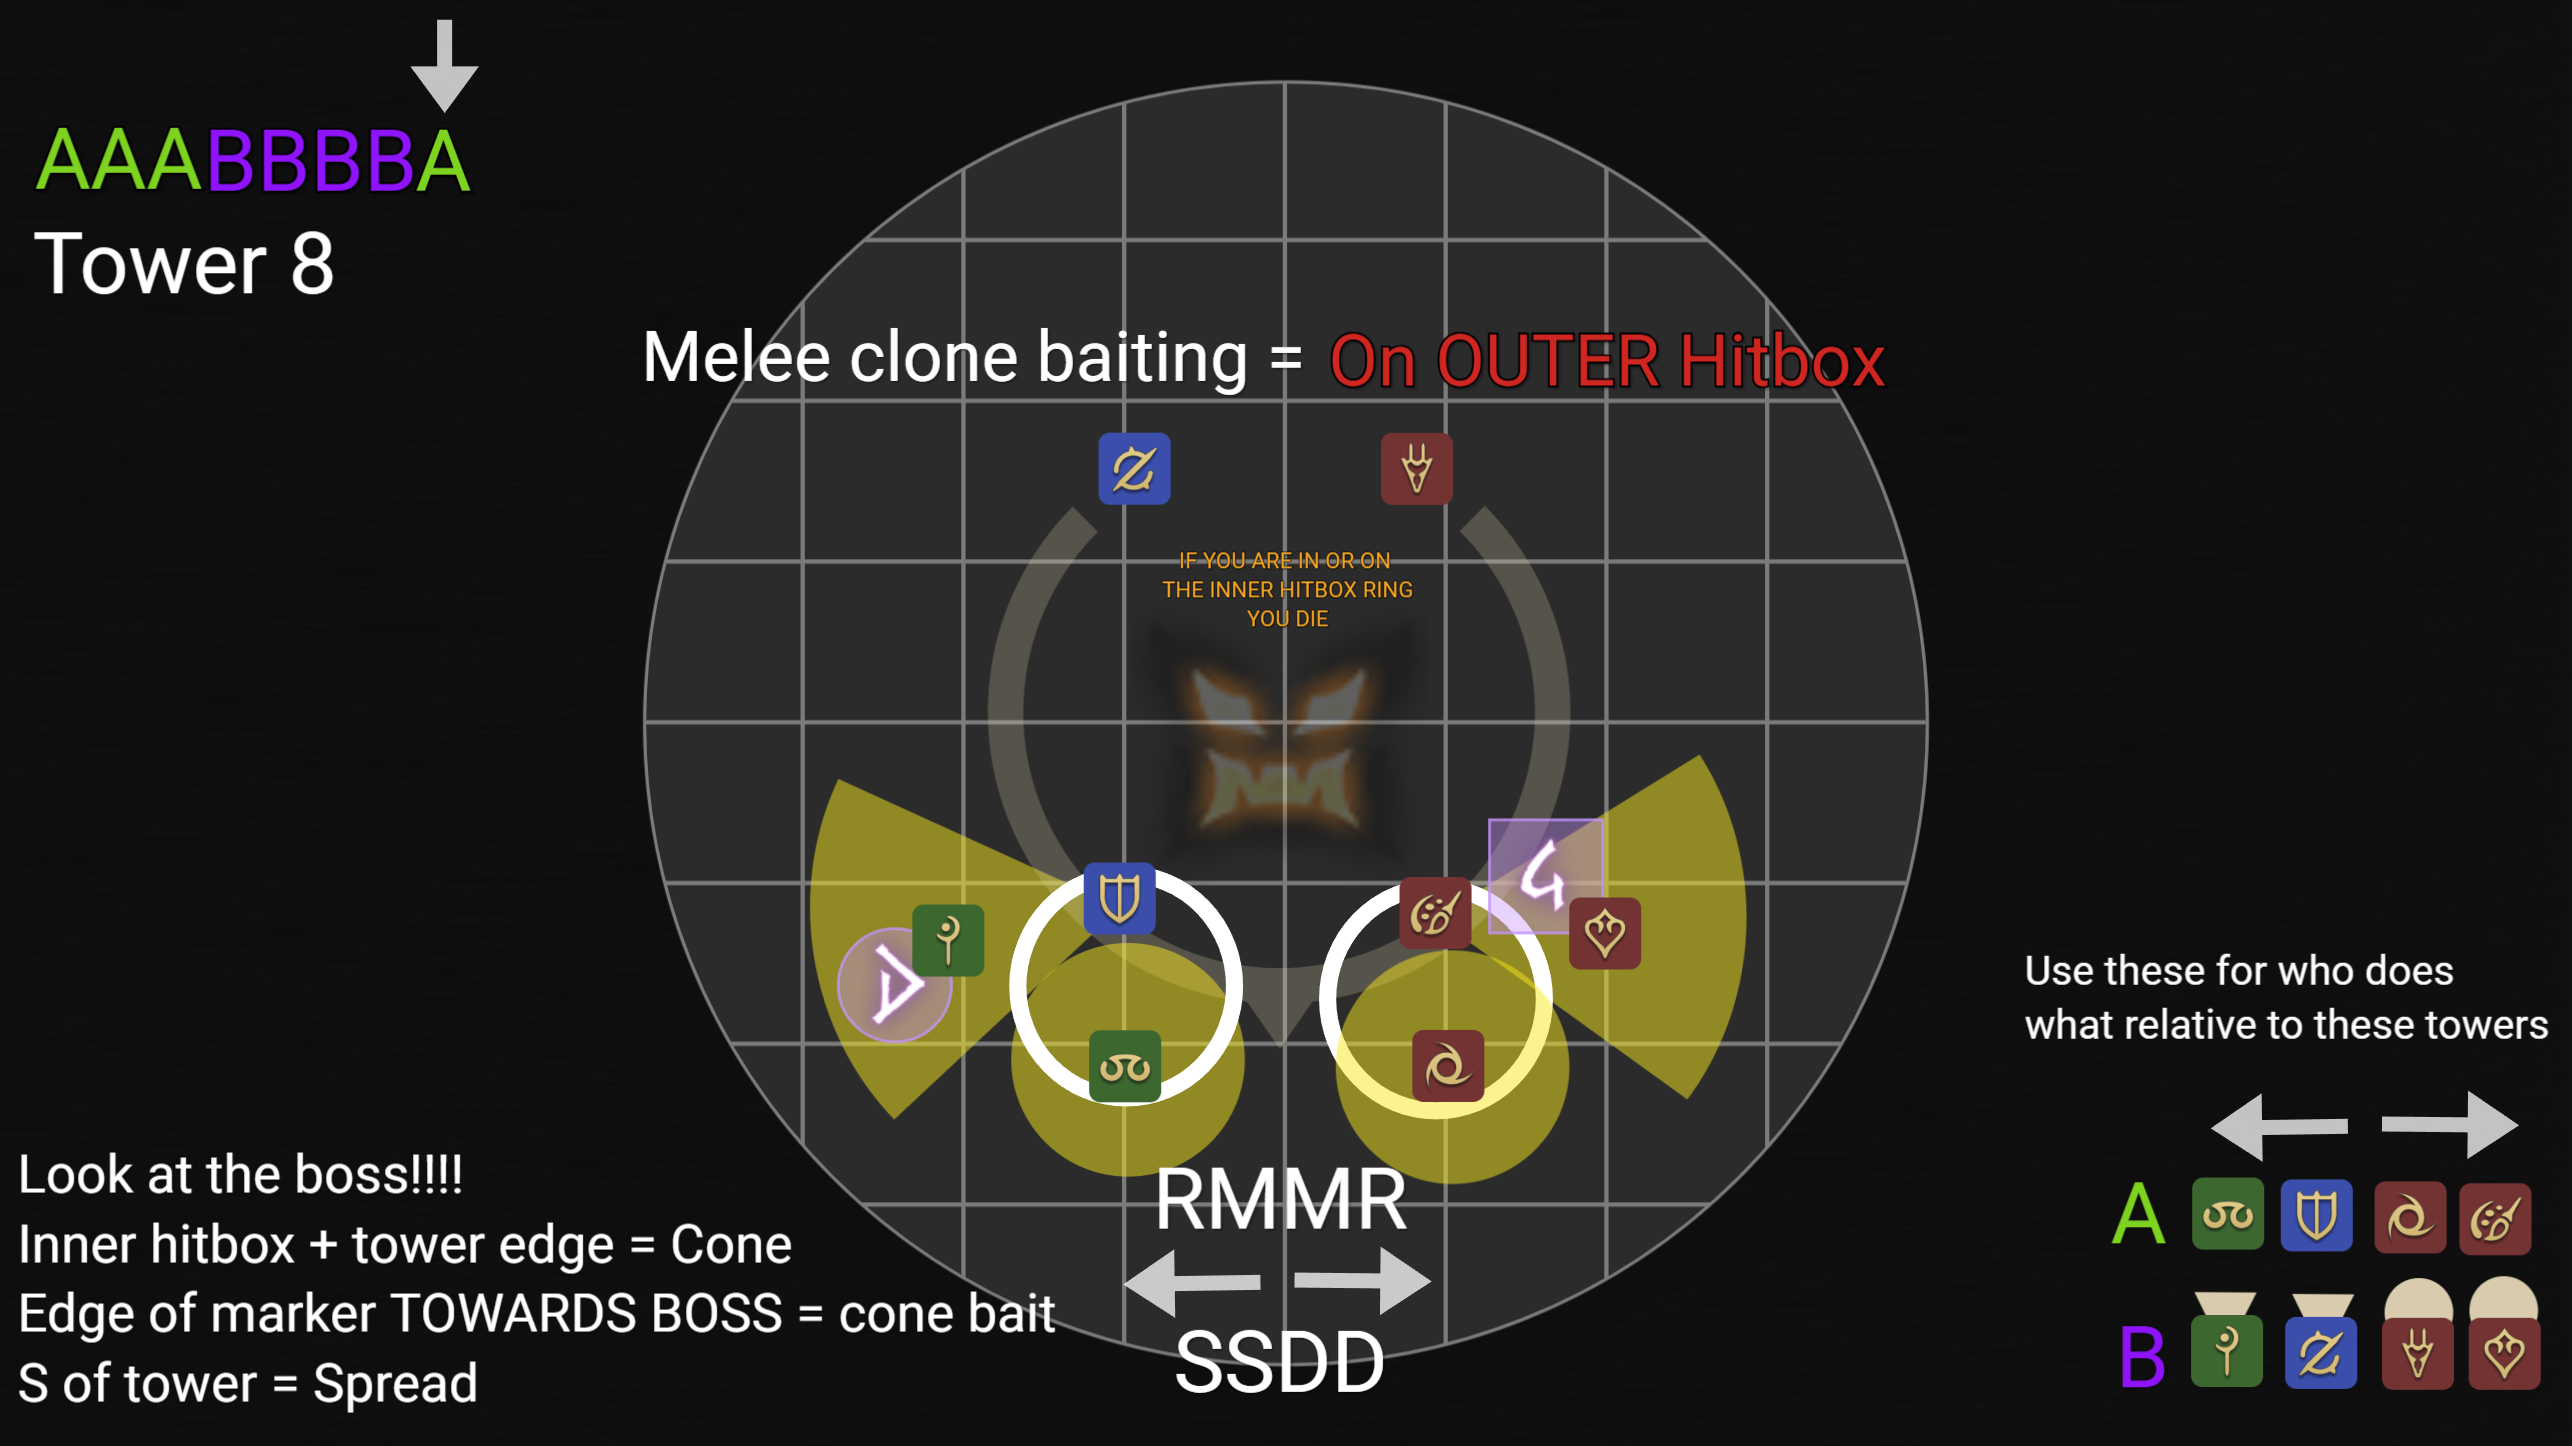
- Cone = inside, ON the INNER hitbox ring, at the TOWER EDGE. Get way up in there, where the tower crosses the inner ring.
- Cone Baiter = back corner of the number (#) waymarks, or on the cardinal (letter) marker edge toward the boss (depending on the tower — check the slide).
- Spread = "South" of the tower, moving slightly toward the other tower, opposite of the cone.
- Melee clone baiting = on the OUTER hitbox.
Look at the boss! Inner hitbox + tower edge = Cone. Edge of marker toward boss = cone bait. South of tower = Spread.
⚠️ If you are in or on the INNER hitbox ring, you die (unless you're the cone on the tower edge).
Cone-bait waymark spots — the baiter stands on the back corner of the number marks, or on the cardinal letter-mark edge toward the boss. Each even tower's exact spot:
Per-tower diagrams#
Tower 1 (odd) — DPS stackers in front, scoot left. Tank in front on edge; Healer in back, not on edge.
Tower 2 (even) — see the Even Towers diagram above.

Tower 3 (odd) — Bs are doing the same thing as towers 1–3 & 8.
Tower 4 (even) — B takes over the towers here.
Tower 5 (odd)
Tower 6 (even)
Tower 7 (odd) — As are doing the same thing as towers 4–7. Scooch a little right to dodge cone cleaves later.
Tower 8 (even) — last tower, then straight into Post-Tower 8.
4 — Post-Tower 8#
After the last set of towers, everyone goes to waymark A to bait the final Past/Future.
⚠️ Don't forget to dodge Future after the bait.
5 — Trines#
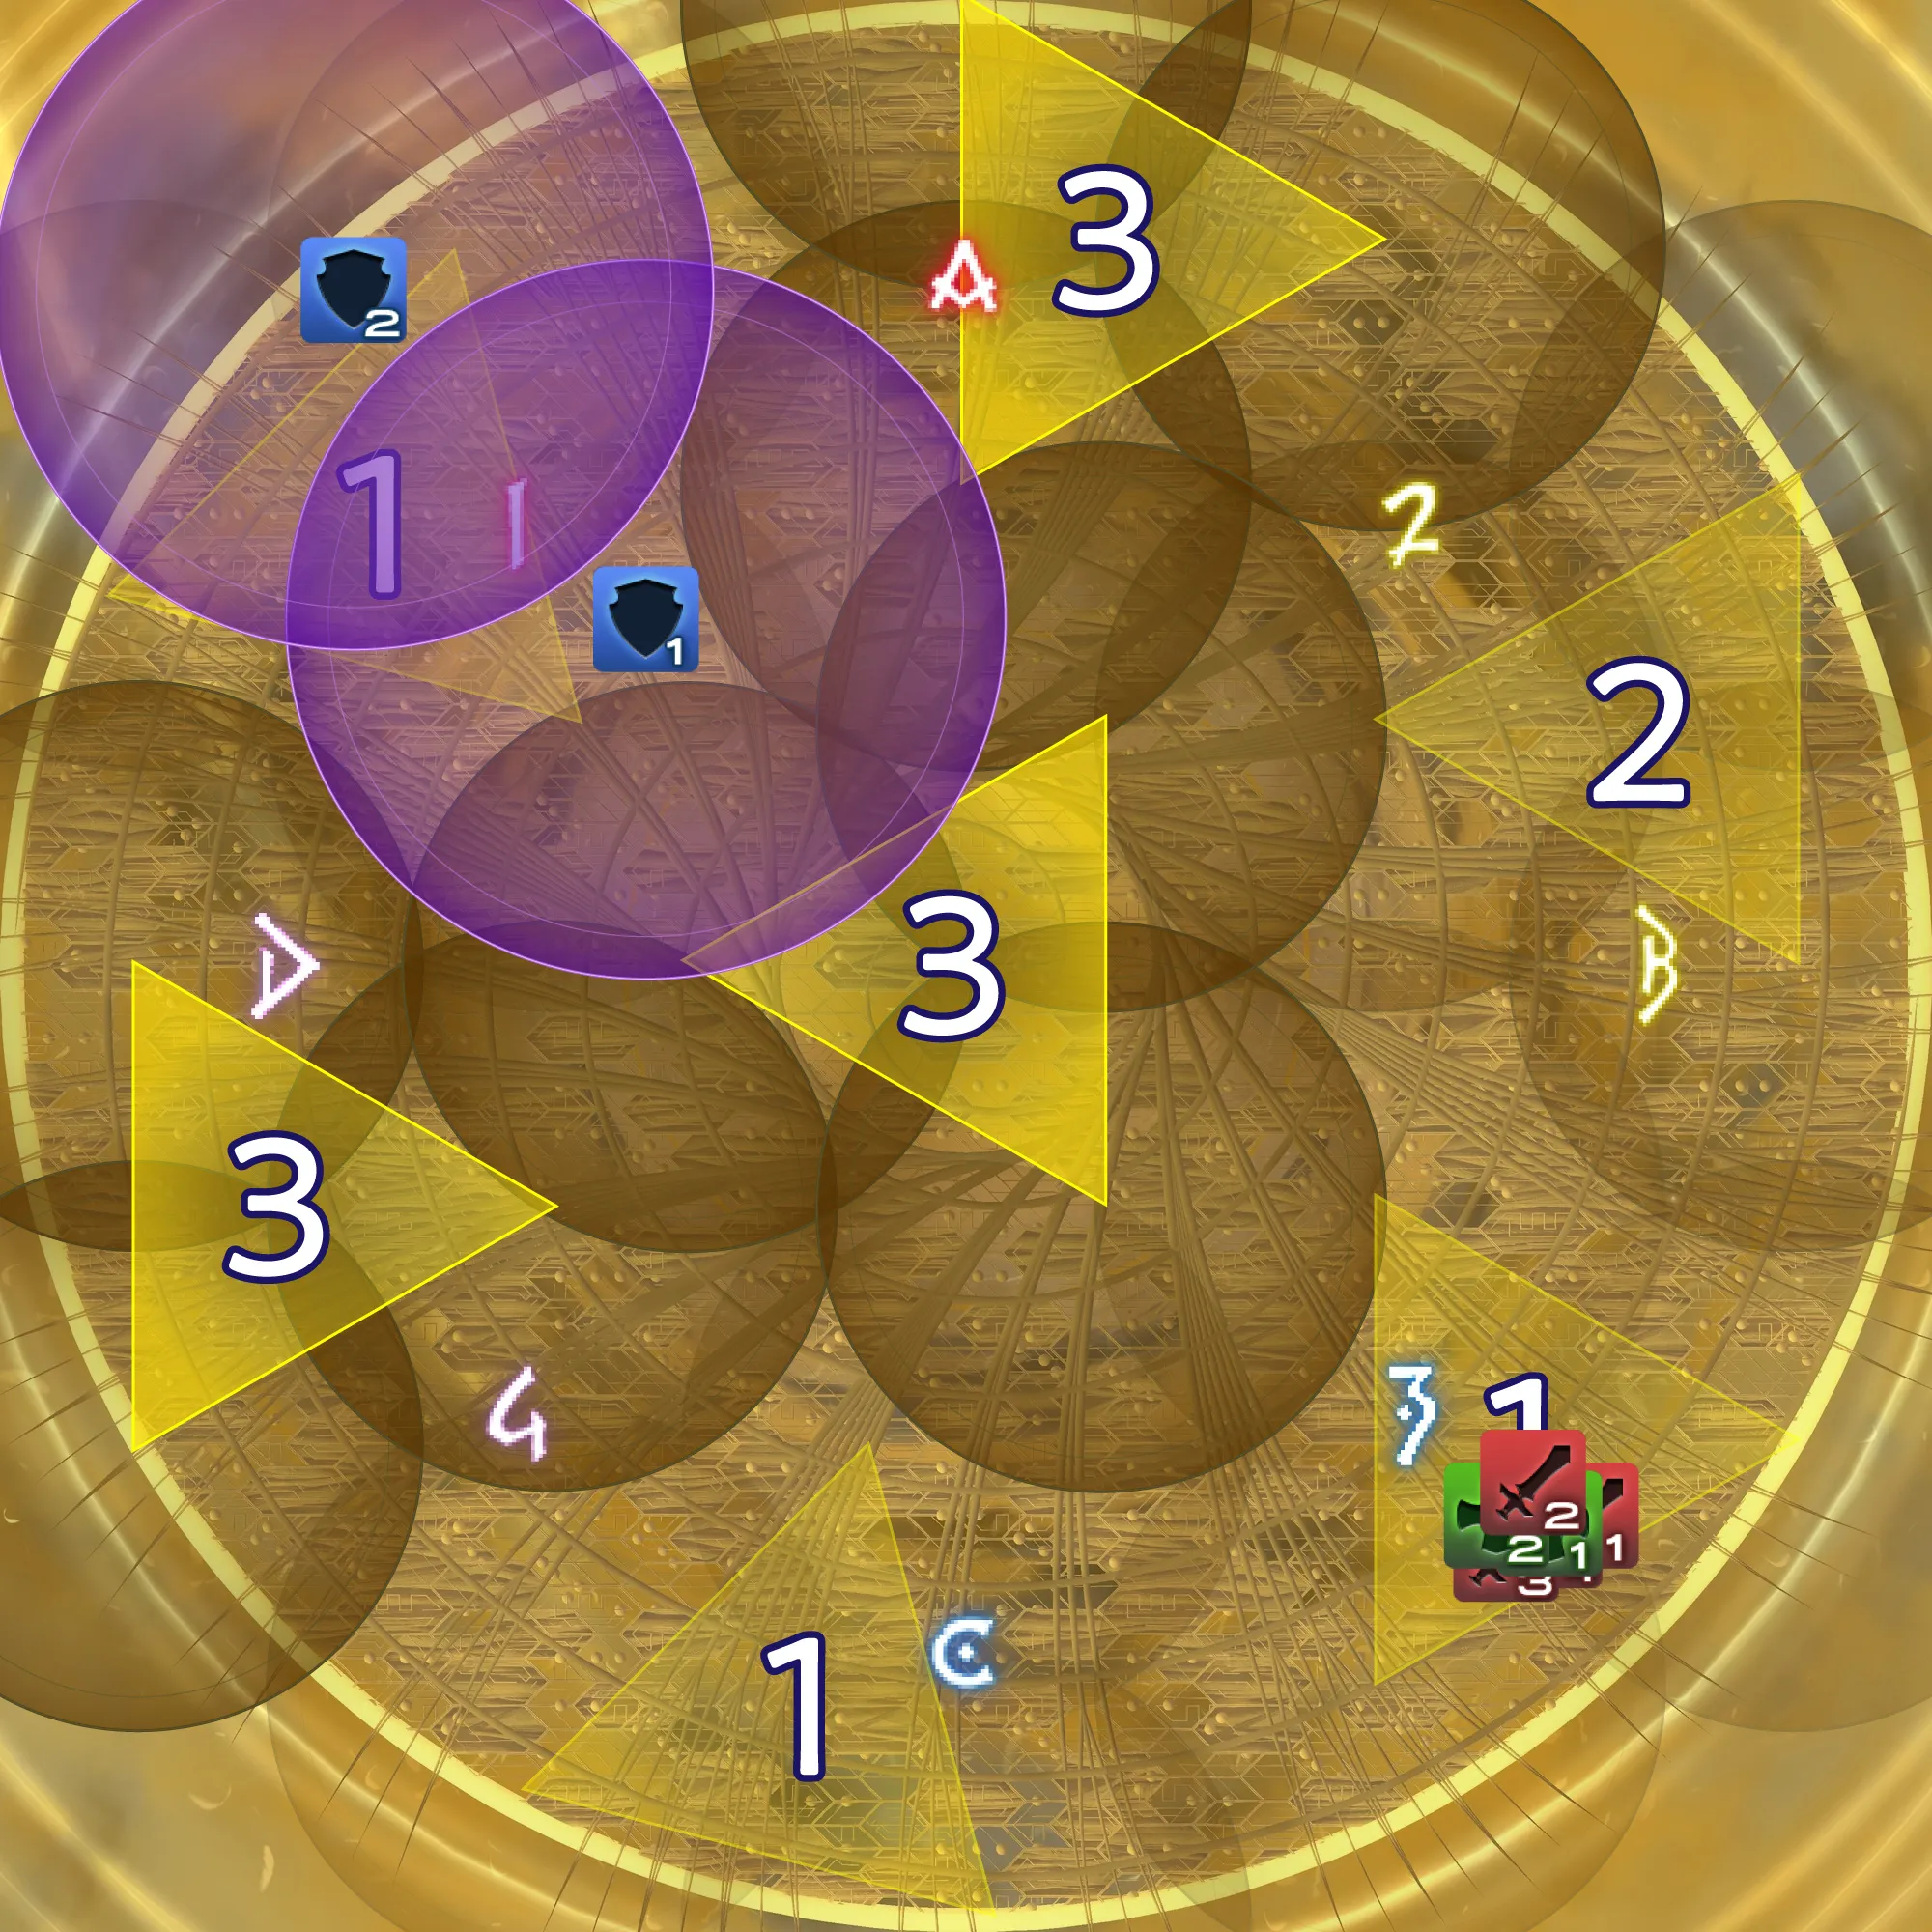
The final mechanic. Three waves of triangle AoEs (Trines) drop in sequence while Wings of Destruction layers a half-room AoE and a near/far hit on top.
The Trines#
- Trines fall in three waves — numbered 1 → 2 → 3 on the diagram.
- Stand in the triangle that fell on wave 1. Once it resolves, that wedge is safe — confirm which triangle dropped first before you commit.
- A half-room AoE (Wings of Destruction) sweeps in while you're repositioning — dodge it on the way to your safe wedge.
- The 3rd trine always lands dead center, so the middle is never your out.
Wings of Destruction — near & far#
Wings of Destruction also throws a strong hit on the nearest and the farthest player. Spread by radius so the right people eat it:
- MT — move in toward the boss (takes the near hit), watching the Trine range so you don't clip a triangle.
- ST — sit on the absolute outermost edge (takes the far hit).
- Healers / DPS — outer ring, but not quite on the outermost edge. Close enough to the wall to be safe, far enough in that you're neither nearest nor farthest.
Where to look for your safe wedge#
Find your safe triangle by side so the two groups don't collide:
- Tanks → the counterclockwise side of North (A) — look N first, then W.
- Healers + DPS → the clockwise side of North (A) — look S first, then E.
⚠️ Keeping tanks on the NW side and the party on the SE side stops the near/far hits — and the trines — from catching the wrong people.
Differs from PF? No — both Bubble Mew and PF run this same raidplan. The PF page is the same strat written for pick-up groups.
POVs: Cardinal — https://www.twitch.tv/videos/2791185431?t=0h37m57s · Intercardinal — https://www.twitch.tv/videos/2791185431?t=0h32m3s