 Bubble Mew
UMAD — Phase 3 (Party Finder)#
PF-standard resolution for this phase — the Tank LB3 variant — based on the community guide at yan-flash.com. For our team's version see the Bubble Mew strat. Role abbreviations (MT/ST/H1/H2/D1/D2/D3/D4) are explained in the fundamentals.
Boss Overview#
Phase 3 is the Chaos & Exdeath phase: Kefka summons both bosses and the party splits to handle them in tandem. The core of the PF strat is a set of elemental crystal debuffs (flame / water / wind) resolved from fixed positions, capped by a Vacuum Wave knockback that the party survives with Tank LB3.
Mechanic Timeline#
| Mechanic | Notes |
|---|---|
| Adds Summon | Kefka summons Exdeath and Chaos — split by boss proximity |
| Bawl of Agony | Crystal debuffs: Chaos Flame / Water / Wind (2 TH + 2 DPS) |
| Crystal Resolution | Flame & water holders flank their crystals; fixed TLB3 spots |
| Vacuum Wave | Knockback — Tank LB3 at ~70% cast to survive |
| Earthquake (Black Holes) | Decisive Battle → 1-HP Primordial Crust, laser tethers, hand attacks → White Hole |
Adds Summon + Party Split#
Kefka summons Exdeath and Chaos. The party splits by boss proximity and holds this split through the crystal phase:
| Chaos side | Exdeath side |
|---|---|
| MT · H1 · D1 · D2 | ST · H2 · D3 · D4 |
Bawl of Agony — Crystal Debuffs#
Three crystals spawn with wind flanked by fire and water — fire and water are always diagonal to each other (the wind crystal's diagonal stays empty), pointing toward the waymark numbers (1–4). Debuffs apply always to 2 tank/healers and 2 DPS (random):
| Debuff | Count | On expiry | Cleanse |
|---|---|---|---|
| Chaos Flame | 2 | Self-centered AoE | Take the water crystal's burst |
| Chaos Water | 2 | Donut | Take the fire crystal's burst |
| Chaos Wind | remainder | — | Cleared on the final Vacuum Wave |
Flame and water holders clear each other's Chaos Wind: when a flame debuff expires the fire crystal fires a donut onto the 2 nearest (the water holders), and a water expiry makes the water crystal fire an AoE onto the 2 nearest (the flame holders) — mind your facing. Chaos Wind comes in front-facing and back-facing variants (resolved on the Vacuum Wave, below).
Crystal Resolution (Tank LB3 fixed spots)#
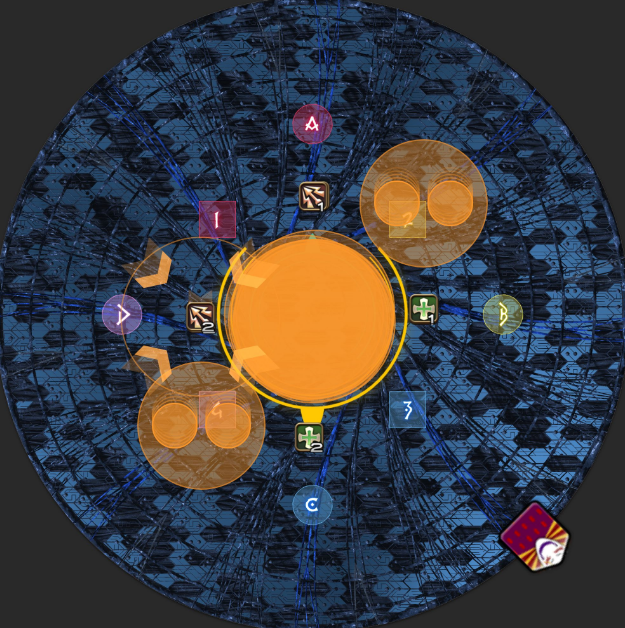
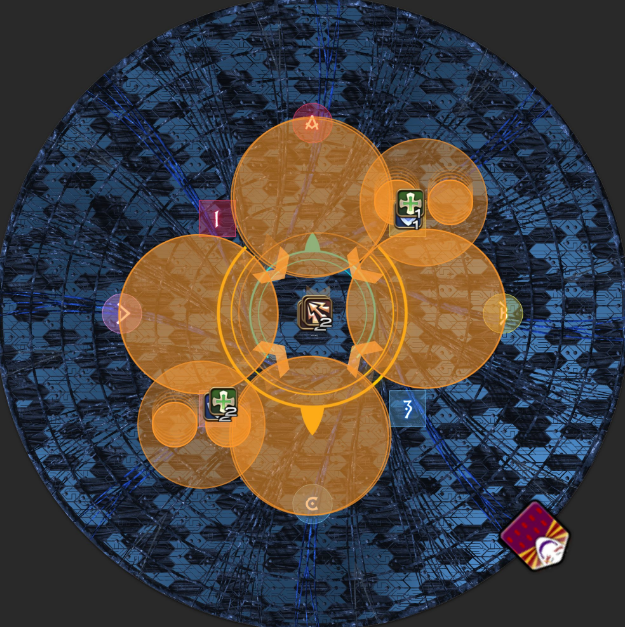
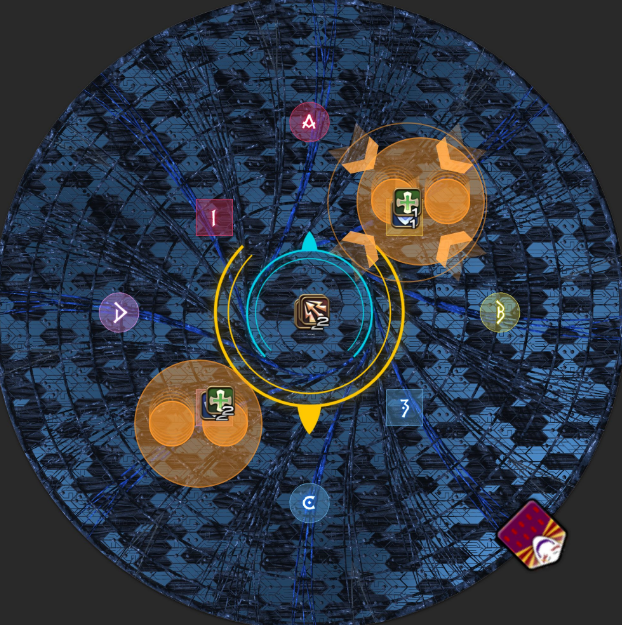
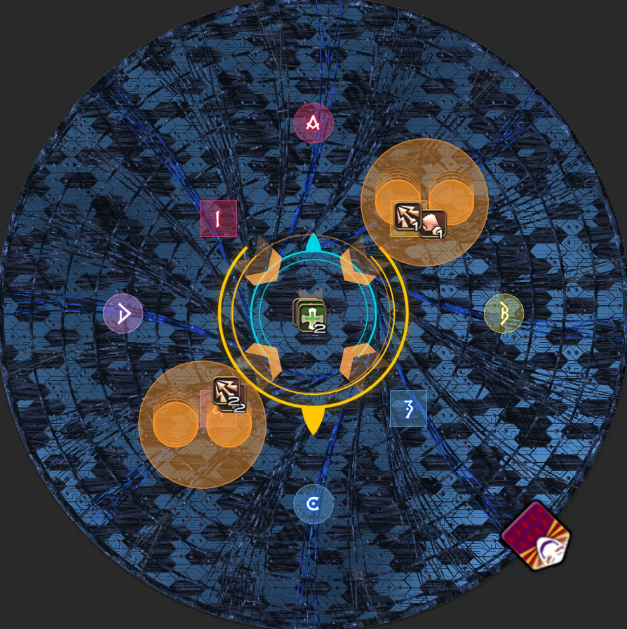
The TLB3 method skips reading debuff durations: everyone stands at fixed positions keyed to the wind & water crystals and resolves in sequence. The diagrams below assume a Chaos Flame start — if flame and water are swapped, mirror the setup.
1. Flame crystal 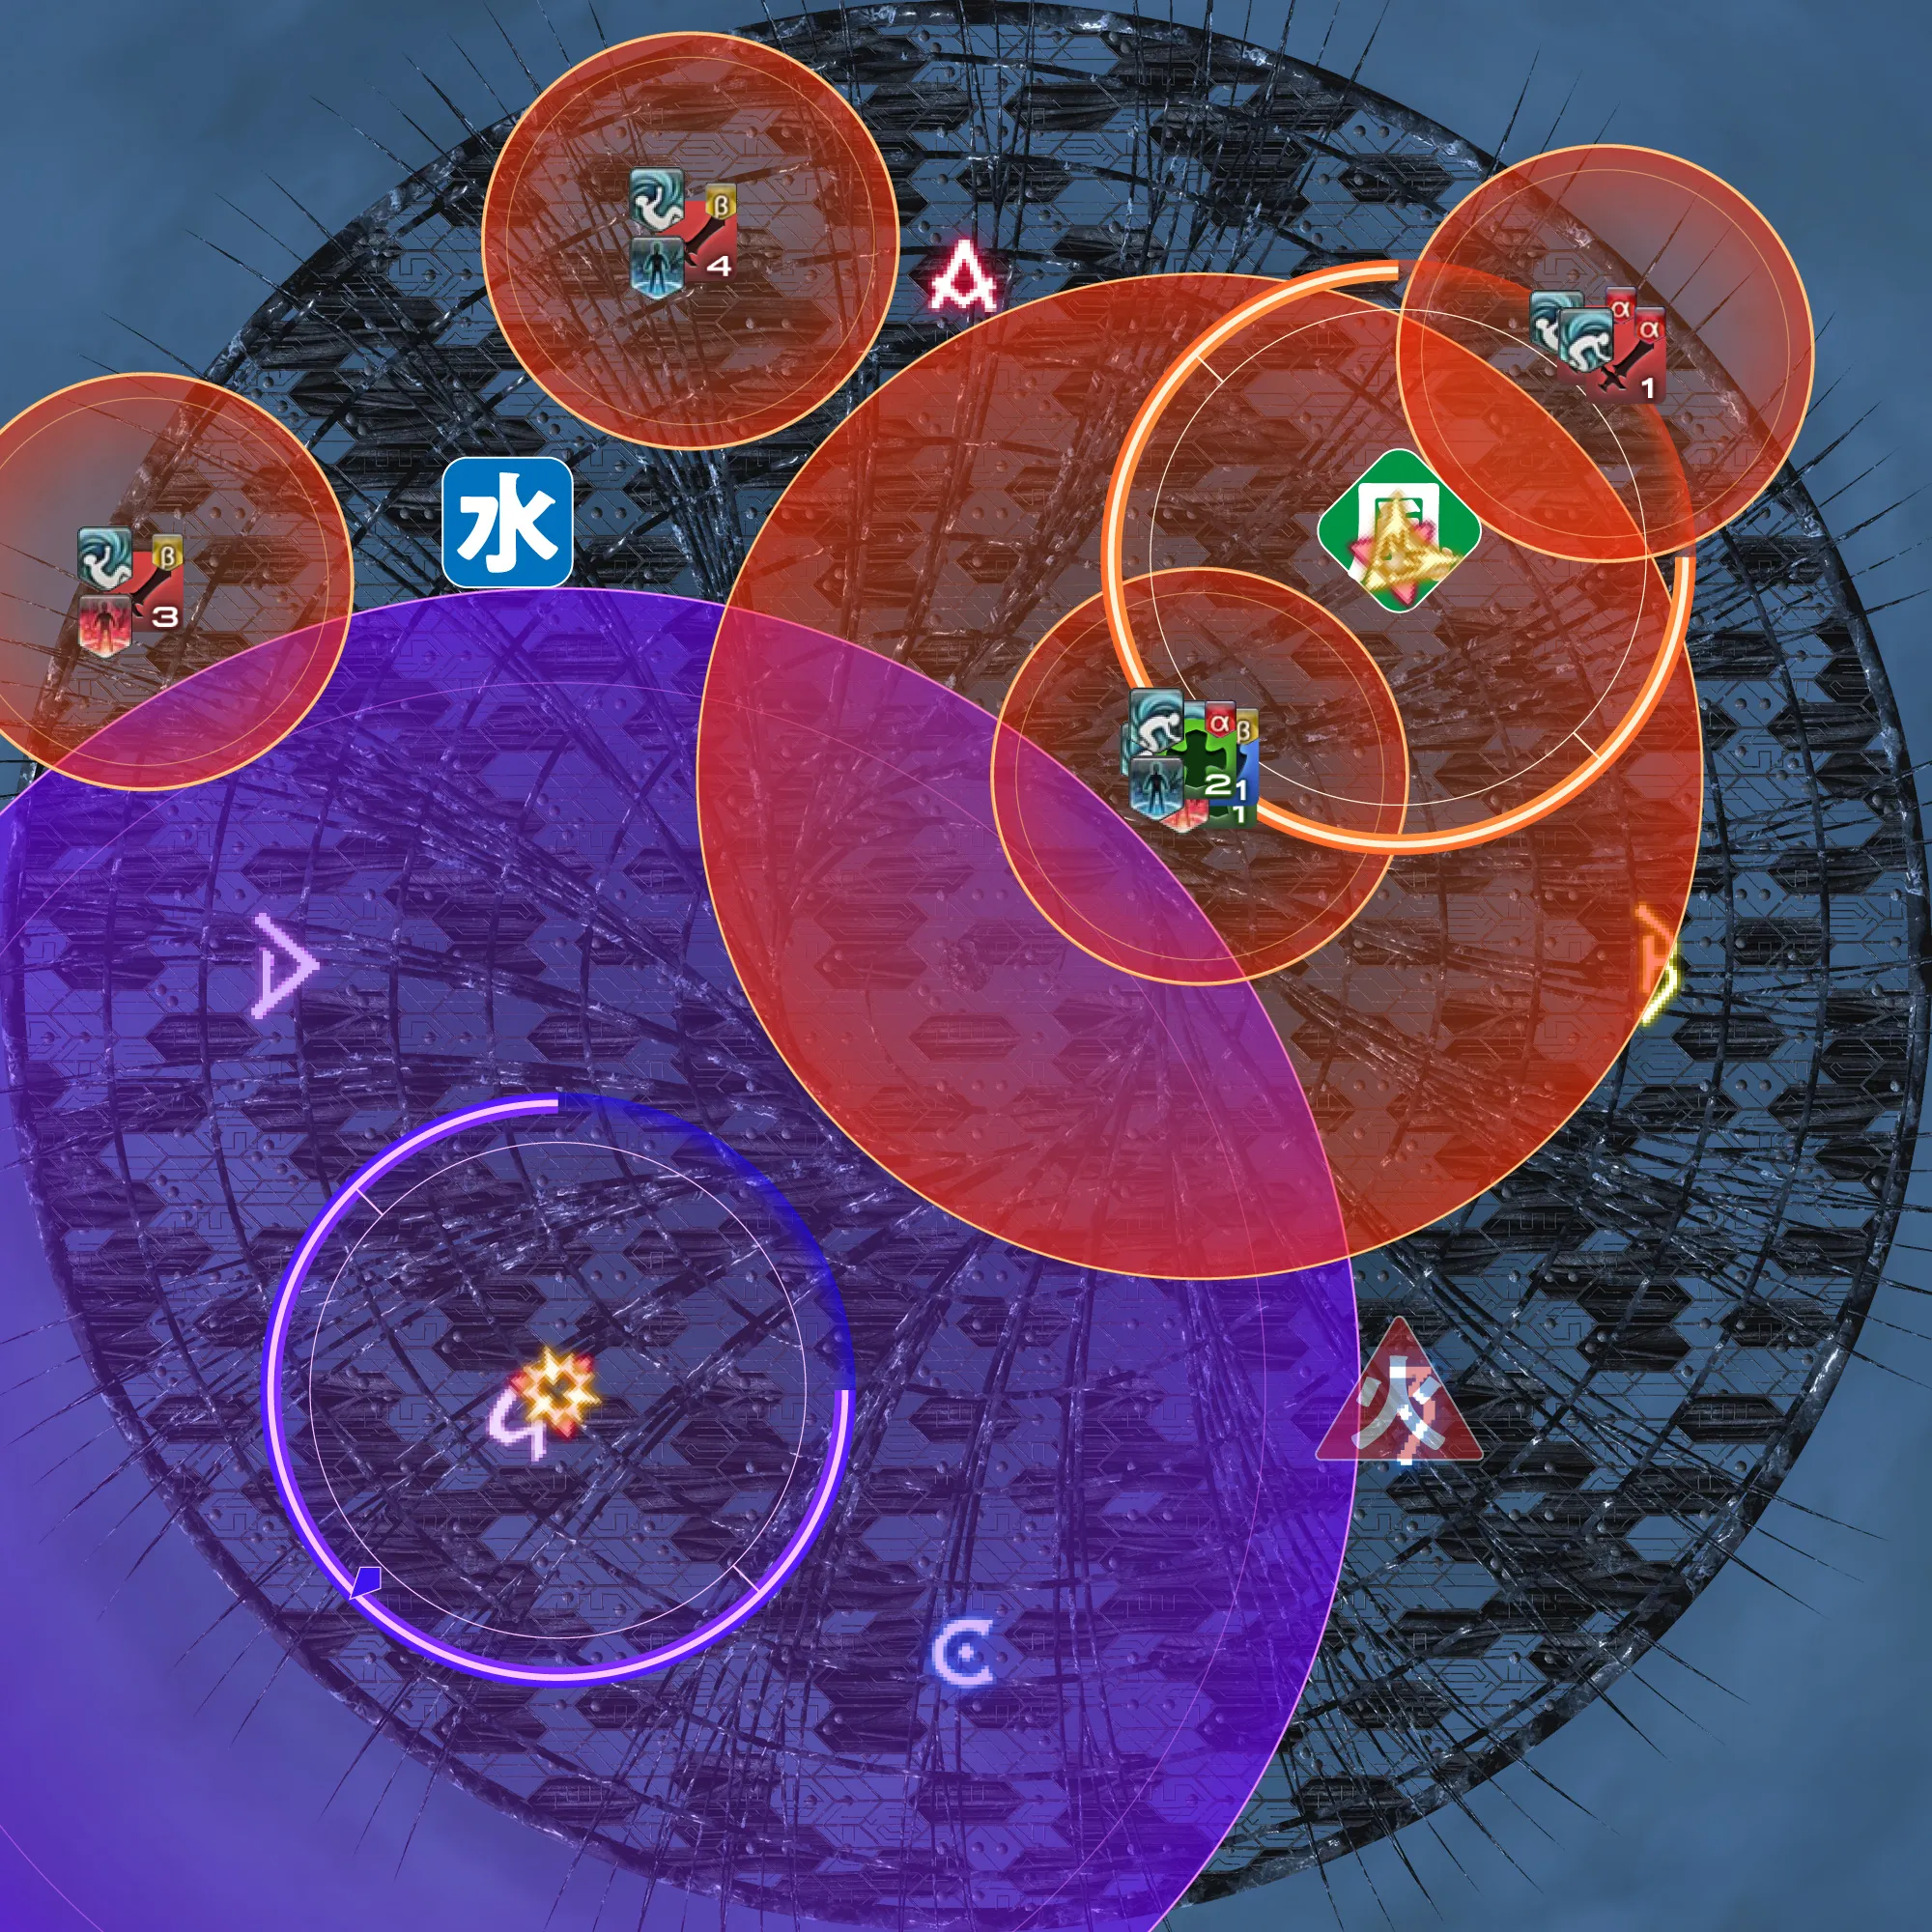 | 2. Chaos at 45° 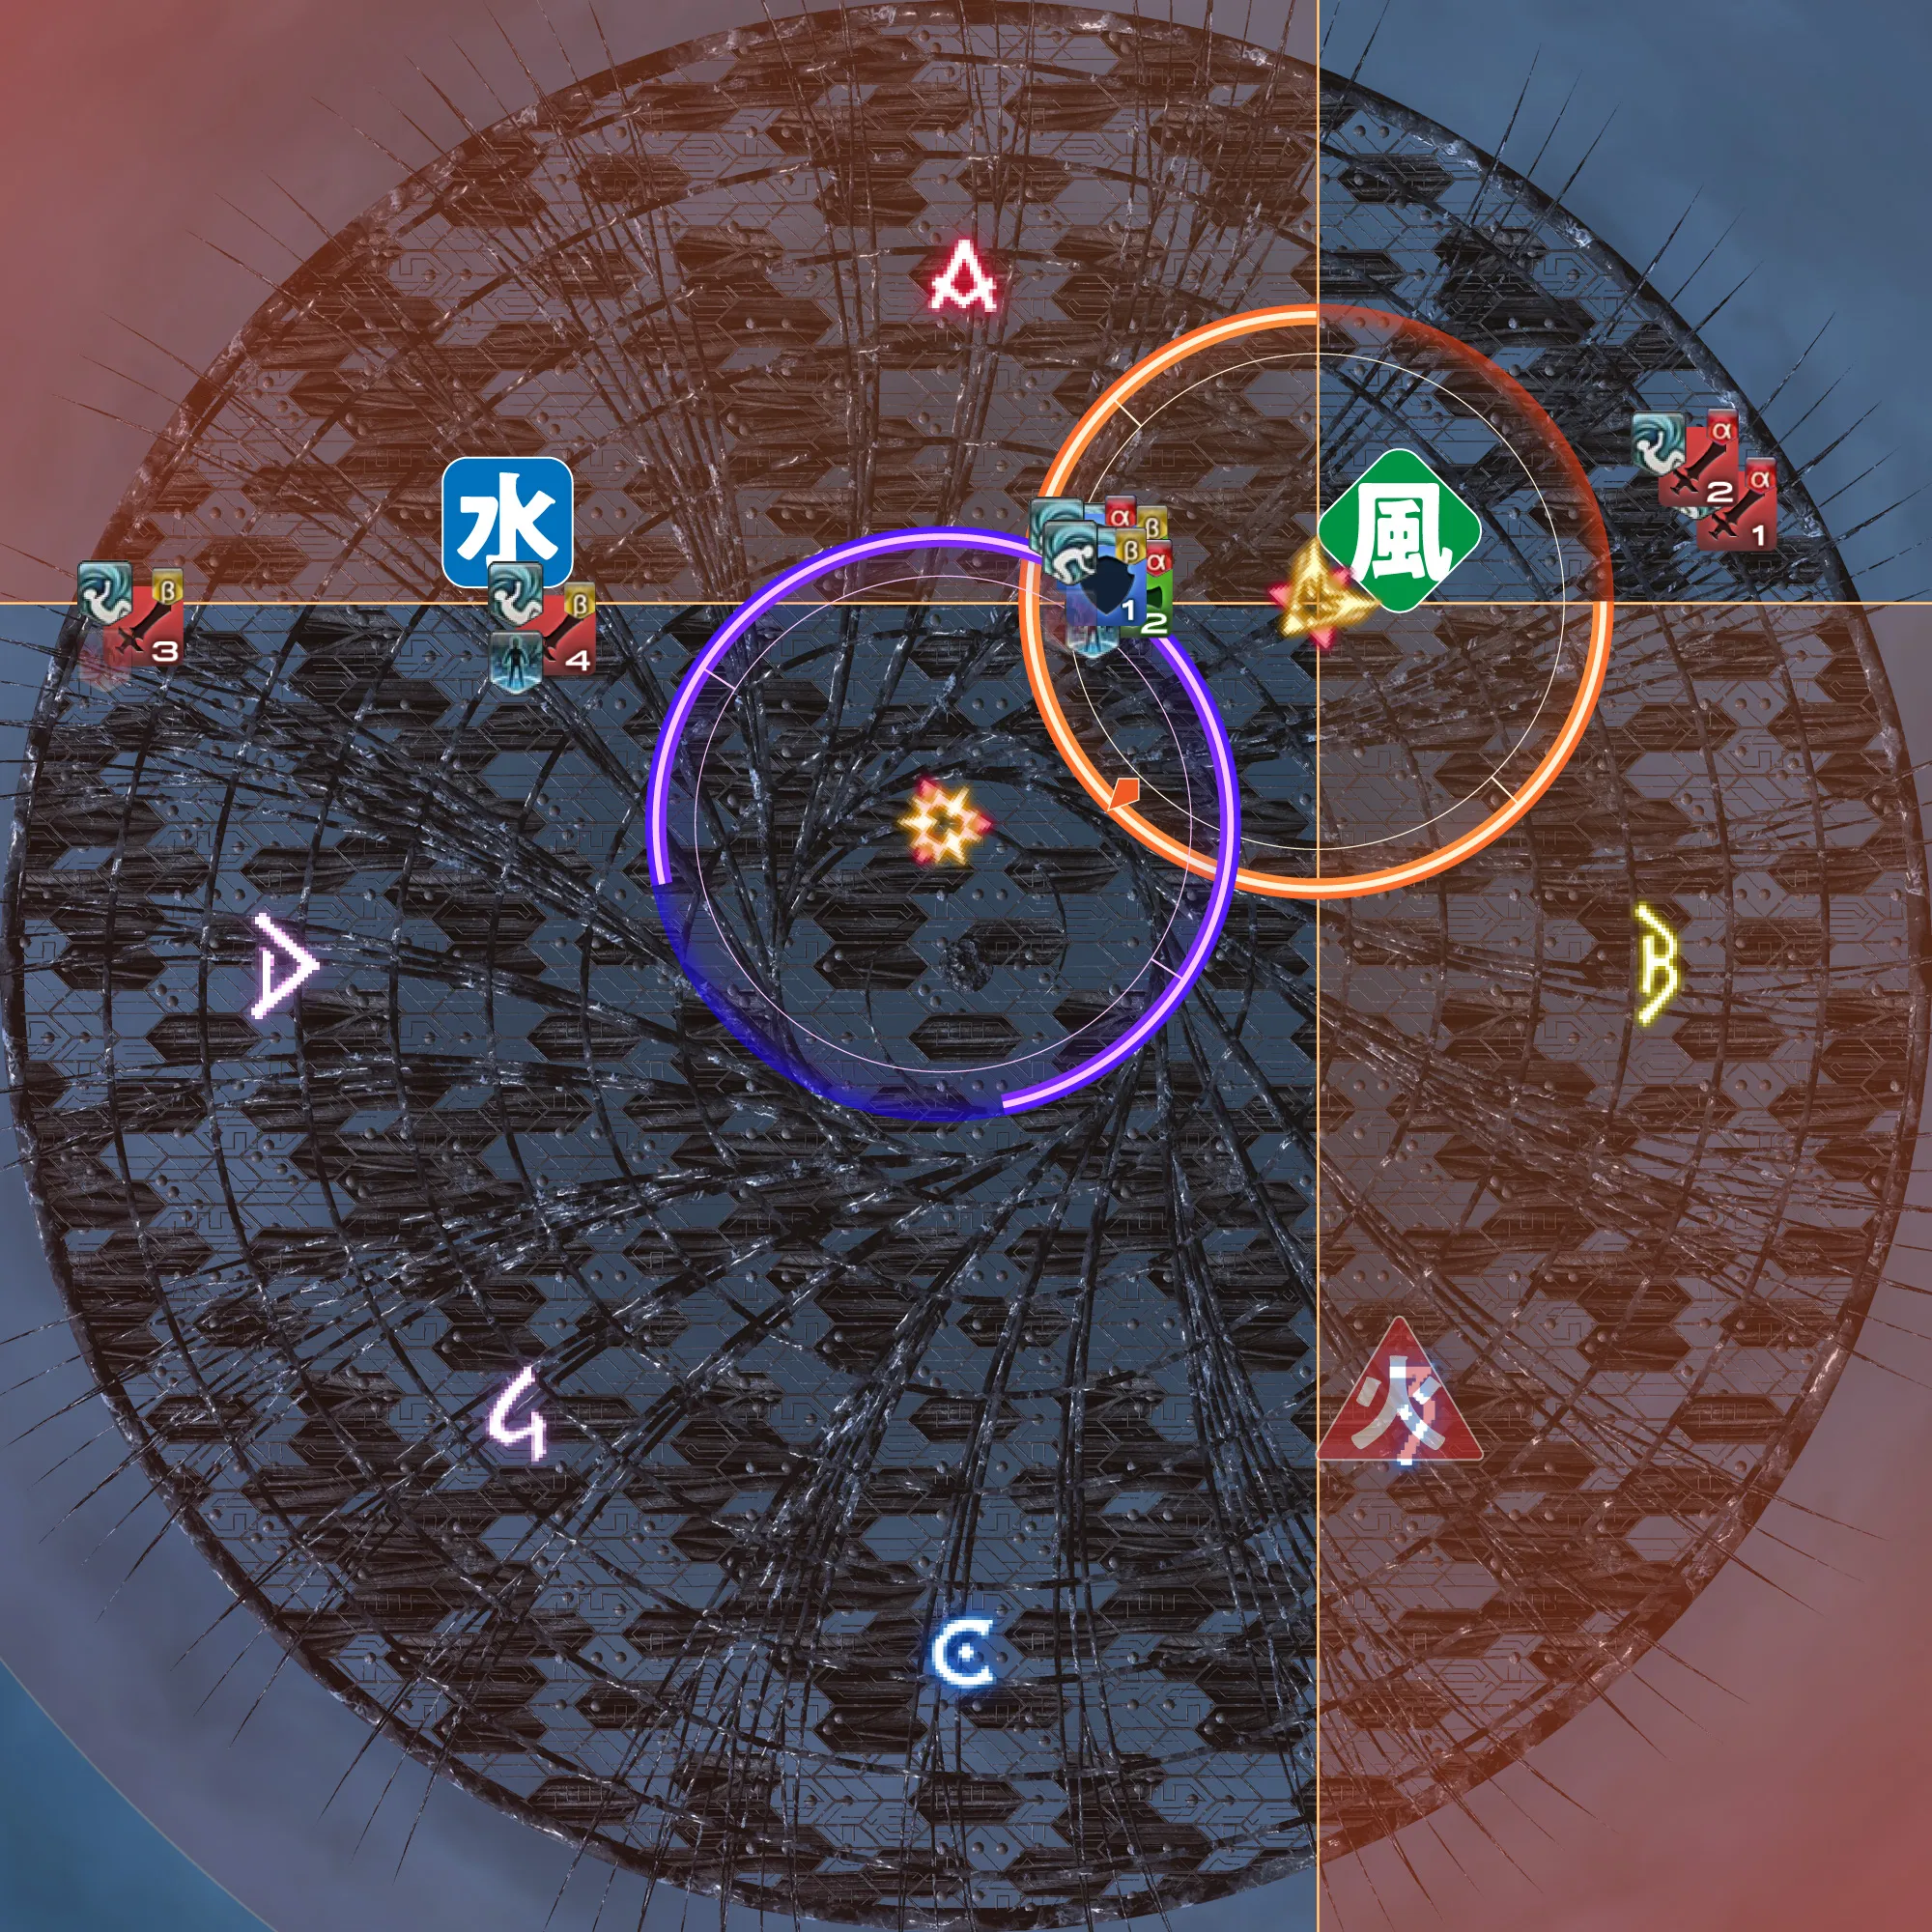 |
3. Water crystal 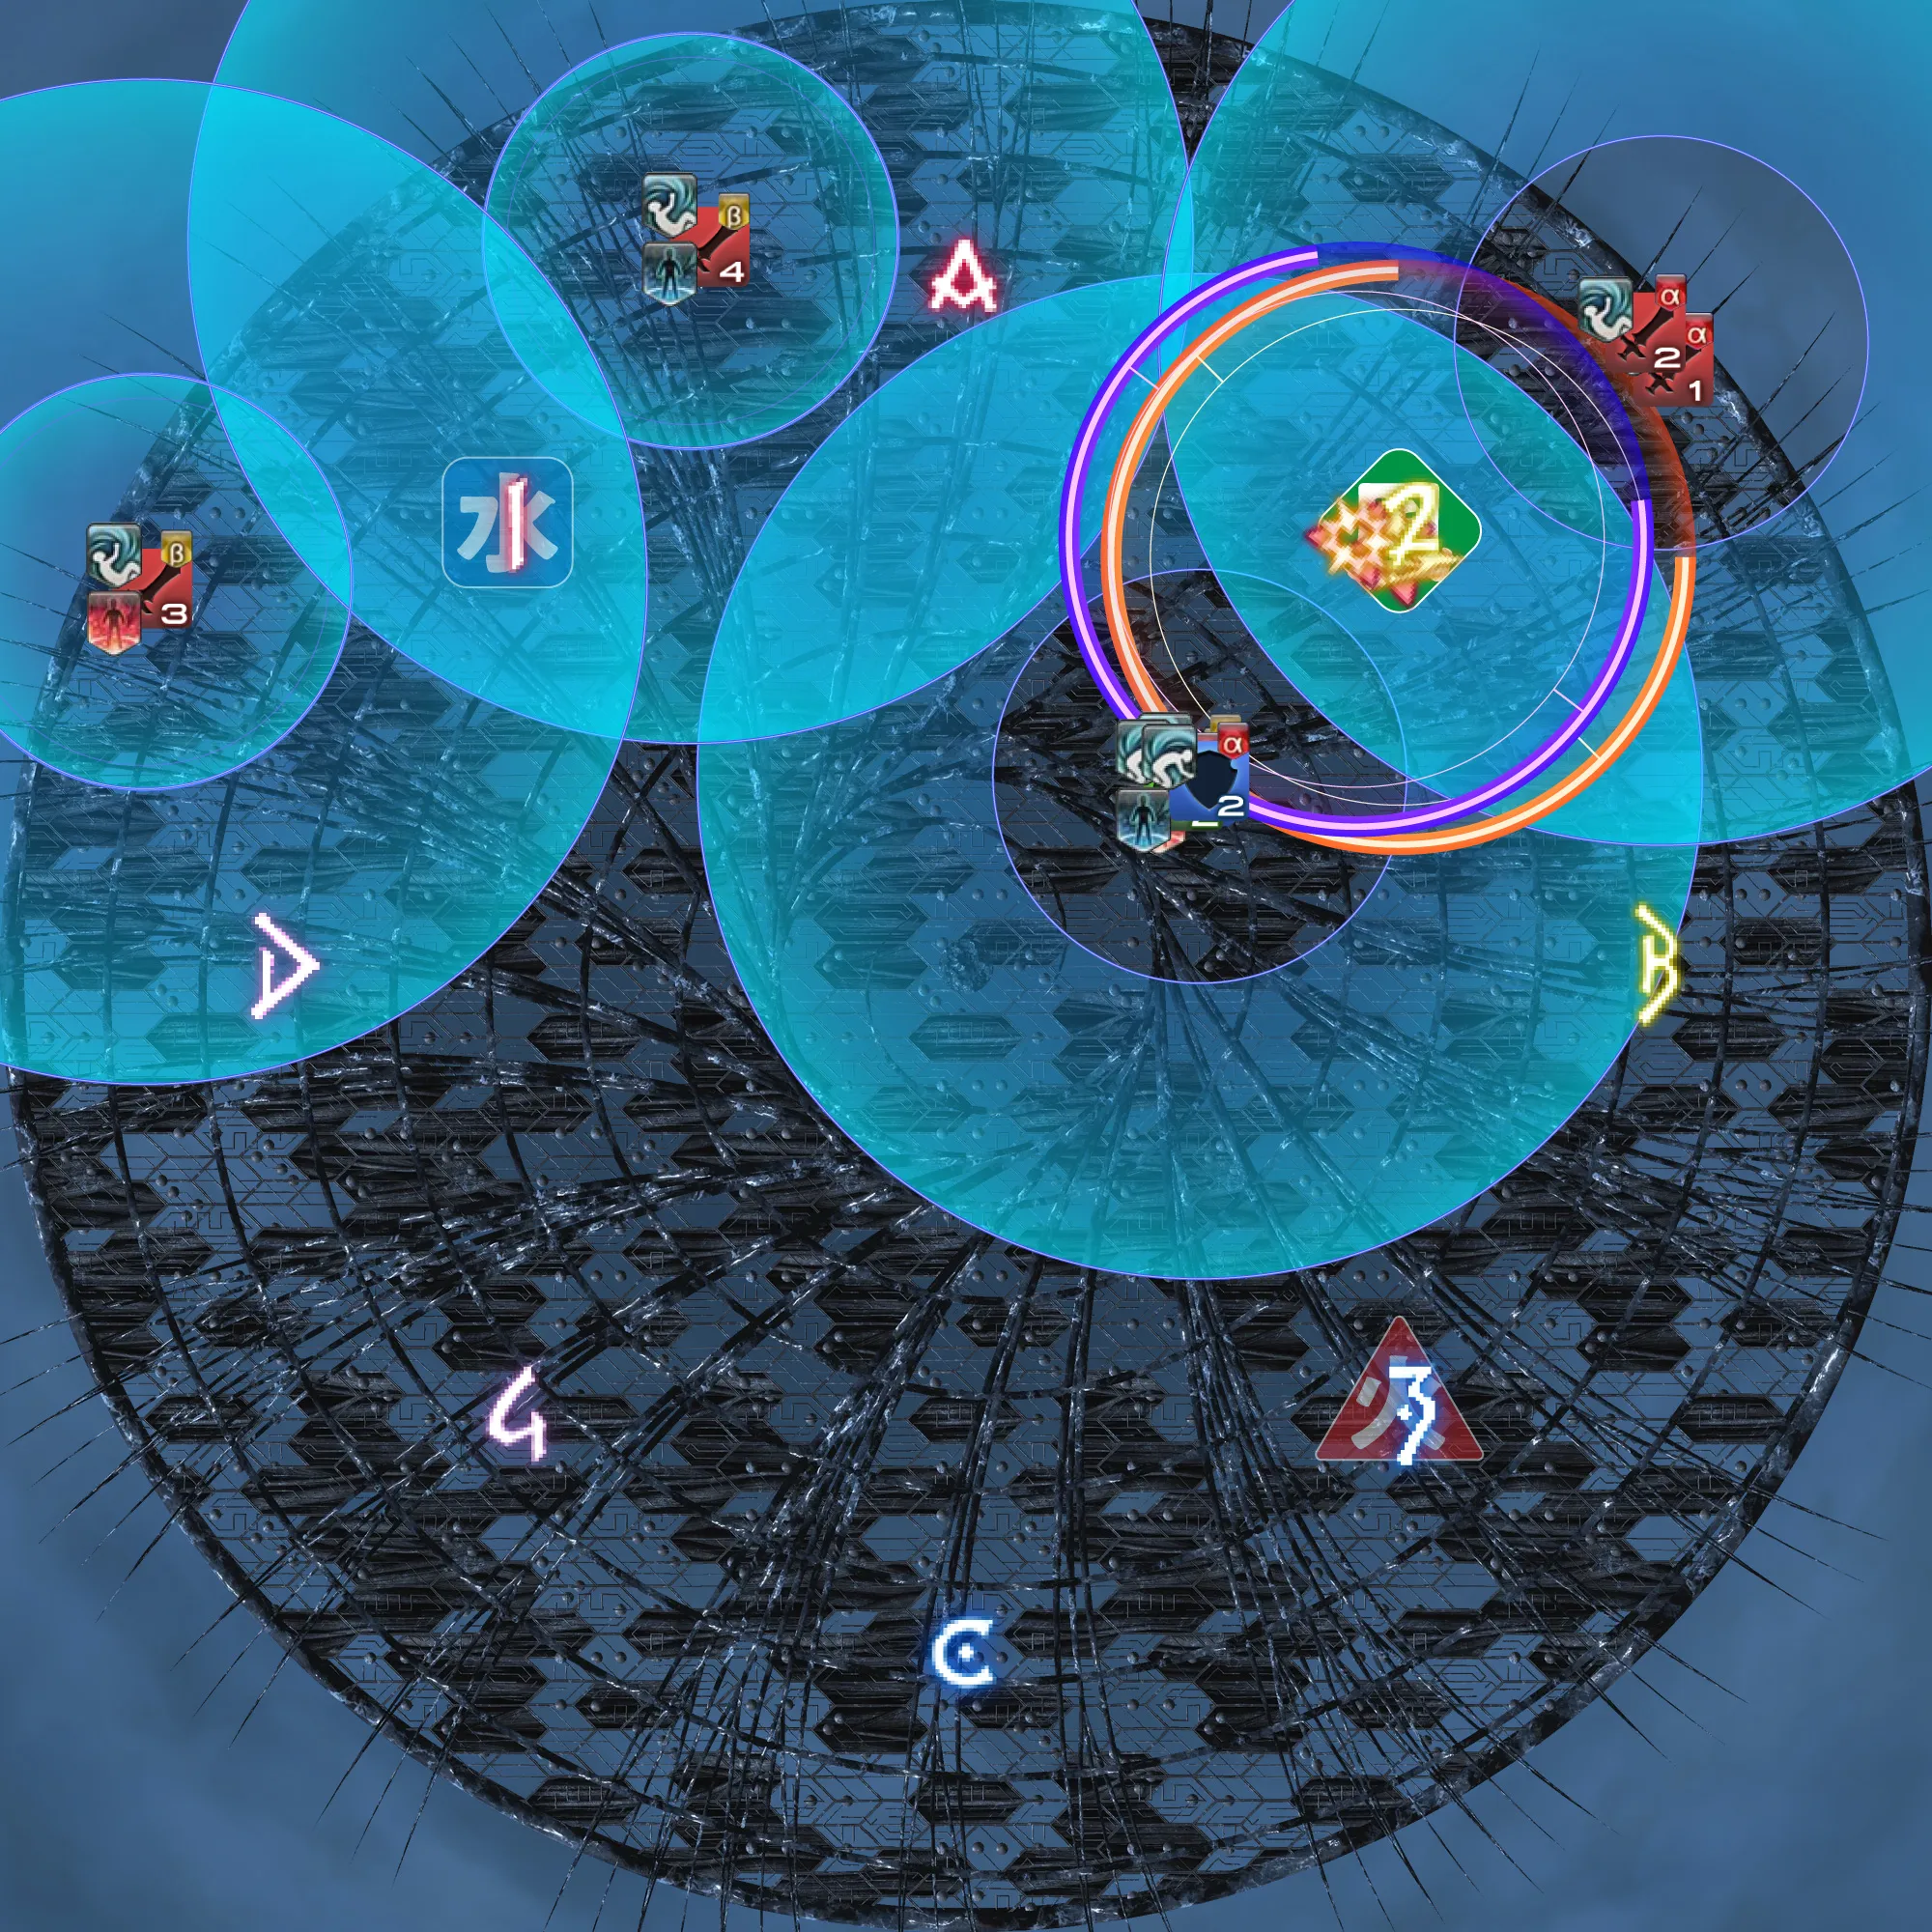 | 4. Wind bait + LB3 cue 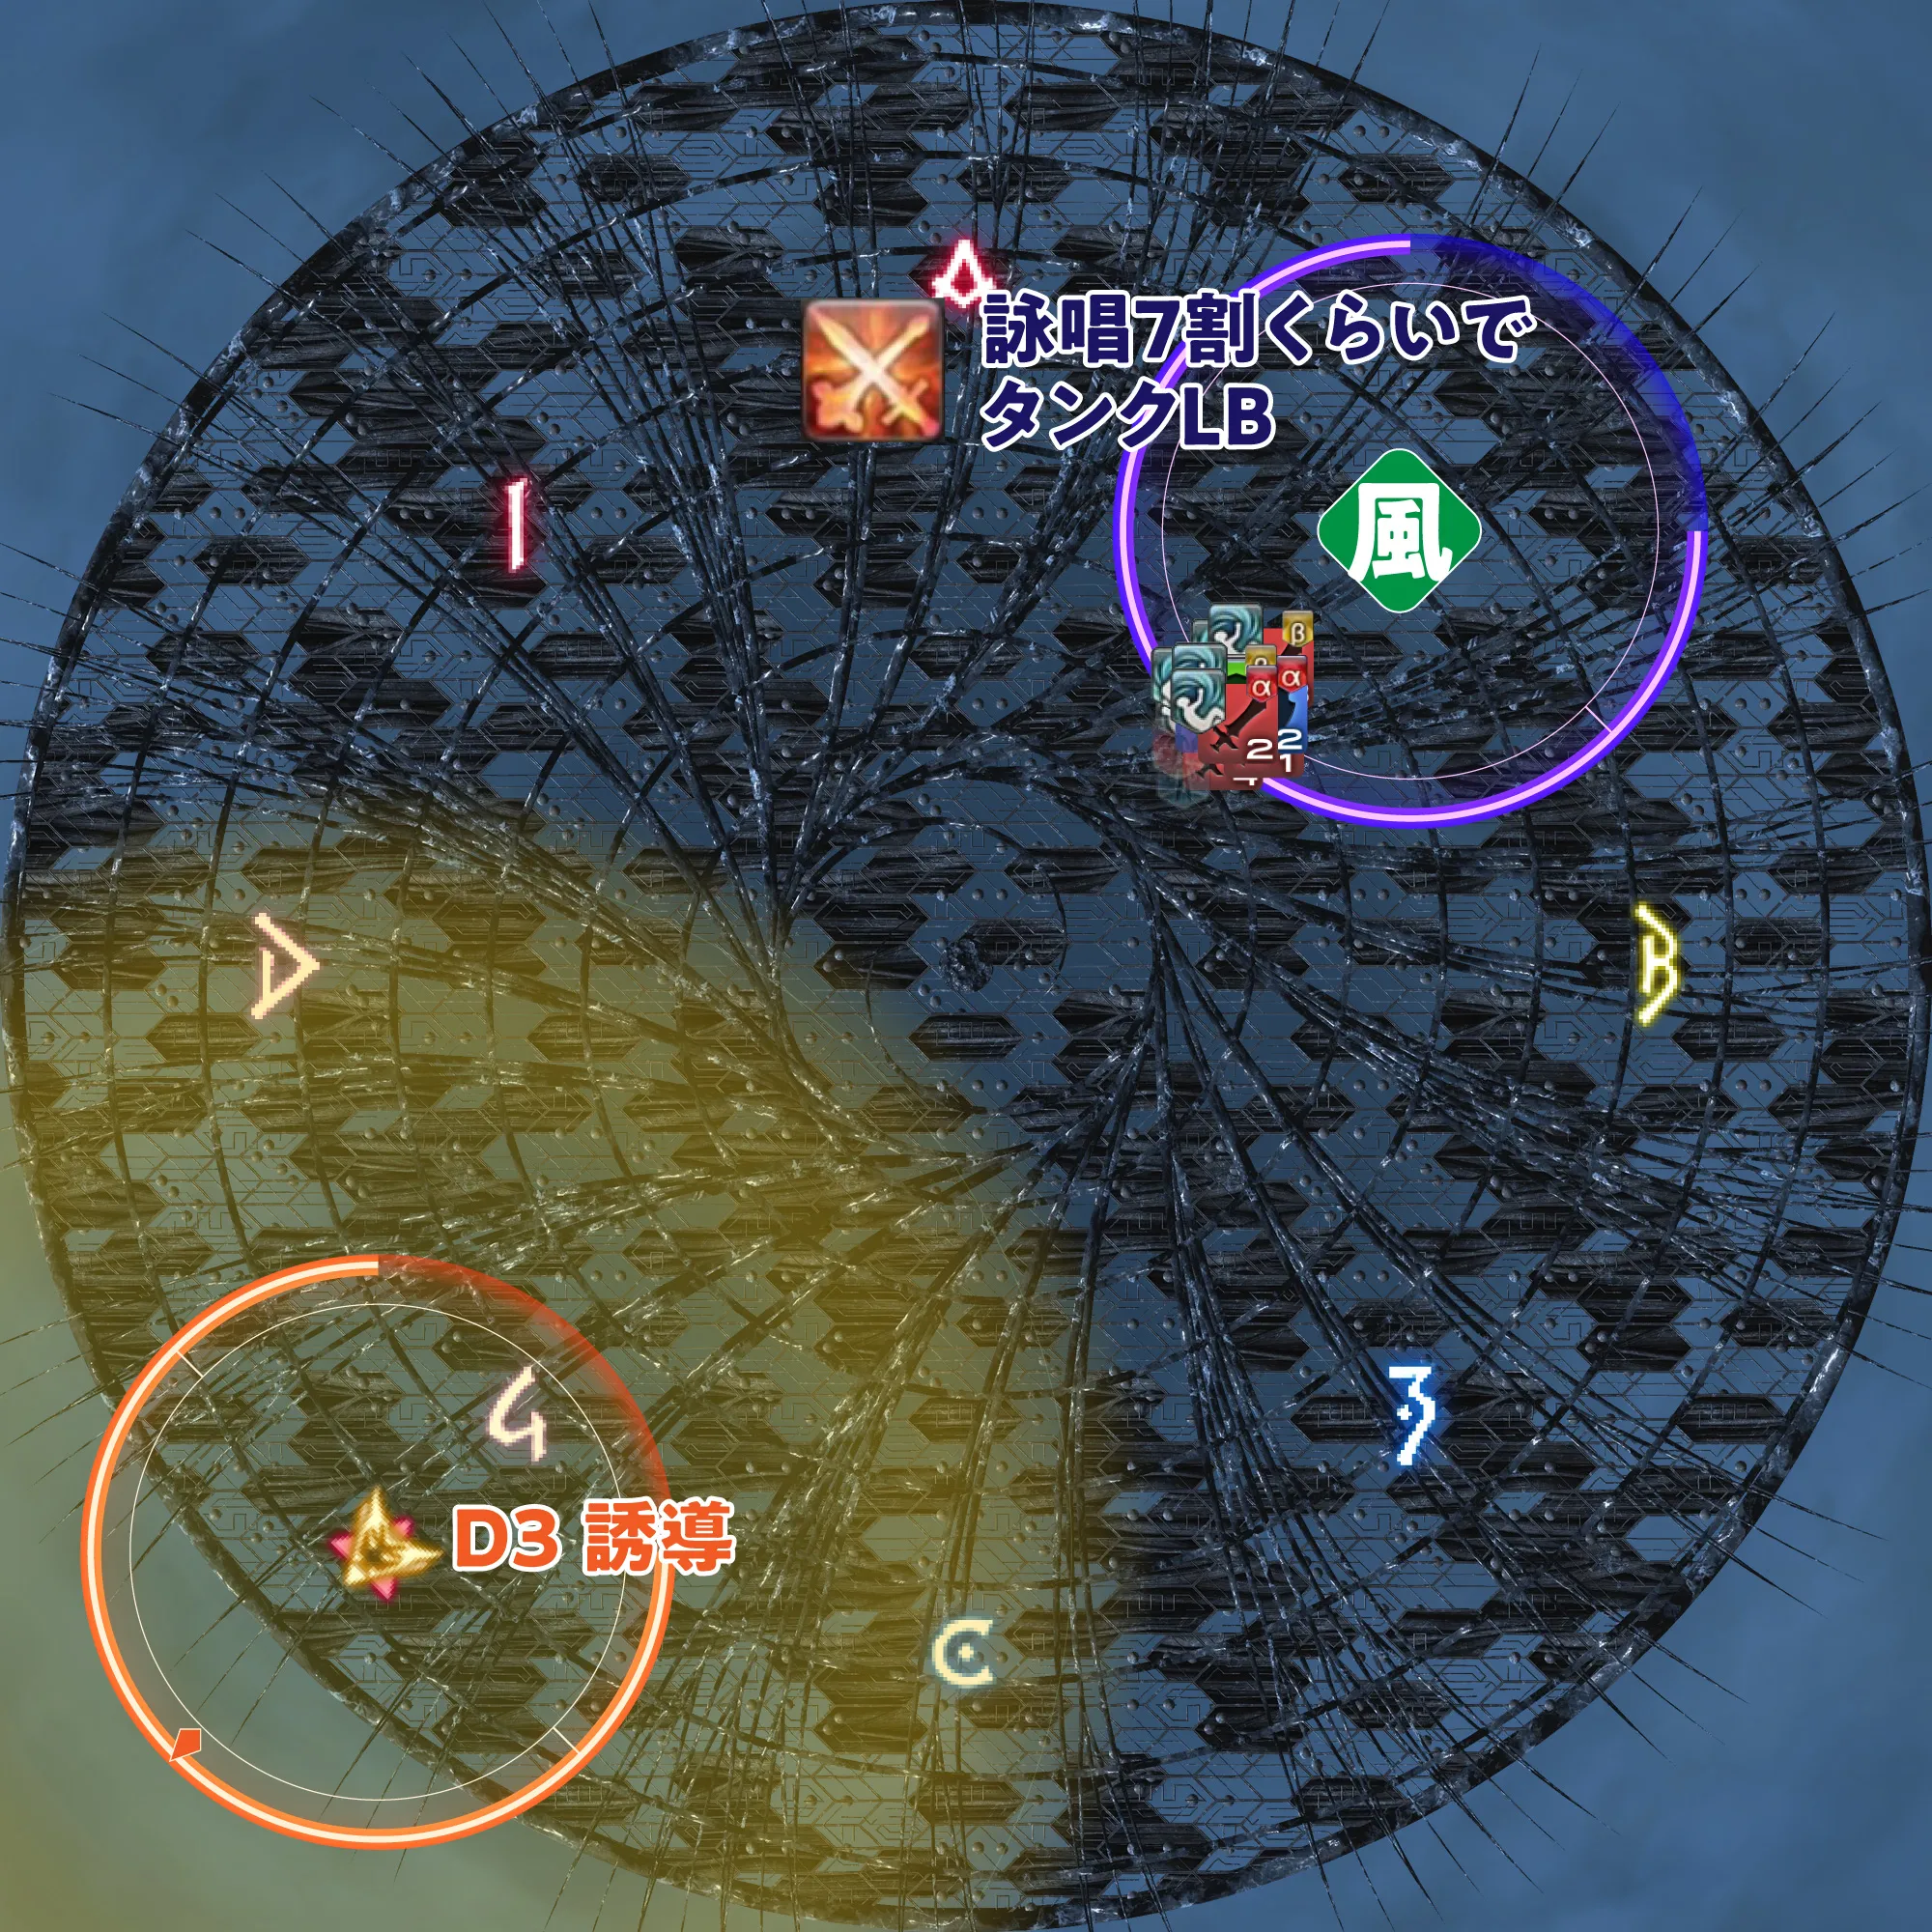 |
5. Vacuum Wave gather 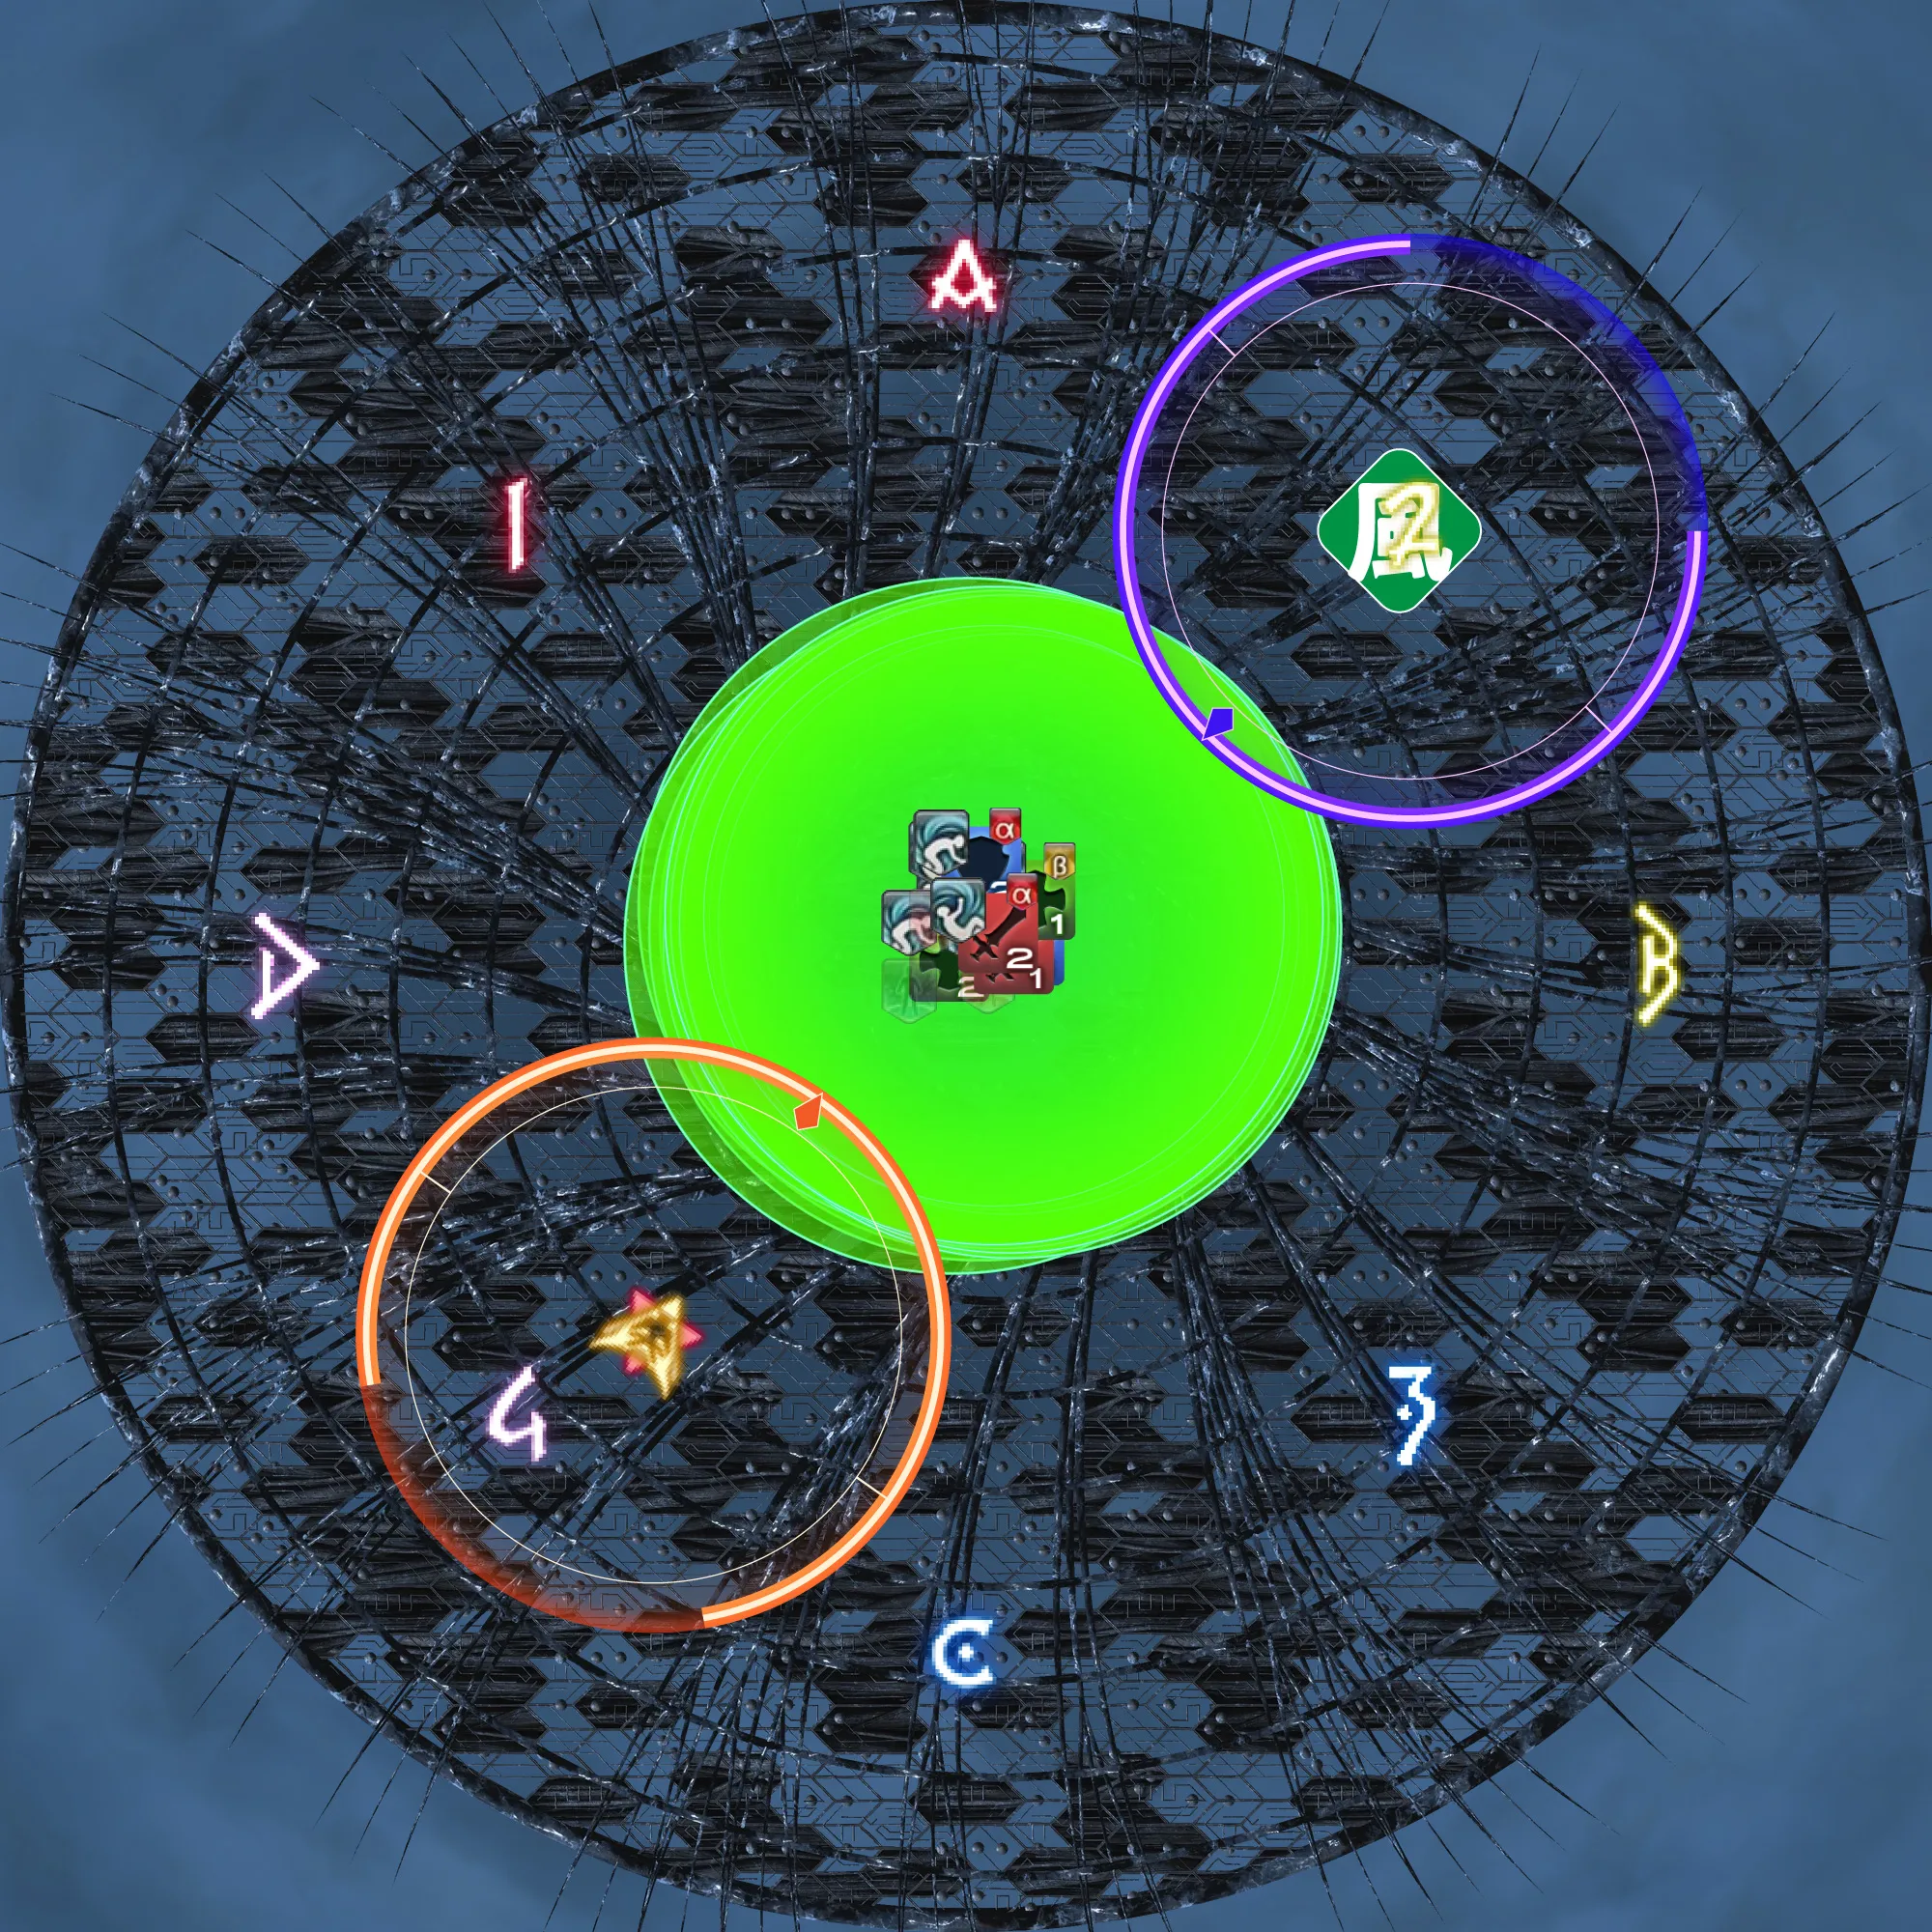 |
How each step resolves:
- Flank priority (both crystals), inner → outer: Tank > Healer > D1 > D2 > D3 > D4. Flame holders flank the flame crystal, water holders flank the water crystal.
- MT baits Exdeath's empowered Thundaga (the absorbed-void AoE); a tank buster follows each crystal, so invuln / mitigate near Exdeath, then lead Exdeath toward Chaos.
- Chaos is parked on the outer edge at exactly 45° to bait Horizontal / Vertical Implosion cleanly.
- Wind baiters (no flame/water debuff) lead the wind crystal: tank/healers inner → outer MT > ST > H1 > H2, DPS at a safe distance D1 > D2 > D3 > D4. The wind hit is a 2-person share (≈1.7M if soloed) — never take it alone.
- D3 baits Chaos's Umbral Smash to the side opposite the wind crystal; it's distance-falloff damage, so stay far from Chaos.
Vacuum Wave — Tank LB3#
Vacuum Wave is the closing knockback. The party survives it with Tank LB3:
- Fire Tank LB3 at ~70% of the Vacuum Wave cast.
- Face according to your wind effect:
- Wind effect on your back → you take the knockback from behind.
- Wind effect on your belly / front → you take the knockback from the front.
- Players without a wind debuff use a personal mitigation (Arm's Length / Surecast equivalent) and wait outside Exdeath's target circle.
- Gather order into the stack: tank/healers from the left-back MT → ST → H1 → H2; DPS from the right-back D1 → D2 → D3 → D4.
🔧 LB3 here is a survival tool for this specific knockback, not general mitigation — timing + facing matter more than the cast itself. Note: some groups stack all 8 wind clears under LB3 and still take heavy pair-stack damage, so layer raid mitigation on top.
Want to call out the limit cut after the knockback? Grab the macro here: pastebin.com/PZWfm7ia.
Second Half — Earthquake (Black Holes)#
This half follows a coordinated-static resolution (from the Bubble Mew P3 deck), not the yan-flash PF guide — expect named group splits and LB usage rather than a loose PF convention.
The Decisive Battle#
Both bosses cast The Decisive Battle, applying Epic Hero / Fated Hero debuffs for the rest of the phase. Split into two groups:
- G1 — MT, H1 + melees → Chaos (melee want Chaos's larger hitbox).
- G2 — ST, H2 + ranged → Exdeath.
Exdeath keeps throwing Thunder III tankbusters through this half (TB 3/5 → 5/5) — swap or invuln each one.
1-HP Setup#
Stack both bosses center. Everyone's HP is set low and you receive:
- Primordial Crust — not healed off; it's "cleansed" by dying to a Black Hole laser, which leaves you at 1 HP.
- Accretion (1 DPS + 1 healer) — cleansed by healing to full. It will fall off later, so remember you had it.
- First / Second / Third In Line (FIL / SIL / TIL) — your tether-order debuff.
An Earth Crystal spawns: a raidwide + 4s Earth Vuln fires each time an Earth debuff drops, so healers ramp the party up steadily.
Kefka Hand Attacks#
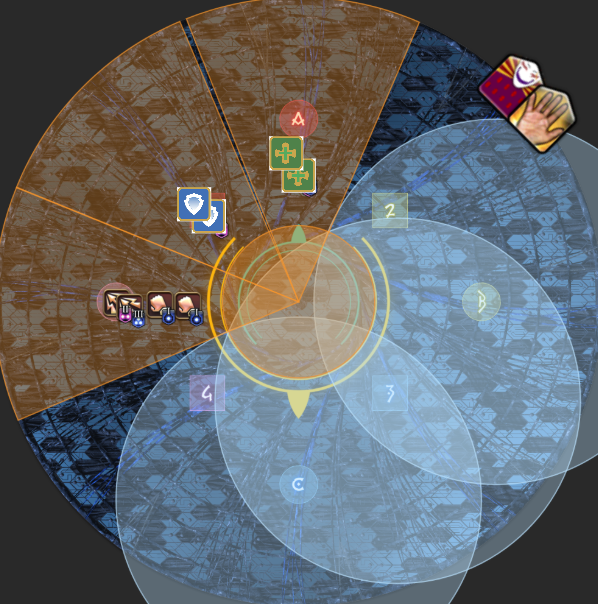
Kefka teleports, raises a hand, does 3 AoEs on that half of the arena, then slams the center. Read the raised hand (facing the boss):
- Left side unsafe → party stack.
- Right side unsafe → role spread.
Black Hole Lasers#
Black holes spawn on the cardinals and tether, firing lasers. Soaking a laser gives Unbecoming; a second stack becomes Meanest Existence (lethal). You use the lasers deliberately to kill Primordial Crust players (death → cleanse → back at 1 HP). Standing in a black hole grants a damage down.
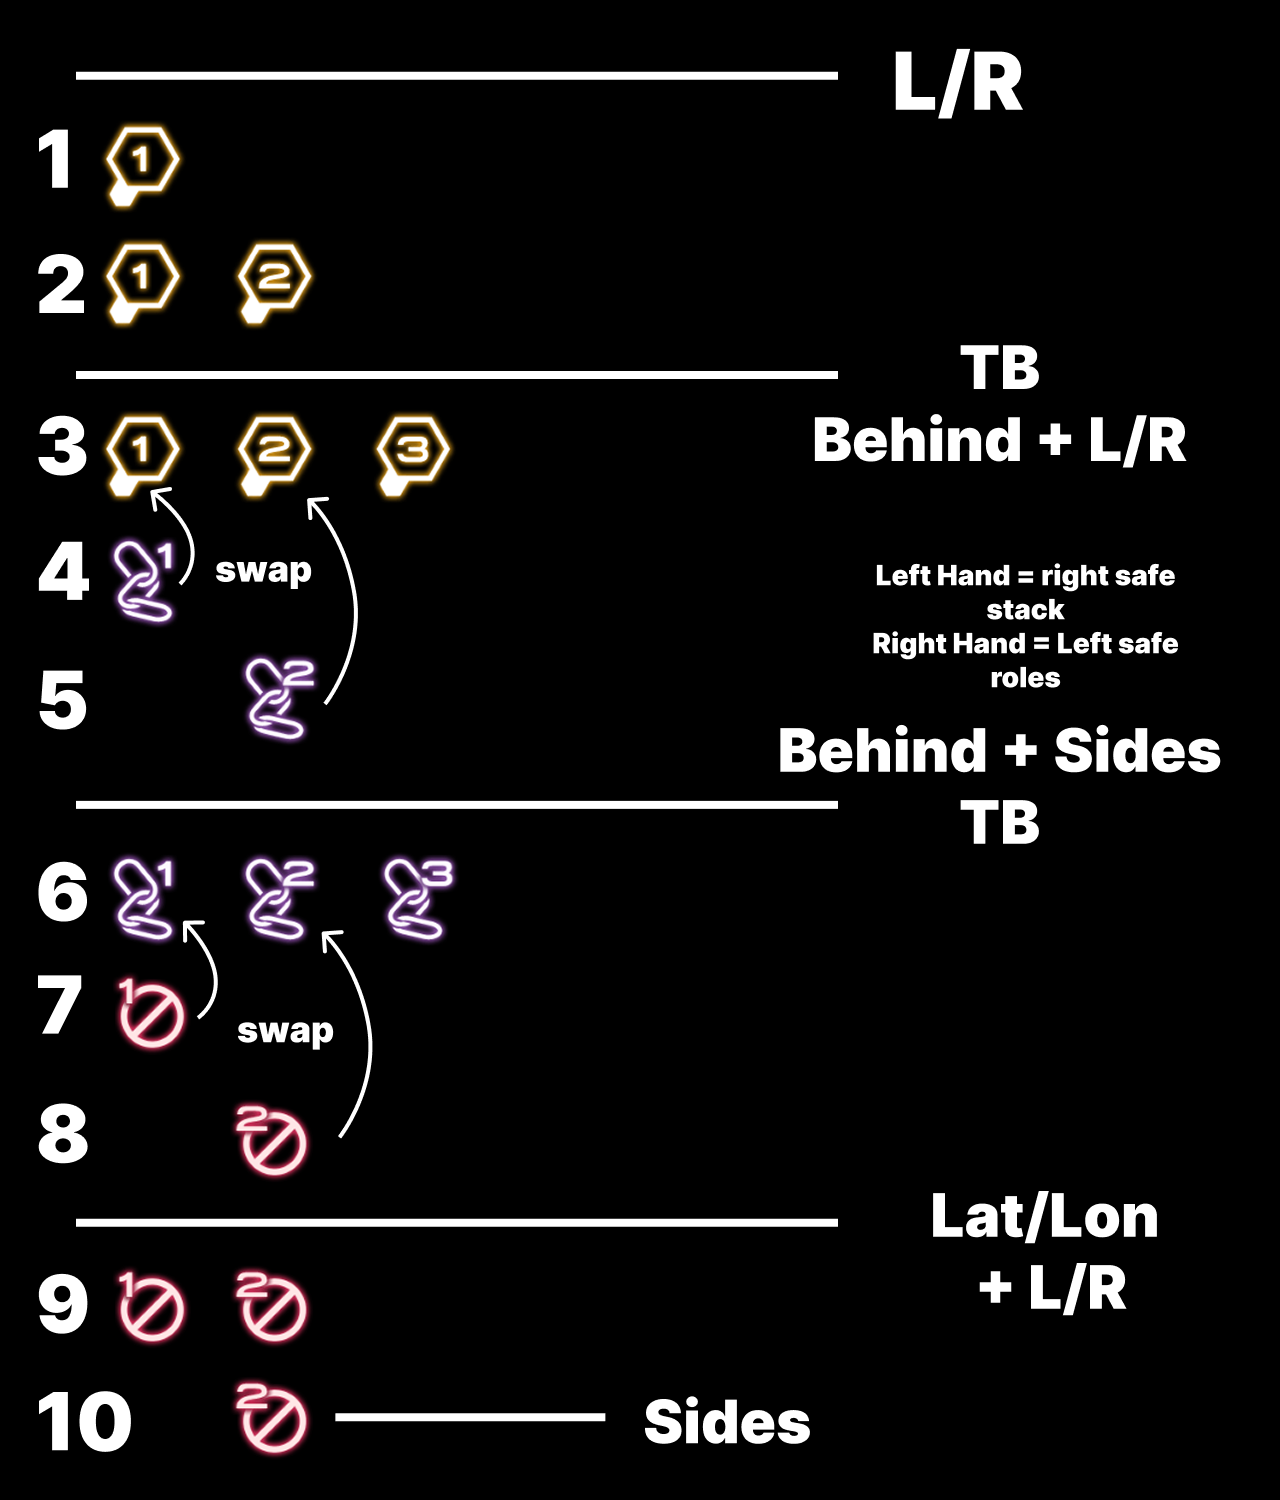
Tether grab order, clockwise from Kefka: 1 → 2 → 3. Across the phase you rotate through your In-Line debuff: FIL soak the first set, SIL swap the second, TIL swap the third — always aim lasers clockwise.
The full self-mark / tether order across the whole sequence (steps 1–10, with the tankbusters and swaps called out):
Interspersed Casts & White Hole#
- Damning Edict — Chaos faces a random player and cleaves everything in front; dodge behind Chaos (then the hand attack).
- Kefka bodyslam — center slam between laser sets; dodge out.
- White Hole — Exdeath's check that requires everyone at full HP.
- Latitude / Longitude — cross-shaped AoEs; dodge to the safe side on the 2nd hit.
Enrage — Blizzard / Big Bang#
The closing sequence. Kill both bosses before the enrage finishes.
1 — Stack middle. Party stacks middle. Kefka is Relative North for this phase.
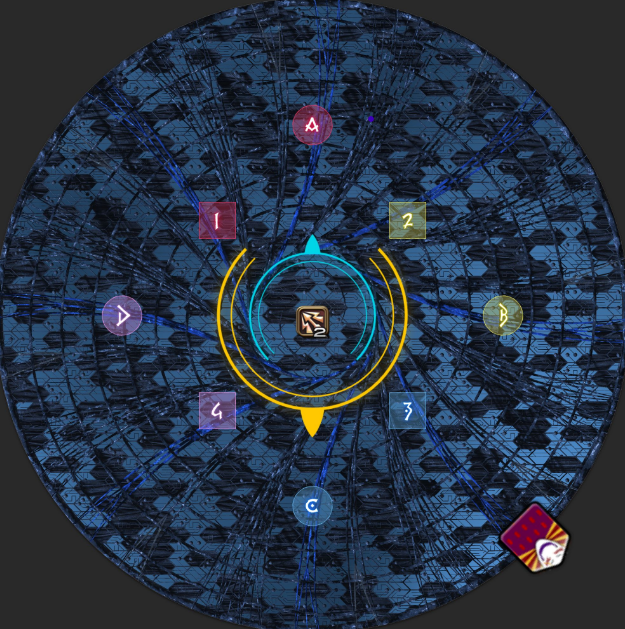
2 — Blizzard AoEs. Blizzard AoEs appear under all players — move toward the inter-cardinals in partners: Supports Relative North, DPS Relative South, G1 Relative West/Left, G2 Relative East/Right. Either 1 Support or 1 DPS is targeted with a stack marker.
3 — Stack / tower split. The role targeted by the stack marker goes back to mid after the second puddle baits. The role not targeted goes Relative East/West to soak a tower.
4 — Swap. The opposite role is now targeted for the stack — swap positions. G1 → Relative West/Left tower, G2 → Relative East/Right tower. Exdeath casts Blizzard III — keep moving.
5 — Big Bang. Chaos casts Big Bang, hitting the 2 stack locations with AoEs — move out of middle. Exdeath's Blizzard III keeps everyone moving. Burn both bosses down before enrage.
Differs from our strat? See the Bubble Mew P3 strat for comparison.